
For many site owners, SEO seems overly complex. That doesn’t have to be the case.
While there’s plenty of value in hiring a highly skilled SEO expert, there is also plenty you can do on your own using well-built SEO tools and customizable content management systems.
Today, I want to talk about the perfect marriage of those two — WordPress and Yoast SEO.
If you want a powerful, customizable, and easy-to-use platform to host your website, you don’t have to look any further than WordPress.
Originally launched as b2 cafelog in 2001, today WordPress powers 26 percent of the web.
In fact, every day more than 500 brand new websites are created with it.
Learning how to use WordPress is fairly simple, which lowers the barrier to entry for many would-be publishers or site owners.
WordPress uses open-source software, which means it’s highly customizable because programmers from all over the world can create plugins.
These plugins allow you to customize your WordPress site in a variety of ways, including:
- Adding social share buttons
- Getting stats about shares
- Checking comments for spam
- Creating image galleries and slideshows
- Optimizing for search
And many, many more.
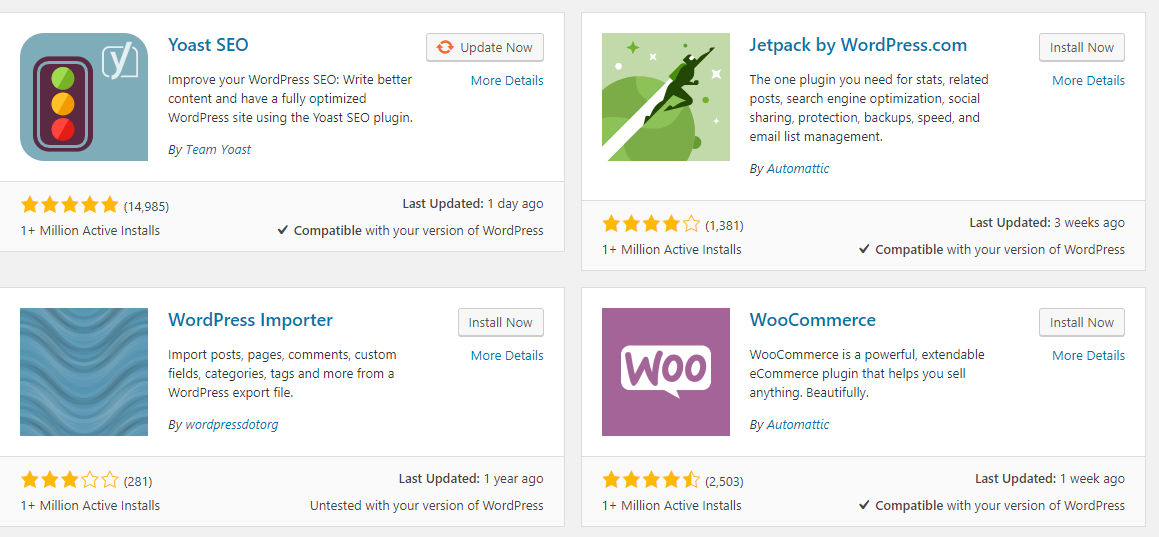
Here are a few of the most popular WordPress plugins:
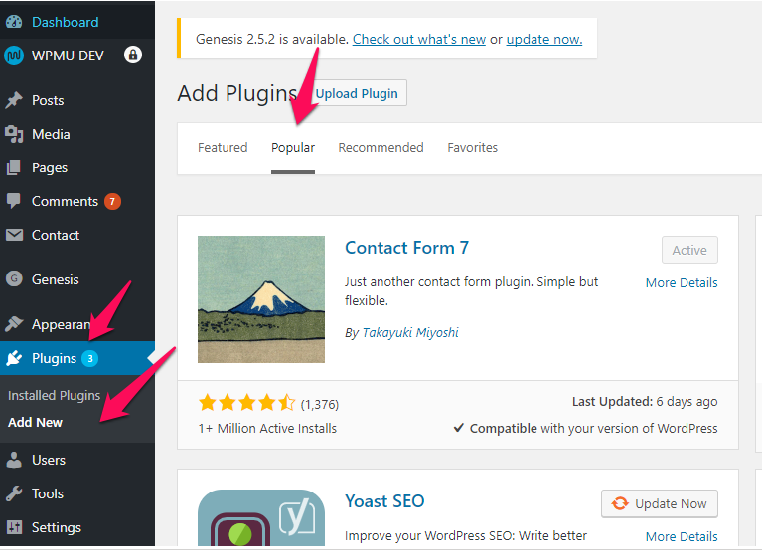
You can find the most popular plugins by going to your WordPress dashboard, then clicking Plugins > Add New > Popular.
Now that you understand what WordPress is and how plugins can help you get the most out of the platform, let’s talk about Yoast SEO.
This plugin is super powerful and if you aren’t already using it, you’re missing out.
What is Yoast and what does it do?
Yoast SEO, best known as just Yoast, is a WordPress plugin designed to make onsite SEO simple for WordPress users.
Their tagline is “SEO for everyone” and the plugin really is for anyone and everyone, no matter how well they understand SEO.
One of my favorite things about Yoast is it makes SEO simple and doesn’t require you to know how to code.
The plugin walks you through every step and uses easy-to-understand color codes to show you where there are issues. Then it tells you how to fix those issues.
Here’s an example of what the plugin looks like in the backend of your WordPress site:
I’ll get into how to download it and set it up a bit later, but I want to show you what it looks like now so you can see how simple it is.
There are two versions of Yoast — one is free and one requires payment. For most smaller sites, you can easily get what you need from the free version. Larger or more technical sites will benefit from the pay version.
Both versions offer:
- The ability to adjust your SEO title, URL slug, and meta description
- Optimization tips for SEO title, URL slug, and meta description
- A preview of how your post will show up on mobile and Google search results
- An analysis of keyword usage
- An internal link counter
- And a readability check
The paid version of Yoast also offers:
- A redirect tool
- Internal linking suggestions
- Social sharing previews
- The ability to focus on multiple keywords
SEO can be complicated and even overwhelming if you’re just getting started. You might be tempted to skip SEO for now, but that would be a huge mistake.
You’ll find that Yoast is simple to use, but I’m going to walk you through each step from the very beginning.
How to download and install Yoast on WordPress
If you’ve already installed Yoast on your site and you just want tips on how to set it up and use it, skip down to “Setting up Yoast.”
If you don’t have Yoast on your WordPress site, let’s get started.
The first step is to log in to the back end of your WordPress site.
This will take you into your WordPress Dashboard. Click on “Plugins.”
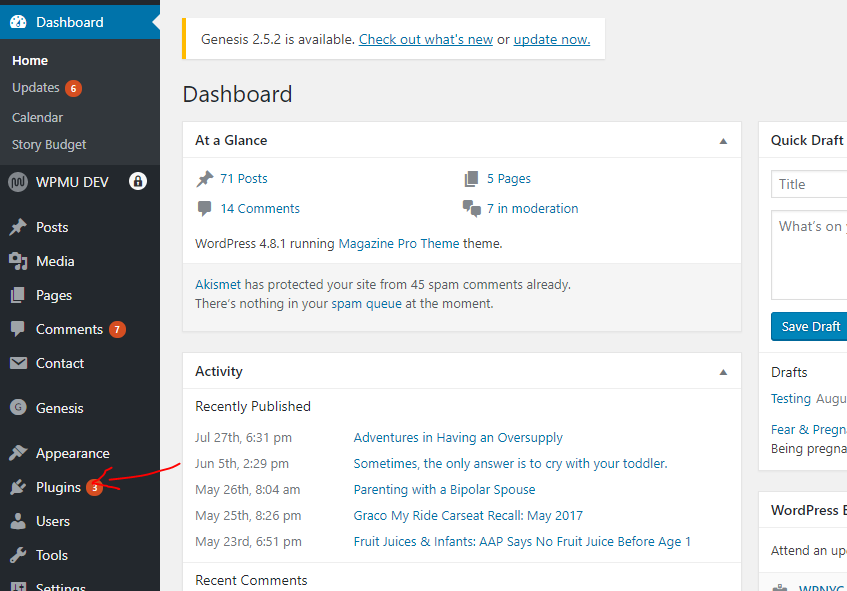
Next, choose “Add New” from the drop down menu, which will take you to, essentially, a plugin store.
Type “Yoast” into the search bar in the upper right corner.
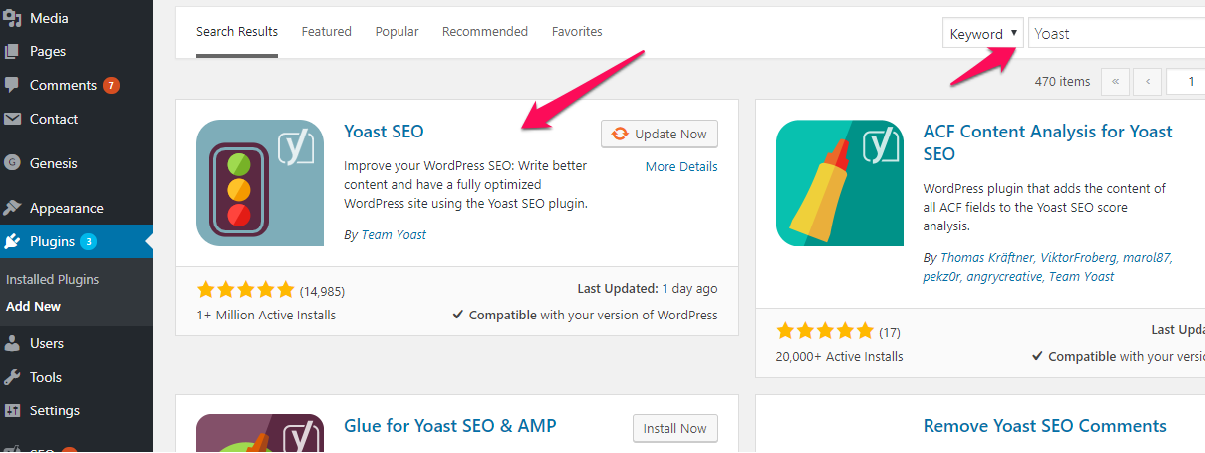
Click the “Install Now” button in the right corner of the plugin.
Because WordPress is open-source software, you should always be careful when downloading plugins. Anyone can create them, though WordPress does do a pretty good job of monitoring them.
Make sure to check the reviews and look for recent updates to ensure any plugin you install is still supported.
After you click “Install Now,” WordPress will download and install the plugin.
It will then request that you “Activate” the plugin.
Once you’ve completed these steps, you are good to go.
Congrats, you now have Yoast SEO installed on your WordPress site.
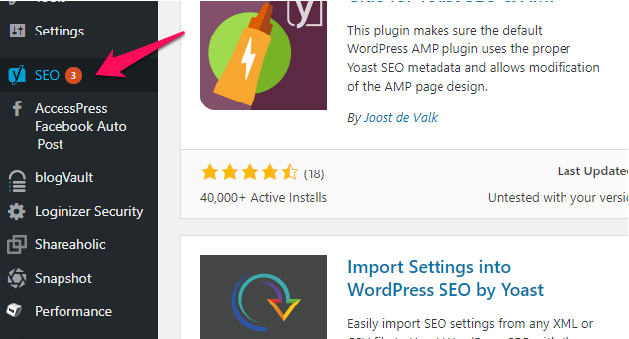
If you go back to your WordPress dashboard, you’ll see Yoast SEO in your left side bar under “SEO.”
The next step is to set up Yoast and learn how to get the most out of your new plugin.
Setting up Yoast
Now that you’ve installed Yoast, you can start using it to leverage SEO to build traffic to your content.
The first step will depend upon if you were using another SEO plugin before installing Yoast.
If you were, Yoast makes it simple to import those settings. If not, skip this section and go straight into getting your settings set up.
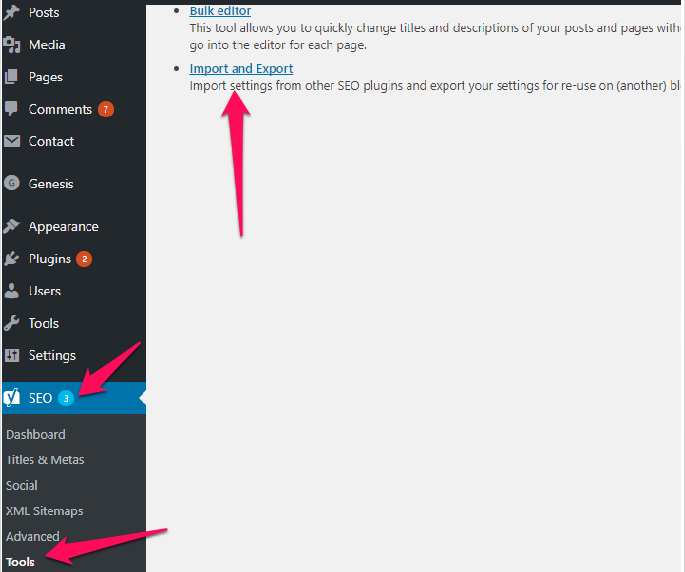
So, if you were using another tool, go to SEO > Tools > Import and Export.
Then, select Import from other SEO plugins.
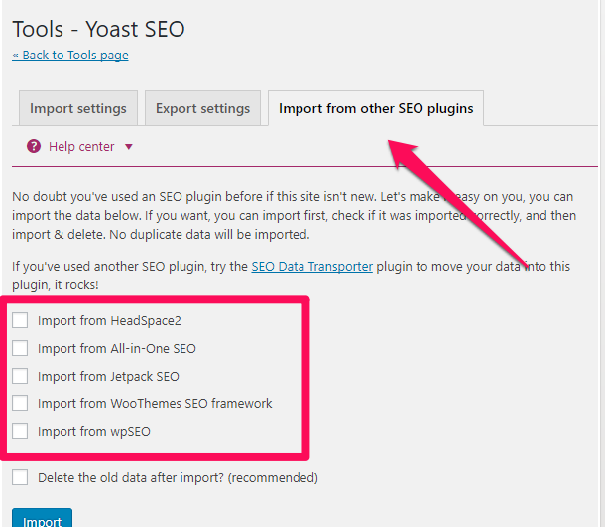
You will see that you can select the settings for a few other SEO plugins, including All-in-One SEO, wpSEO, and Woo SEO Frameworks.
Check the box of the SEO tool you were using and click Import. Yoast will automatically import all your settings, including things like your default XML sitemap settings or a default title template.
NOTE: The import function is only available for paid Yoast users. So if you don’t see the option, it might be time to upgrade.
If you weren’t using another SEO tool, you’re starting with a clean slate.
Even if you imported your settings from another plugin, I recommend going through all the settings below so you can get the most out of Yoast.
Let’s look at how to get all those new settings set up and figure out what they all mean.
First, click on SEO in your WordPress sidebar. This will take you to your Yoast dashboard.
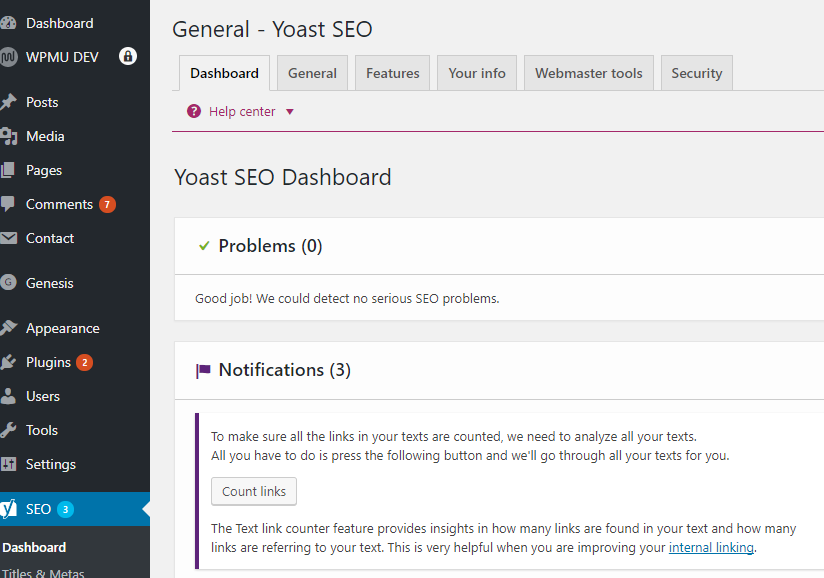
Here you will see any major SEO problems as well as any new notifications.
We’re going to start with the Configuration Wizard, which will walk us through the settings step by step.
Click on the General > Configuration Wizard to open it.
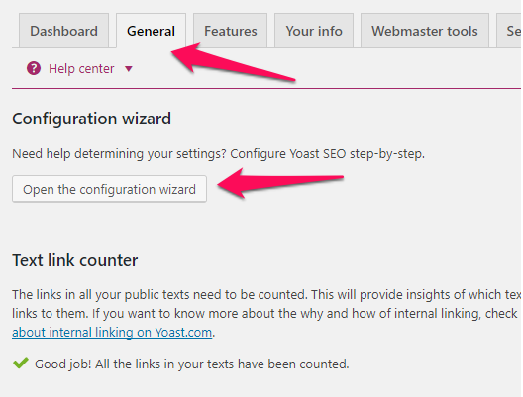
You will be given the option to configure it yourself or pay for a configuration service.
We could pay someone, but what’s the fun in that?
Let’s set it up ourselves.
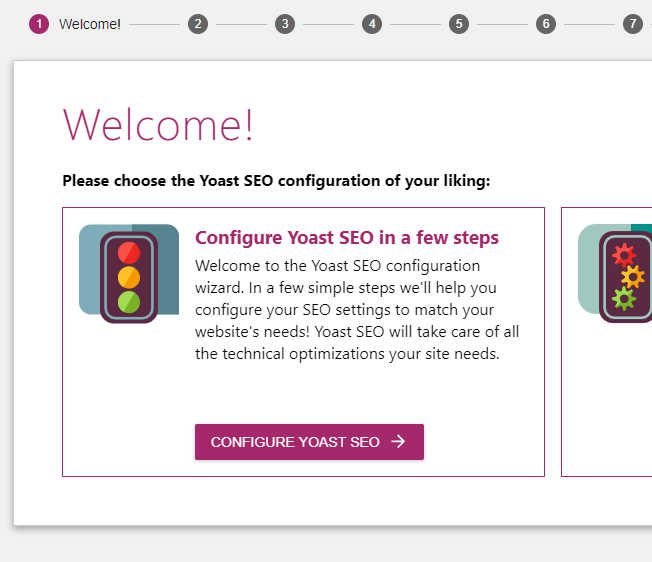
The site I’m using as an example is a parent blog. I’ll blur out the details, but I really want to show you this process step by step.
First up is environment. Yoast wants to know what type of site this is:
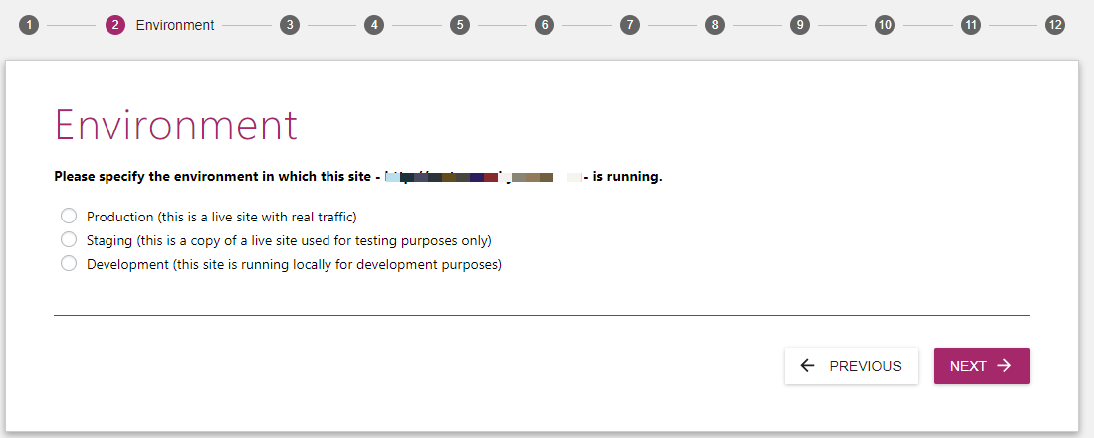
I am going to choose the first option because we’re setting up Yoast for a site that’s live on the internet.
If you’re doing this for your own site and this isn’t a site used just for development, you will likely choose the first option as well.
If you choose a staging or development site, Yoast will prevent the site from being indexed by search engines, which can create a variety of problems including duplicate content.
It’s important to note that if you choose development or staging for a live site, your site will not be found in search engines.
So, make sure you choose the correct one.
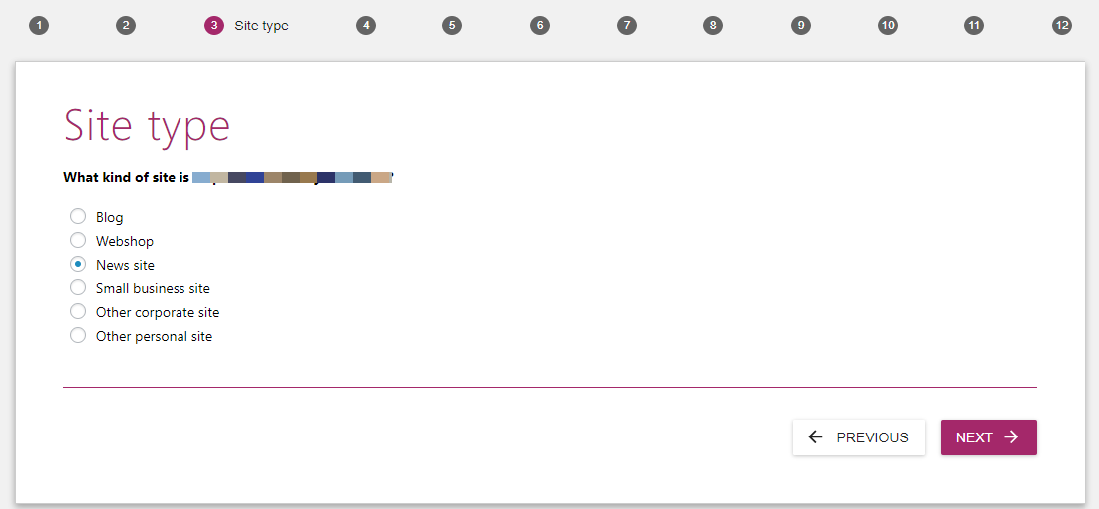
Next up is site type, which is pretty simple. Since this is a small publishing site, we’re going to choose ‘News site.’
Next, Yoast asks if we are a person or a company. In this case, the site is for a company, so we’ll choose that option.
If you’re creating a personal site, say for a portfolio or personal blog, then choose ‘Person.’ Yoast will ask you for your name.
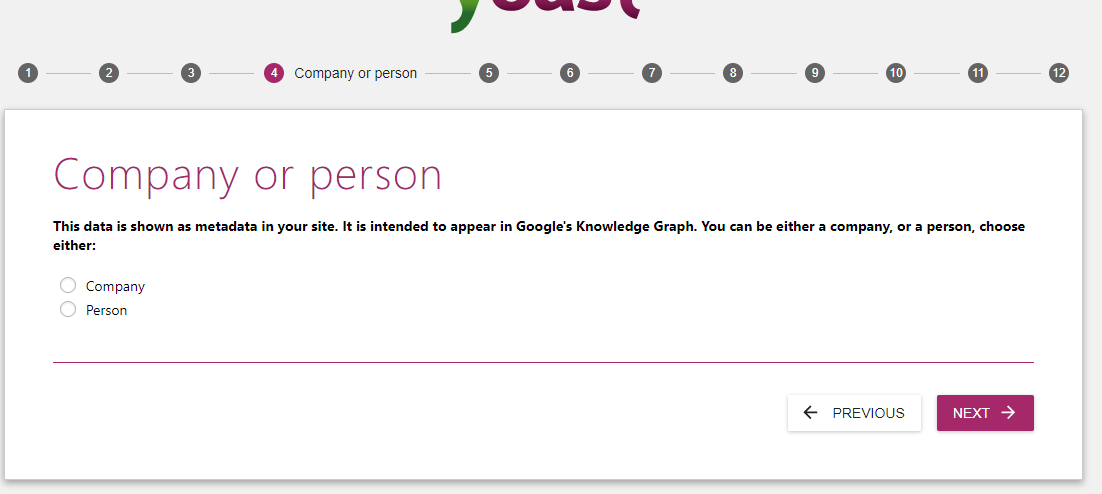
If you chose Company, Yoast will ask you to add the name and upload an image of the company logo.
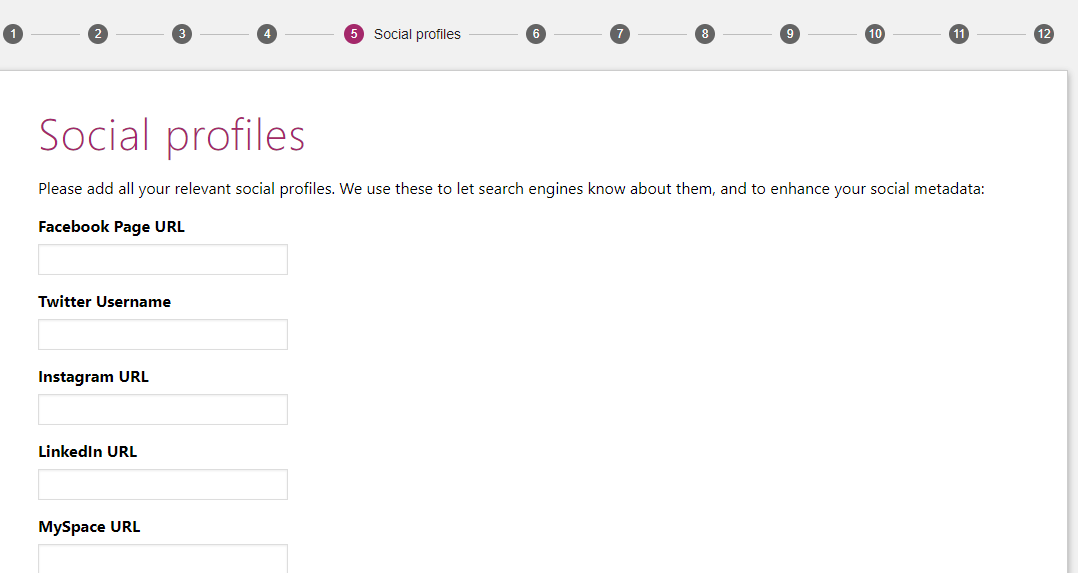
Next, it asks about our social sites. Add as many as you currently have.
Yoast then asks about ‘Post type visibility.’ This one is slightly more complicated. Once again, Yoast is asking what it should show to the search engines, or what pages should be deindexed .
You can learn more about what pages you might want to block from the search engines here.

In general, you’ll want to block the search engines from things like media, thank-you pages, printer-friendly versions of pages, test pages, and testimonial pages.
We’re going to leave the default settings. In most cases, you will, too.
NOTE: If you’re using a theme with more page types, you may see more options in Post Type Visibility.
If so, you need to determine whether you want those pages indexed or not.
Next is another self-explanatory setting. Do you have multiple authors? This site does, so we select ‘Yes.’

If you plan to publish posts under one or just a handful of general user names, you would select ‘No.’ This tells Yoast not to index author pages.
Next, Yoast wants to connect to Google Search Console.
If you choose “Reauthenticate with Google,” it will open a new window and ask you to log in to your Google account. Then it will give you a code to enter into Yoast.
If you don’t have Search Console, I highly recommend you create an account. It gives you access to tons of data and, best of all, it’s totally free.
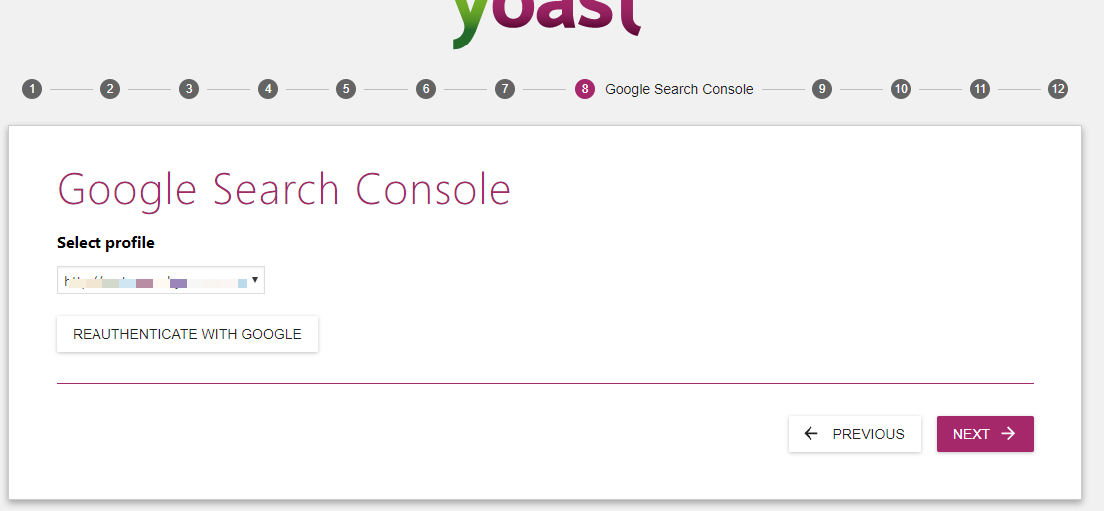
If you don’t have Google Console set up yet, you can skip this step and come back to it later.
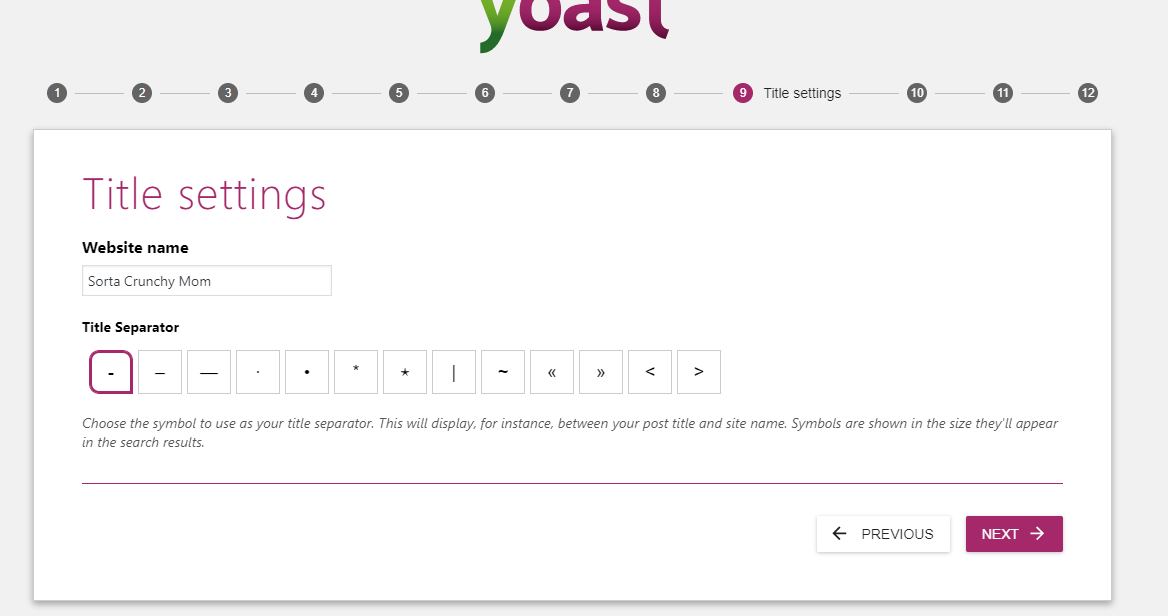
Next up is Title Settings.
This is what will appear in the search results after your SEO Title. For example:
You want to make sure the ‘Website Name’ is the name you want to show up in the search results.
The title separator you choose isn’t particularly important. I normally use the default option, which is a simple dash.
Next, you can choose to sign up for Yoast’s newsletter. If you’re doing this on your own, I recommend signing up so you can continue to learn, but it’s not required.
You have now finished Yoast’s setting configurator.
This is just the beginning, however. Now it’s time to use the tool.
Using Yoast
Most WordPress users see Yoast in action when they’re publishing a new post.
And for good reason, because Yoast helps with on-page SEO quite a bit, including helping you optimize titles, metas, and key terms.
Let’s walk through what the plugin looks like and explore all the options.
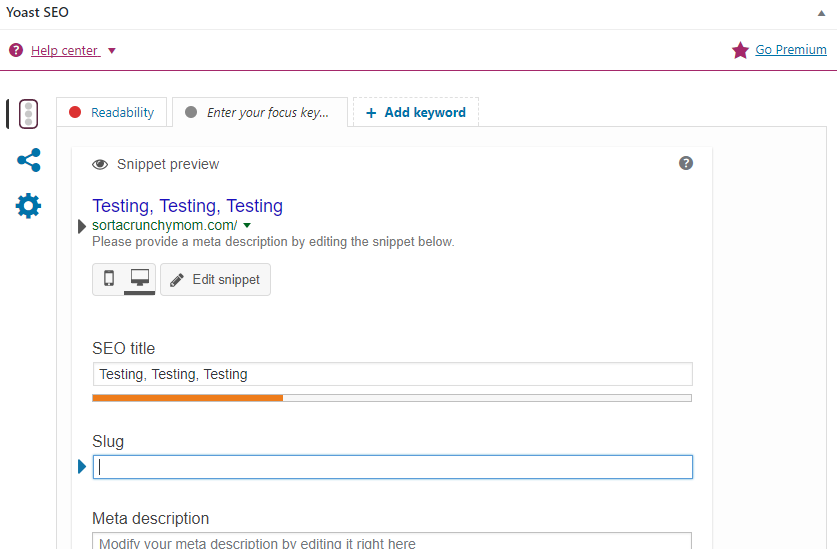
When you create a new post in WordPress, scroll to the bottom of the post and you’ll see the Yoast box, which looks like this:
At the top, there are three tabs which analyze readability and keywords. If you have the paid version, you’ll see a tab to add additional key terms.
On the left sidebar, there are a few other features we’ll explore in a moment.
First, let’s take a look at those top tabs and see what we can do there.
The first tab says ‘readability’, which is pretty self-explanatory. This will show you how readable your post is.
Yoast uses simple “stop light” signifiers to show you if you’re doing well. Green means you’re good to go, yellow means you can do better, and red means you should definitely take a look.
This post is off to a good start, as you can see. Just one red stoplight.
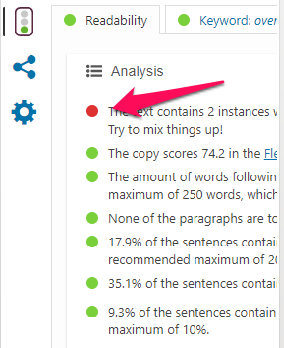
Any time you see a red stoplight, look for the solution as well. Yoast will tell you exactly how to correct it.
The red bullet above says: “The text contains 2 instances where 3 or more consecutive sentences start with the same word. Try to mix things up!”
That one is pretty simple to fix. Yoast will also let you know if you use the passive voice too often, have overly complex sentences, use long paragraphs, or have overly long headings.
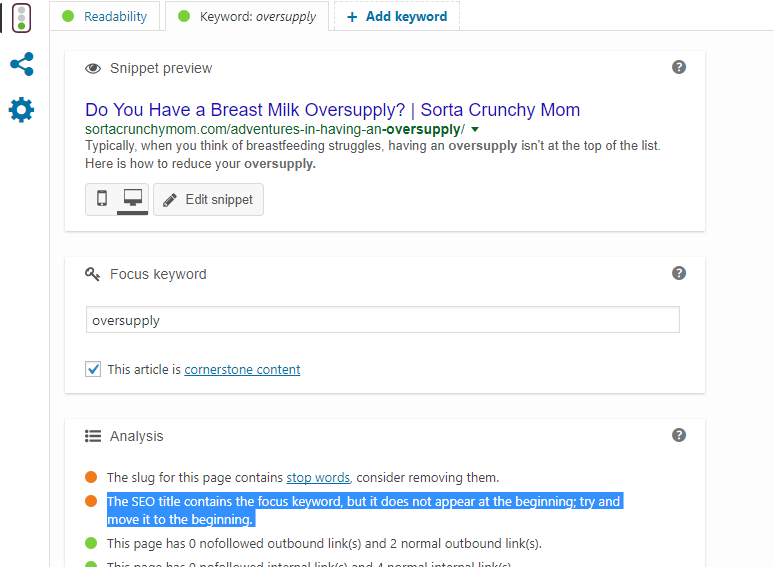
Now, let’s look at that second tab labeled “Keyword.”
This analysis is more complex.
Here you see how your article will appear in the search results, the focus keyword, and Yoast’s analysis of how well optimized your post is.
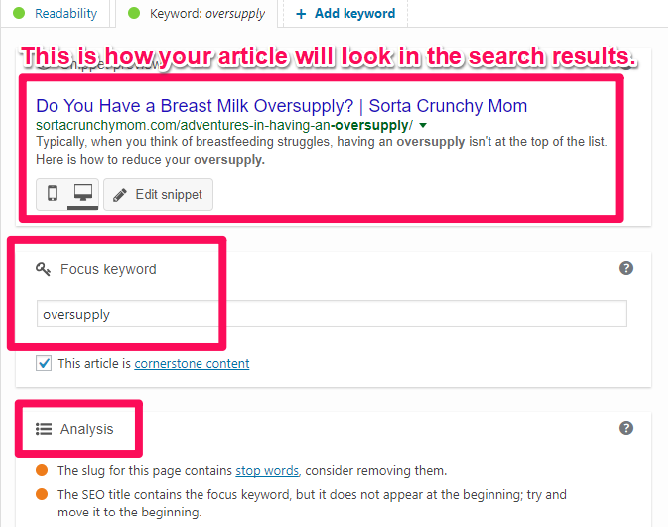
There is a lot of information here, so I’m going to walk you through it.
Step 1: Update your SEO title and meta description.
Click ‘edit snippet.’
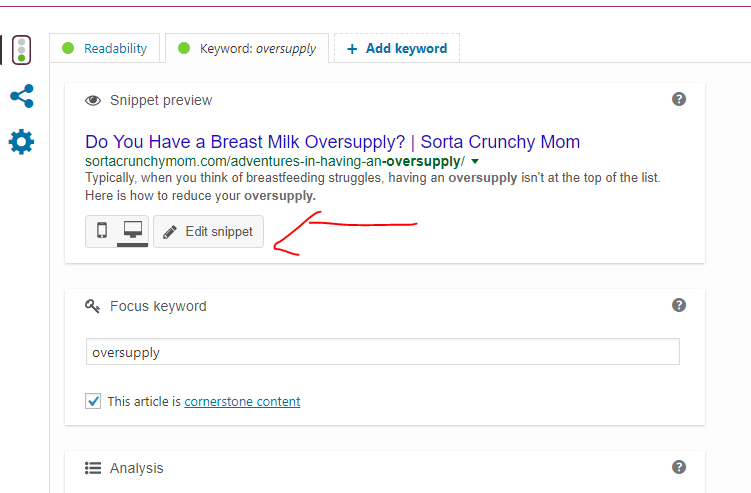
Yoast calls this your SEO title, but you might also hear it called the title tag.
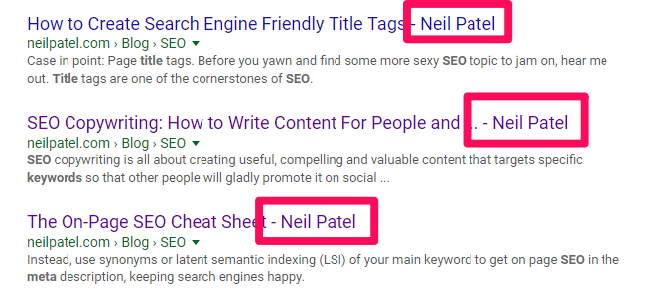
This is premium real estate on Google, so you want to use as much of it as makes sense without going over 60 or so characters.
According to Moz, Google tends to display the first 50-60 characters of a title tag. which is the maximum length Google will show in the search results.
If you go over the length, Google will display an ellipsis, like this:
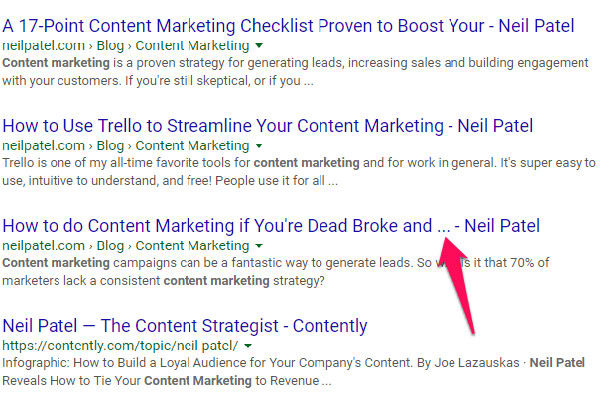
In this case, I used it to create a sense of curiosity.
In general, however, you want the reader to see all of your well-thought-out SEO title.
Now that you have your title optimized, it’s time to move on to the slug, or URL. WordPress creates one for you based on your title, or you can choose to change it.
In general, you want your URL to be simple enough for the user to understand and to include a key term if possible.
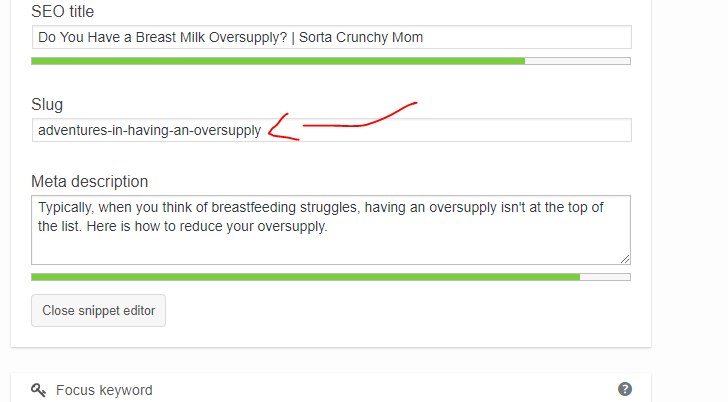
Overall WordPress does a pretty good job of creating these, so don’t feel like you have to change this.
Next, you see the meta description. This comes auto-filled with the first few lines of your article.
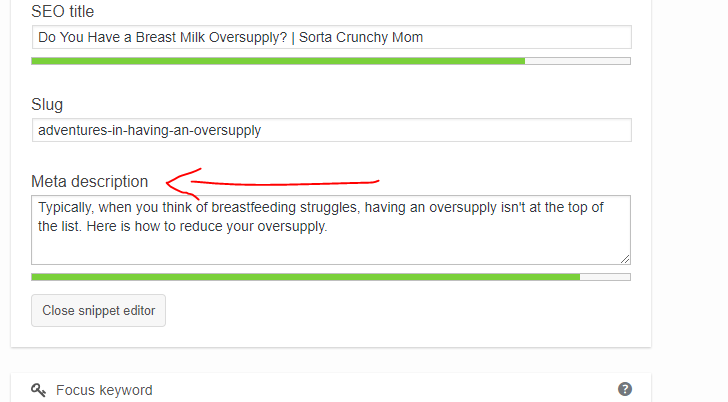
The meta description is the two (or so) lines located below your SEO title in the search results.
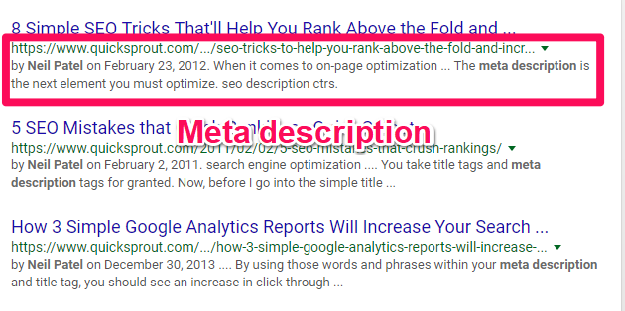
You’ve got about 160 characters to impress your readers and get that click, so use them wisely.
Google has said repeatedly that meta description is not a ranking factor, so it won’t directly affect where you show up in the search results.
However, it can increase clicks and traffic, which can affect your ranking indirectly.
A few best practices for meta descriptions:
- Be concise. Use this space to introduce the reader to what your post is about. Give them enough information to determine if the page is what they’re looking for.
- Use key terms. No, it won’t directly affect SEO, but it will be a good indicator to the reader of what they’ll find on your post.
- Be persuasive. Invite the reader in, even tease them a little bit. Inspire readers to click on your post and learn more.
We’ve covered the SEO title, the slug, and the meta description. The last section is Yoast’s analysis.
Here you will see all the suggestions Yoast has for you to improve the above sections. It’s in your best interests to make as many of these change that make sense.
But, above all, think about your readers.
If you make a choice that’s best for the readers, it’s okay to leave a few of those stop lights yellow or even red.
If you put the reader’s needs first, you won’t go wrong.
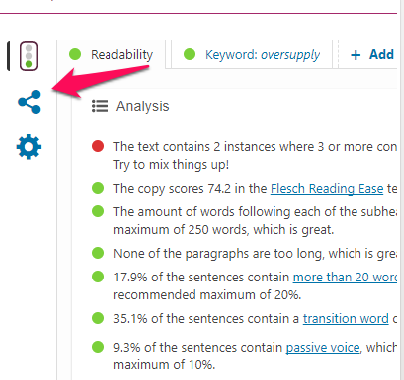
Now that we looked at those top tabs, let’s look at those options on the left.
You will see a stop light, three bullet points, and a settings gear on the left.
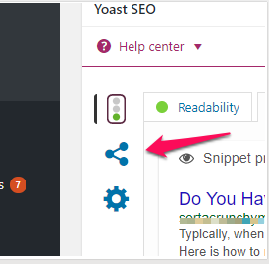
The stop light is the analysis tab we just looked at.
The three bullet points will allow you to preview how your post will look on Facebook. This can be especially useful if you use an auto-post program for new blog posts.
In this section, you can choose a different title, add a different meta, or even upload a different image. 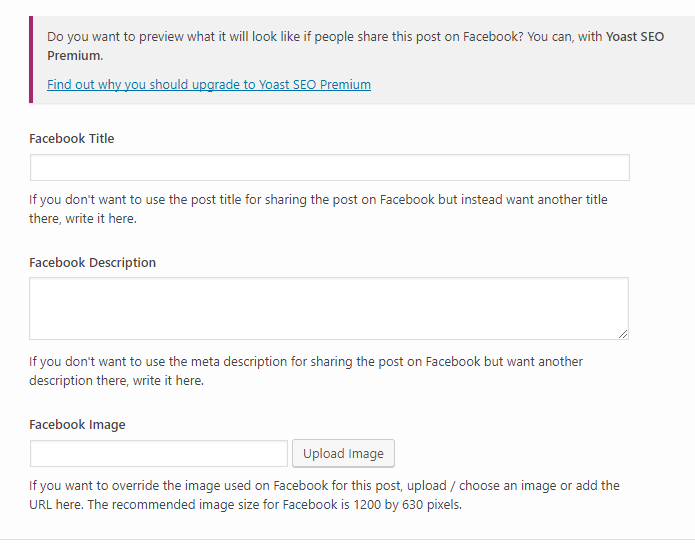
This isn’t a necessary step, but it can be very useful if you’re targeting a specific audience on Facebook or you want to test different descriptions.
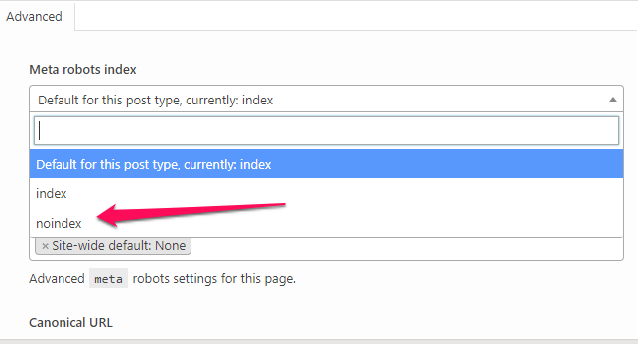
The last icon on the left is the advanced settings gear.
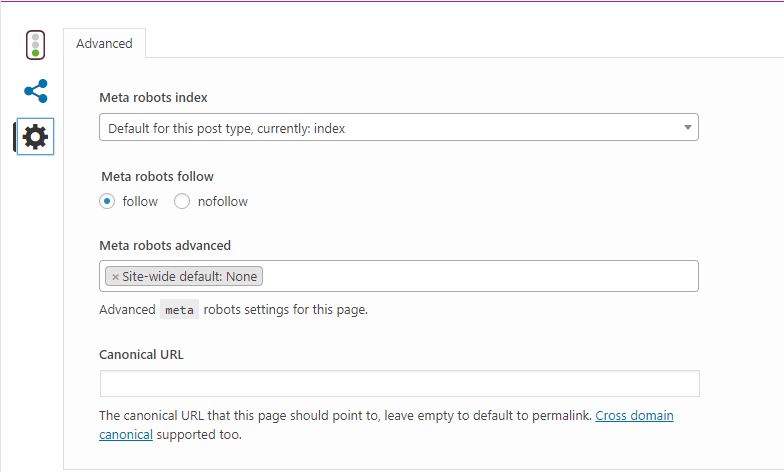
The meta robots index is related to the ‘Post type visibility’ setting we saw when doing the Yoast configuration.
If you want Google to index your post or page, leave this setting as is.
If it’s a Thank You page, or some other page you don’t want Google to index, click the drop-down menu and select ‘noindex.’
If you’re republishing content, this is also the section where you can add the canonical URL.
This tells Google the original source of the content and reduces duplicate content issues.
It’s useful, for example, if you have a printer-friendly version of a page, or if you syndicate content from another publisher.
Conclusion
I hope this post answers most of the questions you have about using Yoast. As you can see, it’s an exceedingly useful and powerful SEO tool for site owners of all levels.
I’ve used it myself for years and highly recommend it to all my clients.
Have you had success with Yoast? What are your experiences with it?
Comments (58)