
Everyone loves “hacks.”
I’m no exception––I love finding ways to make my life better and easier.
That’s why the technique I’m going to tell you about today is one of my absolute favorites. It’s a legitimate SEO hack that you can start using right away.
It’s a way to increase your SEO by taking advantage of a natural part of every website that rarely gets talked about. It’s not difficult to implement either.
It’s the robots.txt file (also called the robots exclusion protocol or standard).
This teeny tiny text file is part of every website on the Internet, but most people don’t even know about it.
It’s designed to work with search engines, but surprisingly, it’s a source of SEO juice just waiting to be unlocked.
I’ve seen client after client bend over backward trying to enhance their SEO. When I tell them that they can edit a little text file, they almost don’t believe me.
However, there are many methods of enhancing SEO that aren’t difficult or time-consuming, and this is one of them.
You don’t need to have any technical experience to leverage the power of robots.txt. If you can find the source code for your website, you can use this.
So when you’re ready, follow along with me, and I’ll show you exactly how to change up your robots.txt file so that search engines will love it.
Why the robots.txt file is important
First, let’s take a look at why the robots.txt file matters in the first place.
The robots.txt file, also known as the robots exclusion protocol or standard, is a text file that tells web robots (most often search engines) which pages on your site to crawl.
It also tells web robots which pages not to crawl.
Let’s say a search engine is about to visit a site. Before it visits the target page, it will check the robots.txt for instructions.
There are different types of robots.txt files, so let’s look at a few different examples of what they look like.
Let’s say the search engine finds this example robots.txt file:

This is the basic skeleton of a robots.txt file.
The asterisk after “user-agent” means that the robots.txt file applies to all web robots that visit the site.
The slash after “Disallow” tells the robot to not visit any pages on the site.
You might be wondering why anyone would want to stop web robots from visiting their site.
After all, one of the major goals of SEO is to get search engines to crawl your site easily so they increase your ranking.
This is where the secret to this SEO hack comes in.
You probably have a lot of pages on your site, right? Even if you don’t think you do, go check. You might be surprised.
If a search engine crawls your site, it will crawl every single one of your pages.
And if you have a lot of pages, it will take the search engine bot a while to crawl them, which can have negative effects on your ranking.
That’s because Googlebot (Google’s search engine bot) has a “crawl budget.”
This breaks down into two parts. The first is crawl rate limit. Here’s how Google explains that:

The second part is crawl demand:

Basically, crawl budget is “the number of URLs Googlebot can and wants to crawl.”
You want to help Googlebot spend its crawl budget for your site in the best way possible. In other words, it should be crawling your most valuable pages.
There are certain factors that will, according to Google, “negatively affect a site’s crawling and indexing.”
Here are those factors:

So let’s come back to robots.txt.
If you create the right robots.txt page, you can tell search engine bots (and especially Googlebot) to avoid certain pages.
Think about the implications. If you tell search engine bots to only crawl your most useful content, the bots will crawl and index your site based on that content alone.
“You don’t want your server to be overwhelmed by Google’s crawler or to waste crawl budget crawling unimportant or similar pages on your site.”
By using your robots.txt the right way, you can tell search engine bots to spend their crawl budgets wisely. And that’s what makes the robots.txt file so useful in an SEO context.
Intrigued by the power of robots.txt?
You should be! Let’s talk about how to find and use it.
Finding your robots.txt file
If you just want a quick look at your robots.txt file, there’s a super easy way to view it.
In fact, this method will work for any site. So you can peek on other sites’ files and see what they’re doing.
All you have to do it type the basic URL of the site into your browser’s search bar (e.g., neilpatel.com, quicksprout.com, etc.). Then add /robots.txt onto the end.
One of three situations will happen:
1) You’ll find a robots.txt file.

2) You’ll find an empty file.
For example, Disney seems to lack a robots.txt file:

3) You’ll get a 404.
Method returns a 404 for robots.txt:

Take a second and view your own site’s robots.txt file.
If you find an empty file or a 404, you’ll want to fix that.
If you do find a valid file, it’s probably set to default settings that were created when you made your site.
I especially like this method for looking at other sites’ robots.txt files. Once you learn the ins and outs of robots.txt, this can be a valuable exercise.
Now let’s look at actually changing your robots.txt file.
Finding your robots.txt file
Your next steps are all going to depend on whether or not you have a robots.txt file. (Check if you do by using the method described above.)
If you don’t have a robots.txt file, you’ll need to create one from scratch. Open a plain text editor like Notepad (Windows) or TextEdit (Mac.)
Only use a plain text editor for this. If you use programs like Microsoft Word, the program could insert additional code into the text.
Editpad.org is a great free option, and that’s what you’ll see me using in this article.

Back to robots.txt. If you have a robots.txt file, you’ll need to locate it in your site’s root directory.
If you’re not used to poking around in source code, then it might be a little difficult to locate the editable version of your robots.txt file.
Usually, you can find your root directory by going to your hosting account website, logging in, and heading to the file management or FTP section of your site.
You should see something that looks like this:

Find your robots.txt file and open it for editing. Delete all of the text, but keep the file.
Note: If you’re using WordPress, you might see a robots.txt file when you go to yoursite.com/robots.txt, but you won’t be able to find it in your files.
This is because WordPress creates a virtual robots.txt file if there’s no robots.txt in the root directory.
If this happens to you, you’ll need to create a new robots.txt file.
Creating a robots.txt file
You can create a new robots.txt file by using the plain text editor of your choice. (Remember, only use a plain text editor.)
If you already have a robots.txt file, make sure you’ve deleted the text (but not the file).
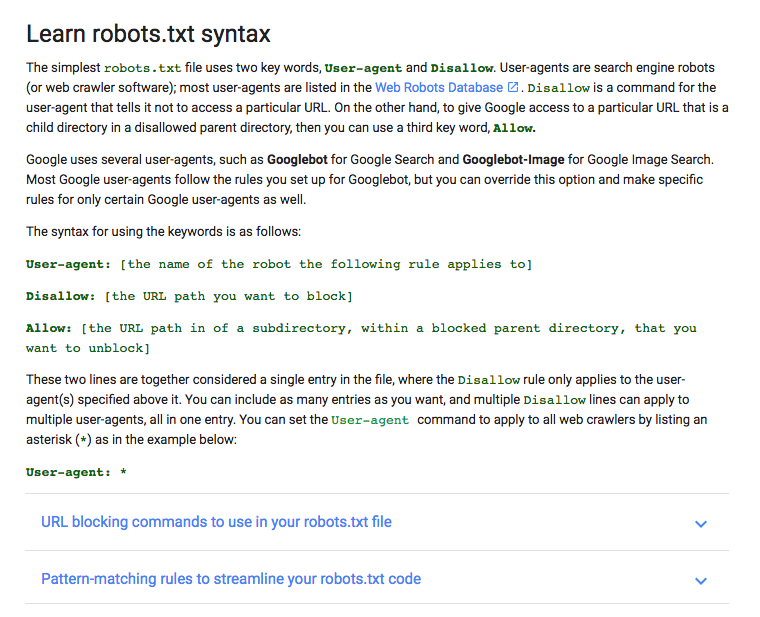
First, you’ll need to become familiar with some of the syntax used in a robots.txt file.
Google has a nice explanation of some basic robots.txt terms:
I’m going to show you how to set up a simple robot.txt file, and then we’ll take a look at how to customize it for SEO.
Start by setting the user-agent term. We’re going to set it so that it applies to all web robots.
Do this by using an asterisk after the user-agent term, like this:
![]()
Next, type “Disallow:” but don’t type anything after that.

Since there’s nothing after the disallow, web robots will be directed to crawl your entire site. Right now, everything on your site is fair game.
So far, your robots.txt file should look like this:

I know it looks super simple, but these two lines are already doing a lot.
You can also link to your XML sitemap, but it’s not necessary. If you want to, here’s what to type:

Believe it or not, this is what a basic robots.txt file looks like.
Now let’s take it to the next level and turn this little file into an SEO booster.
Optimizing robots.txt for SEO
How you optimize robots.txt all depends on the content you have on your site. There are all kinds of ways to use robots.txt to your advantage.
I’ll go over some of the most common ways to use it.
(Keep in mind that you should not use robots.txt to block pages from search engines. That’s a big no-no.)
One of the best uses of the robots.txt file is to maximize search engines’ crawl budgets by telling them to not crawl the parts of your site that aren’t displayed to the public.
For example, if you visit the robots.txt file for this site (neilpatel.com), you’ll see that it disallows the login page (wp-admin).

Since that page is just used for logging into the backend of the site, it wouldn’t make sense for search engine bots to waste their time crawling it.
(If you have WordPress, you can use that same exact disallow line.)
You can use a similar directive (or command) to prevent bots from crawling specific pages. After the disallow, enter the part of the URL that comes after the .com. Put that between two forward slashes.
So if you want to tell a bot to not crawl your page https://yoursite.com/page/, you can type this:
![]()
You might be wondering specifically what types of pages to exclude from indexation. Here are a couple of common scenarios where that would happen:
Purposeful duplicate content. While duplicate content is mostly a bad thing, there are a handful of cases in which it’s necessary and acceptable.
For example, if you have a printer-friendly version of a page, you technically have duplicate content. In this case, you could tell bots to not crawl one of those versions (typically the printer-friendly version).
This is also handy if you’re split-testing pages that have the same content but different designs.
Thank you pages. The thank you page is one of the marketer’s favorite pages because it means a new lead.
…Right?
As it turns out, some thank you pages are accessible through Google. That means people can access these pages without going through the lead capture process, and that’s bad news.
By blocking your thank you pages, you can make sure only qualified leads are seeing them.
So let’s say your thank you page is found at https://yoursite.com/thank-you/. In your robots.txt file, blocking that page would look like this:
![]()
Since there are no universal rules for which pages to disallow, your robots.txt file will be unique to your site. Use your judgment here.
There are two other directives you should know: noindex and nofollow.
You know that disallow directive we’ve been using? It doesn’t actually prevent the page from being indexed.
So theoretically, you could disallow a page, but it could still end up in the index.
Generally, you don’t want that.
That’s why you need the noindex directive. It works with the disallow directive to make sure bots don’t visit or index certain pages.
If you have any pages that you don’t want indexed (like those precious thank you pages), you can use both disallow and noindex directive:

Now, that page won’t show up in the SERPs.
Finally, there’s the nofollow directive. This is actually the same as a nofollow link. In short, it tells web robots to not crawl the links on a page.
But the nofollow directive is going to be implemented a little bit differently because it’s actually not part of the robots.txt file.
However, the nofollow directive is still instructing web robots, so it’s the same concept. The only difference is where it takes place.
Find the source code of the page you want to change, and make sure you’re in between the <head> tags.

Then paste this line:
<meta name=”robots” content=”nofollow”>
So it should look like this:

Make sure you’re not putting this line between any other tags––just the <head> tags.
This is another good option for thank you pages since web robots won’t crawl links to any lead magnets or other exclusive content.
If you want to add both noindex and nofollow directives, use this line of code:
<meta name=”robots” content=”noindex,nofollow”>
This will give web robots both directives at once.
Testing everything out
Finally, test your robots.txt file to make sure everything’s valid and operating the right way.
Google provides a free robots.txt tester as part of the Webmaster tools.
First, sign in to your Webmasters account by clicking “Sign In” on the top right corner.

Select your property (i.e., website) and click on “Crawl” in the left-hand sidebar.

You’ll see “robots.txt Tester.” Click on that.

If there’s any code in the box already, delete it and replace it with your new robots.txt file.
Click “Test” on the lower right part of the screen.

If the “Test” text changes to “Allowed,” that means your robots.txt is valid.
Here’s some more information about the tool so you can learn what everything means in detail.
Finally, upload your robots.txt to your root directory (or save it there if you already had one). You’re now armed with a powerful file, and you should see an increase in your search visibility.
Conclusion
I always love sharing little-known SEO “hacks” that can give you a real advantage in more ways than one.
By setting up your robots.txt file the right way, you’re not just enhancing your own SEO. You’re also helping out your visitors.
If search engine bots can spend their crawl budgets wisely, they’ll organize and display your content in the SERPs in the best way, which means you’ll be more visible.
It also doesn’t take a lot of effort to set up your robots.txt file. It’s mostly a one-time setup, and you can make little changes as needed.
Whether you’re starting your first or fifth site, using robots.txt can make a significant difference. I recommend giving it a spin if you haven’t done it before.
What’s your experience creating robots.txt files?
Comments (279)