Facebook is probably the most neglected online advertising channel of them all.
How often do you hear things like:
“Facebook has been dead since everybody’s parents started using it.”
“Instagram has 10x the engagement rate!”
“Email crushes Facebook.”
Yeah yeah, we get it, Facebook is lame.
So, how come their revenue is growing so fast?
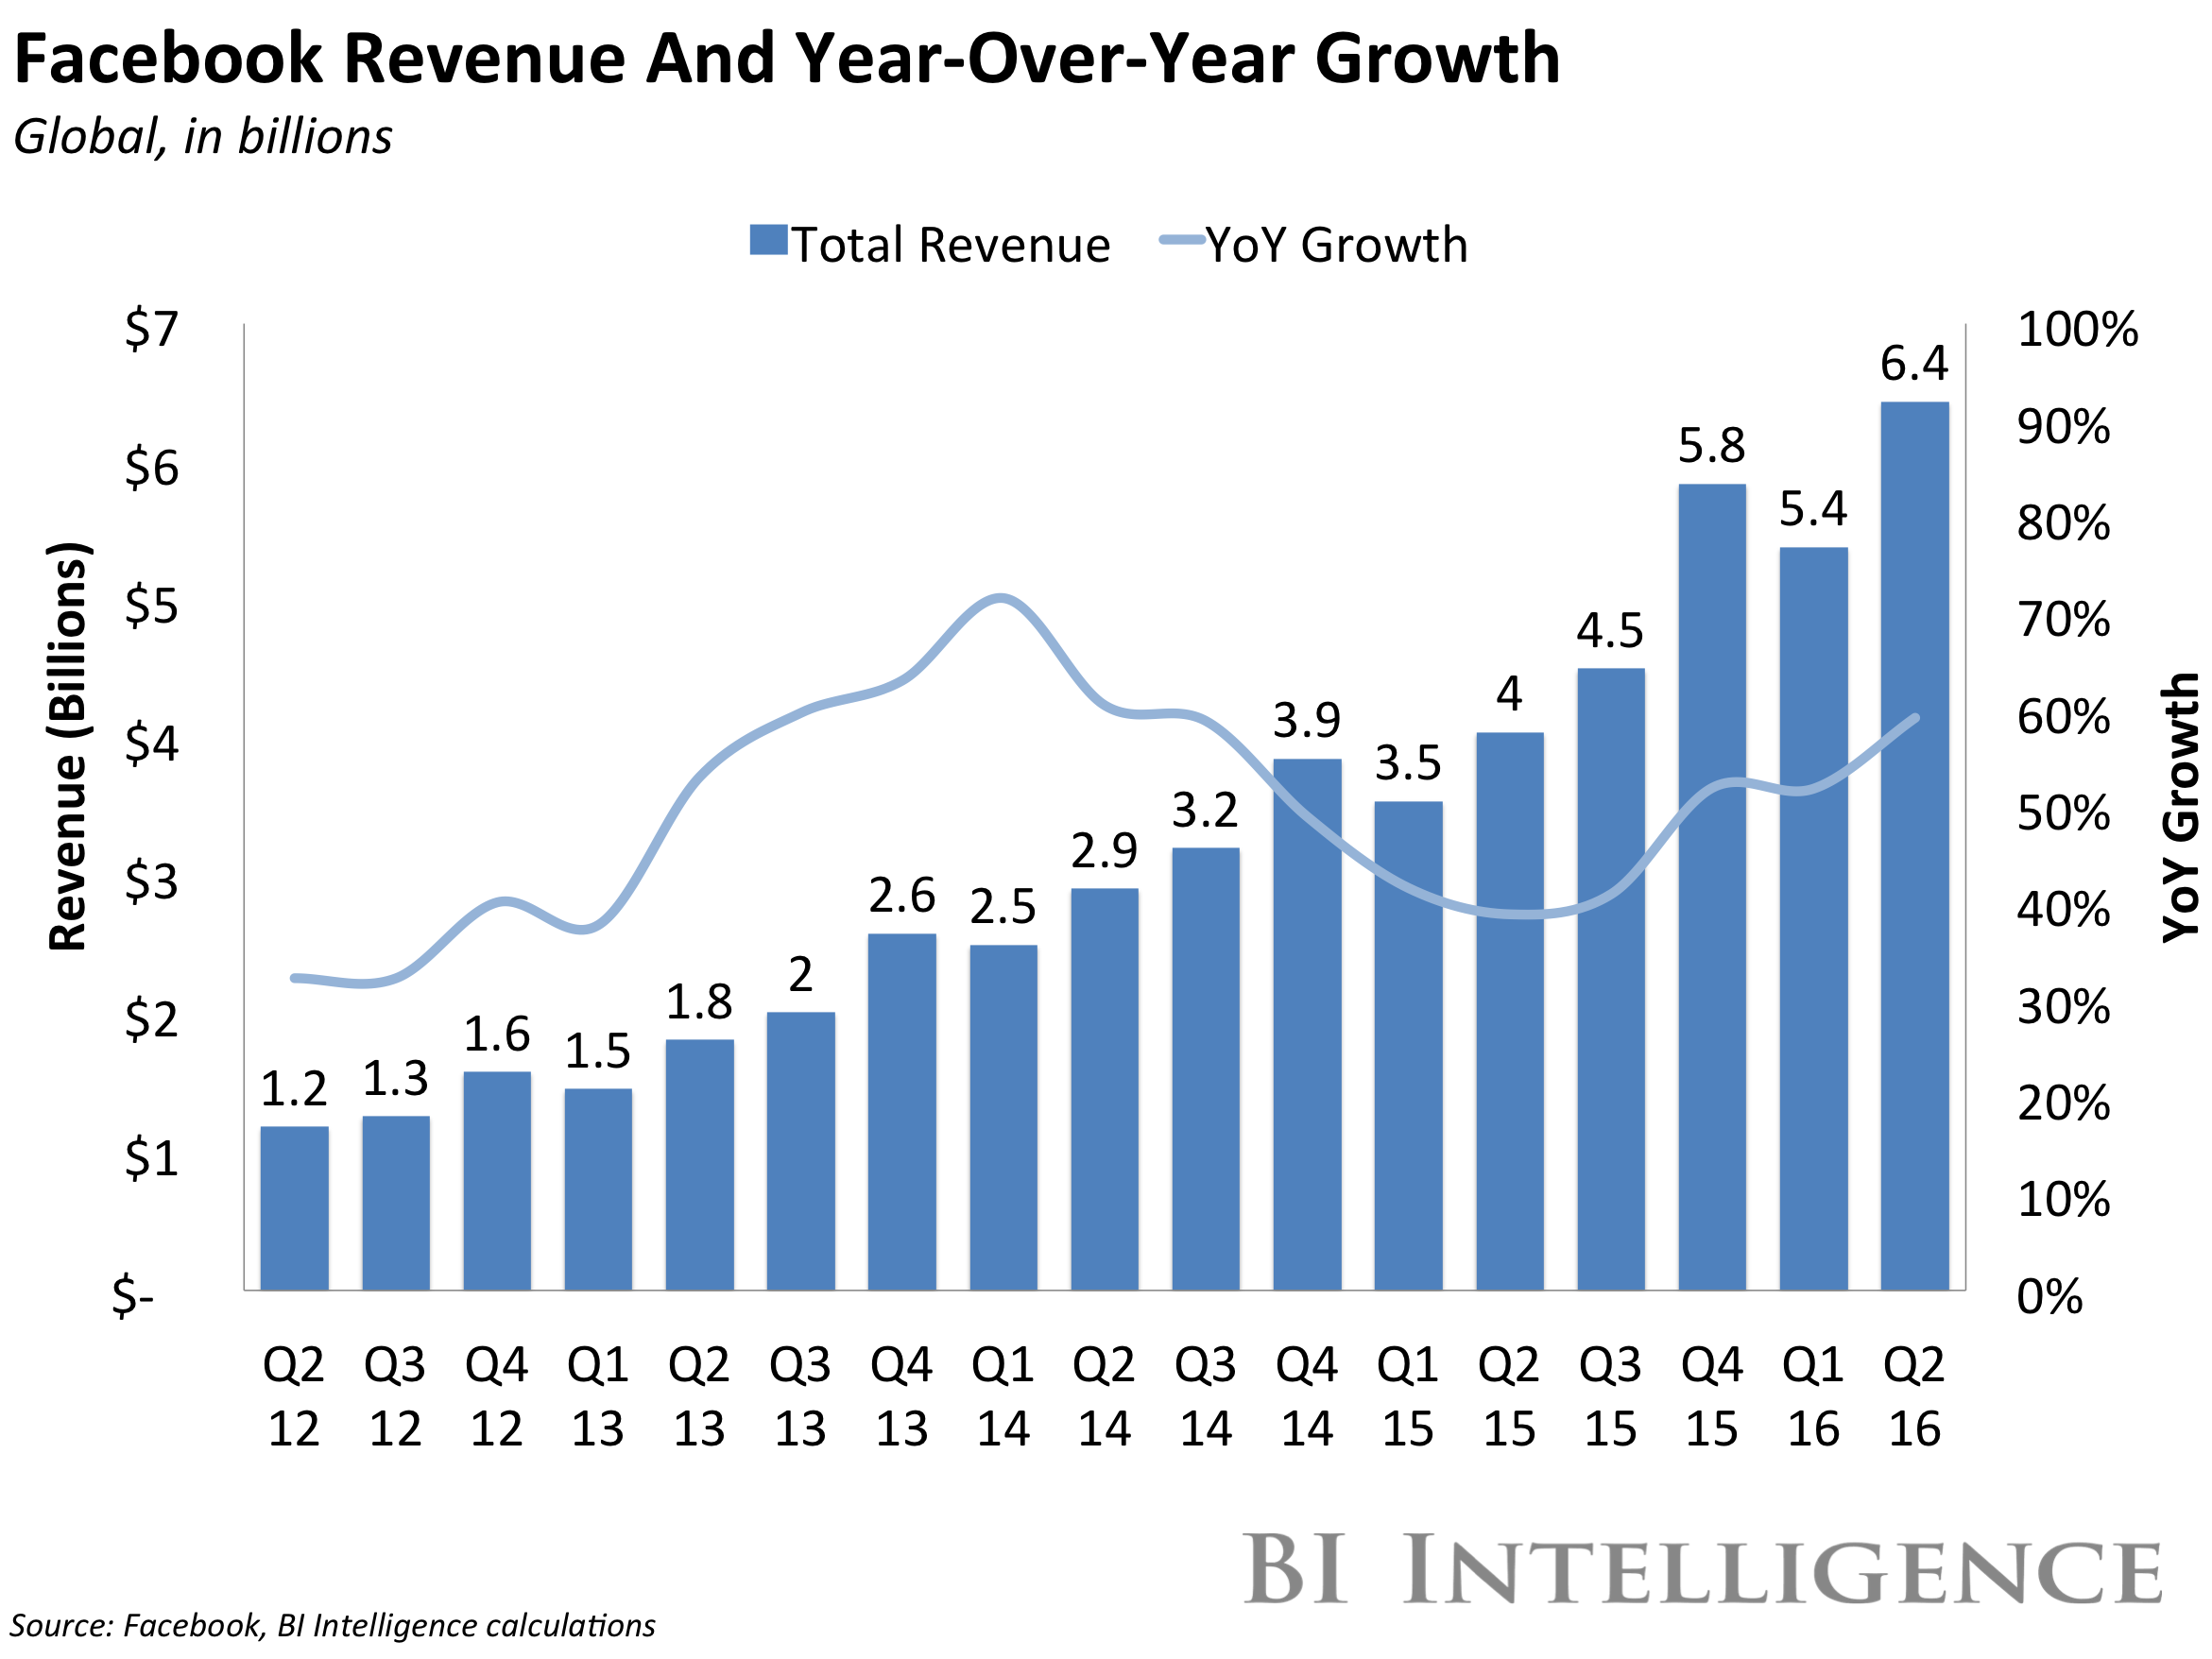
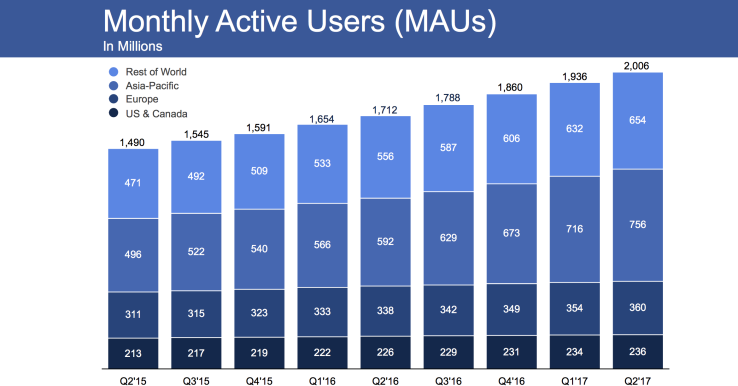
Not only do they have the biggest user base, with over 2 billion monthly active users, but they also seem to make plenty of money with their advertising system.
I think there’s a whole bunch of hypocrites out there.
If one out of every $10 in advertising is spent on Facebook ads, how come everybody shuns the platform, except for a few?
You know what I think?
I think every business tries Facebook ads, fails at it and then blames the platform.
People just suck at making Facebook ads work for them. They don’t truly understand their target audience, so they place ads in the news feed of the wrong people, etc.
Today, I’ll help you out with that.
I’m going to show you a few examples of people who’ve been successful with Facebook ads and then walk you through setting up your first campaign without breaking a sweat.
Even if you’re a complete newbie, after reading this guide, you’ll have a good grasp of Facebook ads.
I mean it.
I’ll start from the very beginning, but you can skip to any section below
- Top Reasons To Advertise on Facebook
- Facebook Advertising Definition
- Facebook Advertising Overview
- 3 case studies from successful Facebook advertisers
- How to Setup Your First Facebook Ad Campaign
- How To Fail-Proof Your Facebook Ad Campaigns
- Step 1: How to Create a Realistic Budget
- Step 2: Create a fan page
- Step 3: Create your first campaign
- Step 4: Create your ad set
- Step 5: Create your first ad
- Step 6: Create 2 more ads for A/B testing
- Step 7: Wait for 24 hours
- Step 8: Kill the ads that don’t work
- Step 9 [Optional]: Increase your budget
- Step 10 [Advanced]: Expand your reach with custom audiences; lookalike audiences
Top Reasons To Advertise on Facebook
You can’t argue with results.
Which means you can’t deny Facebook ads.
They’re super profitable. (If, and that’s a big IF, you know what you’re doing.)
Nearly all social media marketers (96%) consider Facebook advertising the most effective paid option out of all social networks, according to an eMarketer study.
One reason is Facebook’s size.
Billions of people see ads on their platform each month. People spend almost an hour on it each day.
And despite what the haters say, Facebook is still growing, too.
That’s why budgets have been doubling (up to $31 billion and counting).
Another reason is Facebook Advertising gives smaller companies a competitive advantage, if used correctly.
For example, ecommerce startup Barbell Apparel used Facebook ads to surpass their Kickstarter product launch goal of $15,000 by $735,000!
Listen:
You want to reach people online? Facebook is the single best alternative to Google AdWords.
Don’t get me wrong, AdWords is awesome. But it’s also expensive. I’ve personally worked on client accounts where every single click cost anywhere from $50 – 100. Per click!
Then only a tiny percentage of those people ever became a lead. Most of them bounced from the site.
Now guess how much that ad campaign was? This company literally spent thousands of dollars each day just to bring in a few decent leads.
It’s different with Facebook. You get access to the same number of people. But for far less.
And once you’ve got a few tricks up your sleeves (after reading the rest of this article), you’ll be able to get website clicks for pennies and new sales for just a few bucks each.
Facebook Advertising Definition
“Wait, you can advertise on Facebook?”
If that was your initial reaction to this post’s headline, then you’re a little late to the party. But, no worries, I’ll get you up to speed.
Since Facebook gets tons of data from their users, who enter it voluntarily on their profile (things like age, location, and interests), they have a good idea of who users are and what they like.
Therefore, they can serve them targeted ads that show them products that they are likely to buy, sites they tend to like or events they’d love to attend.
For example, I recently joined a Facebook group about Udemy, the online course platform.
Naturally, Facebook jumps on my choice and starts showing me ads that prompt me to sign up for a course (they thought I might like to learn about creating video games).

You might say: “Wait Neil, are you sure this isn’t just a news feed post from Udemy? Did you maybe like their page? How do you know this is an ad?”
Good question!
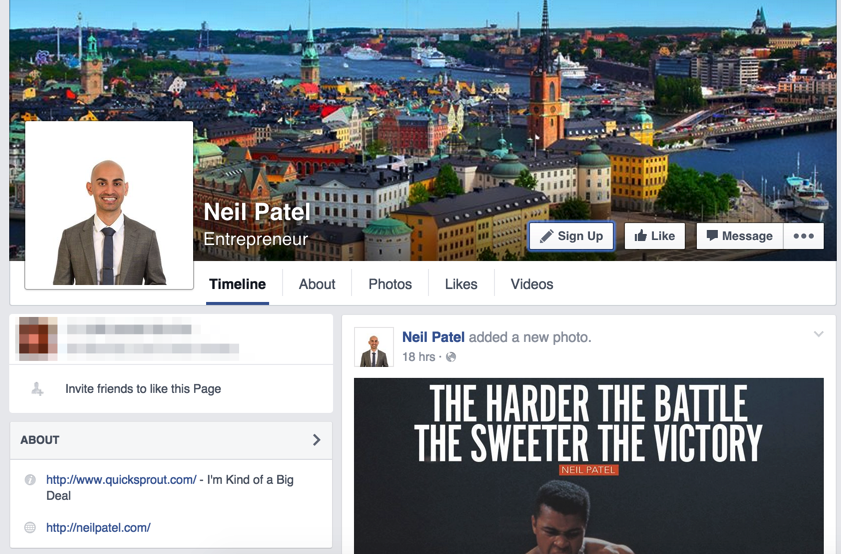
There are a few features that every Facebook ad has and these make ads unmistakable. With these, I can know for sure that it’s an ad.
Here they are:
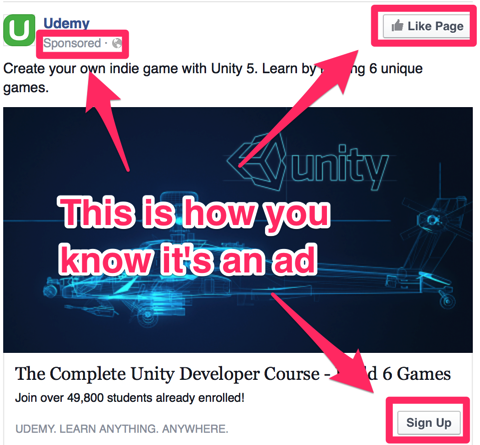
You can see a “Sponsored” tag right underneath the name of the page that is advertising to you.
There’s also a unique “Like Page” button, in the top right corner, that’s never visible on regular posts.
Finally, unlike regular news feed items, all Facebook ads have a call-to-action (also called a CTA), in the bottom right corner, which might say one of the following things:
- Learn More
- Sign Up
- Download
- Contact Us
- Shop Now
- Book Now
- Watch More
- Apply Now
Facebook has a predefined set of CTA buttons.
So, remember, you can spot Facebook ads by paying attention to these 3 things:
- A “sponsored” tag, below the name of the site
- The prompt to like the page in the top right corner
- A call-to-action button in the bottom right corner
You might wonder why Facebook doesn’t make its advertising more aggressive and obvious, like YouTube.
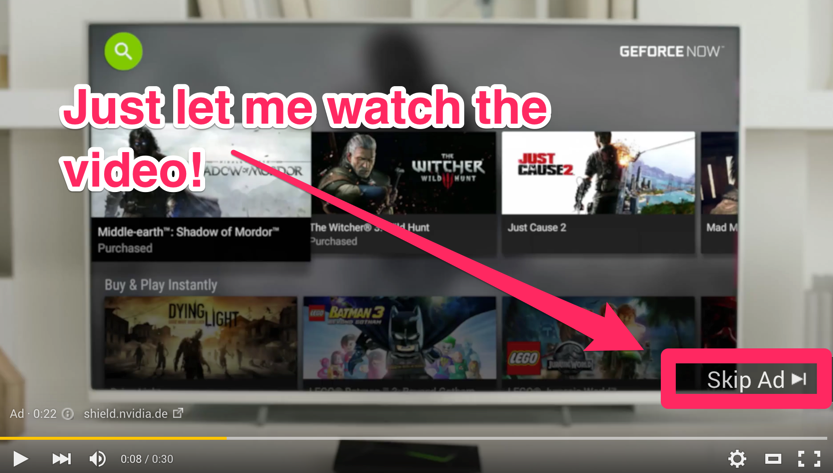
(does anyone like YouTube ads?)
YouTube forces you to sit through an ad for every 3 or 4 videos that you watch. For a while, you can skip the ads, but eventually, you’ll have to sit through an entire 30 second video.
For long videos (>1hr), they even show you commercials during the video (just like TV commercials).
The result: Everyone HATES YouTube ads.
Seriously.
Do you know anyone who doesn’t block these things or who leaves their computer and returns once it’s over?
The reason we hate YouTube ads is that they disrupt the flow of the user experience.
We want our experience to be us just watching video after video, for as long as we like, until we decide to stop.
YouTube changes the experience for us, forcefully, by interrupting it with their ads.
We don’t like being interrupted. As a matter of fact, we face enough interruptions each day, costing us our precious brain power and challenging our self-control.
Facebook is smarter than YouTube.
They want to integrate their ads into the natural flow of the experience, as seamlessly as possible.
Flow is actually a great term for this. Think about how you navigate Facebook.
You always scroll down through your news feed, either with your mouse or your finger. Since they just drop an ad into your feed, you are not interrupted. You can look at it or just keep on scrolling.
It doesn’t change your user experience at all.
Note: There are also sidebar ads, which are similar to banners, but they just cover what would otherwise be white space, so there’s also no interruption there.
Making the ads blend in and not be recognized as such, to the untrained eye, is one of the secrets behind Facebook’s huge revenue growth.
So, advertising on Facebook is, in a nutshell, paying to place promotions and product offers in the news feed of a specific, targeted audience on Facebook.
Before we dive into some case studies and how to set up your first ad, we need to lay some groundwork.
Facebook Advertising Overview
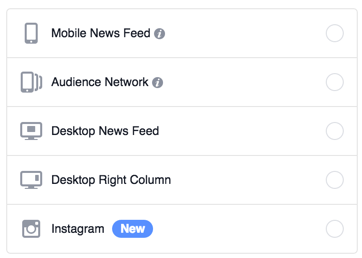
There are 5 types of Facebook ads:
- Inside the news feed on desktop
- Inside the news feed on mobile
- Right-hand sidebar on desktop
- Audience network on mobile
- On Instagram
Instagram opened advertising to everybody at the end of September 2015.
Placing ads in the news feed or on the right column is pretty obvious, but what does an audience network ad look like?
These ads are placed on regular websites, inside apps or even in games.
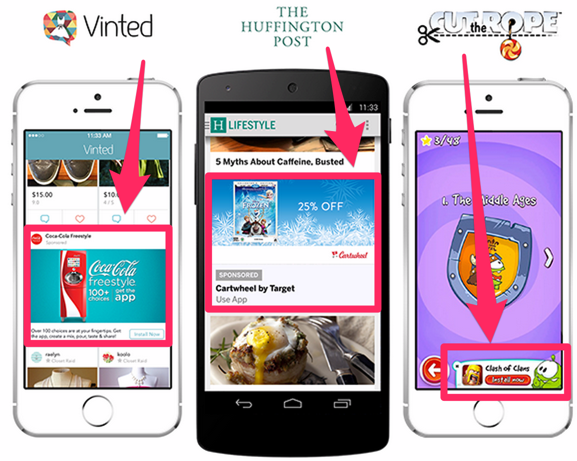
That way, Facebook extended its possibilities for advertising from just inside Facebook to basically any real estate that they own.
Instagram advertising was opened to big brands not so long ago, but now everyone can do it.
Instagram ads are also placed inside the app’s natural feed, which relies on the same principle as native Facebook ads: don’t interrupt the user experience.
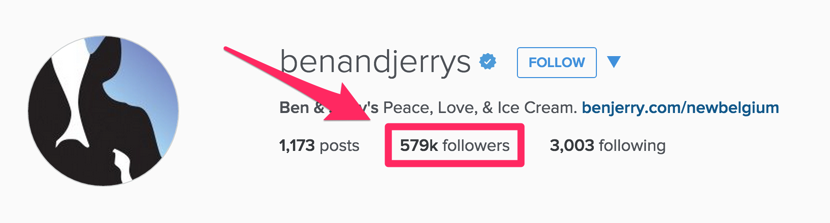
Ben and Jerry’s has done a great job with them:
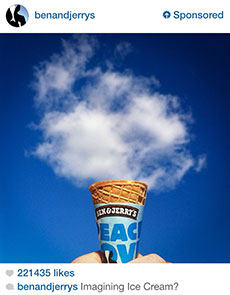
(Image via Postano)
Thanks to a few creative campaigns, their Instagram account now boasts almost 600,000 followers.
There are 2 ways to manage your Facebook ads, which often confuse people.
First, there’s the Ads Manager, which is the standard dashboard that you get when creating your ad account.
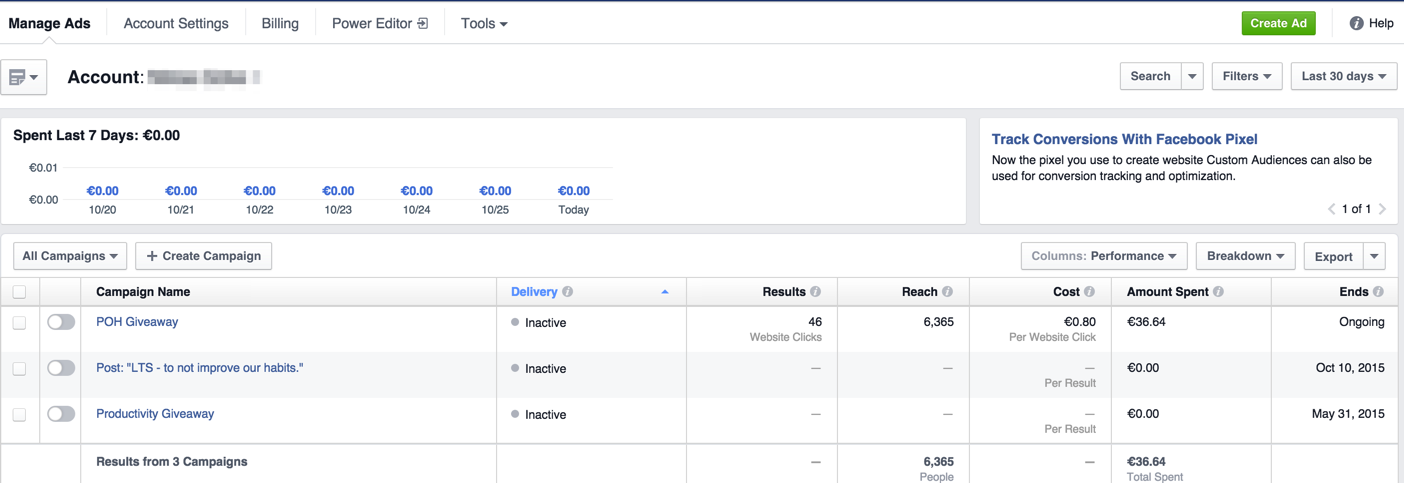
(screenshots courtesy of a friend I recently helped get started)
This is the go-to option for beginners and you should use it too, when starting out. Then, there’s the Power Editor, which is for more advanced users.
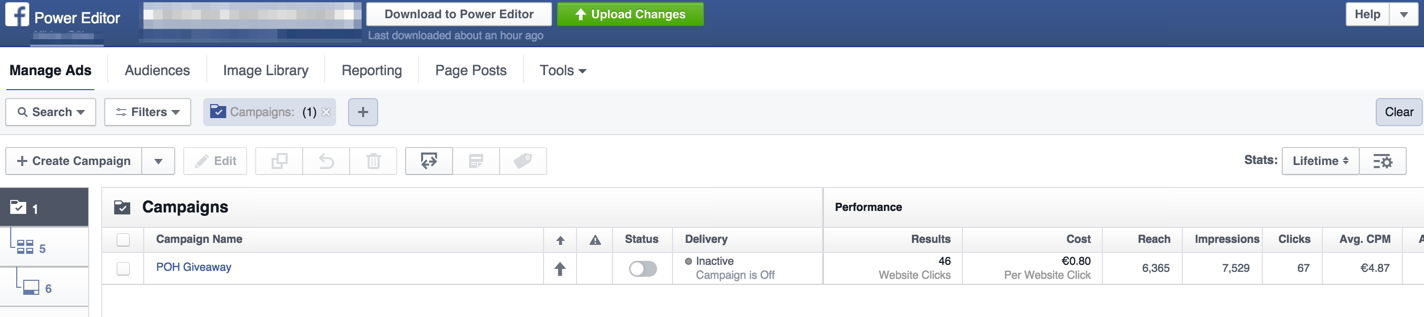
The Power Editor just a different way of organizing your ads and gives you a few more options to customize your advertising.
Instagram ads, for example, can only be run using the Power Editor.
When you first sign up for Facebook advertising, they will immediately prompt you to create your first campaign.
A campaign is the most abstract and broad level of your advertising efforts. The only thing that’s determined here is your target outcome, which can be things such as increasing likes, sending traffic to a website, converting prospects to buyers and getting app downloads.
For example, if you want to promote your new game app, like Plants vs. Zombies, and get more downloads in the first week to make it popular, you can set that target here.
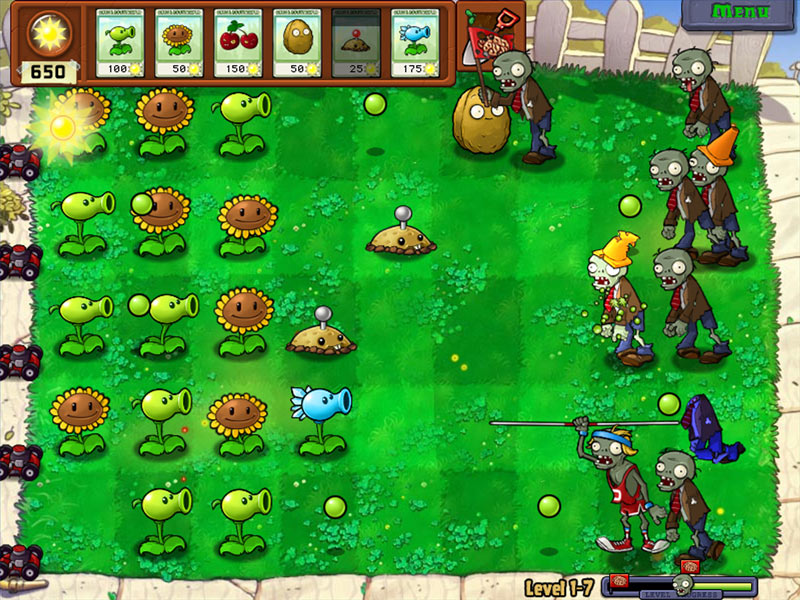
(seriously, don’t download this, it’s addictive)
The level that follows is ad sets. An ad set is where you decide what type of ads that you want to run and the target audience that you want to see your ads.
Continuing with the game example, you could create one set for Instagram ads and one for desktop feed ads.
Finally, there are the ads themselves. This is the level where you actually design your ads and decide elements like copy, images and CTA buttons.
You can have multiple ads in each ad set, to test which ones work best.
If that reminds you strongly of Google Adwords, that’s because it’s exactly the same structure.
Now, we’ve covered all of the basics that you need to know, in order to not feel like an idiot when someone mentions Facebook ads.
But, before I help you turn into a pro (well, compared to 90% of the rest of the world, that is), let’s see whether this actually works.
3 case studies from successful Facebook advertisers
Luckily, not all businesses screw up Facebook ads, so I have some successful campaigns to show you.
First, here’s one that completely blew my mind the other day.
Look at this ad from LeadPages:
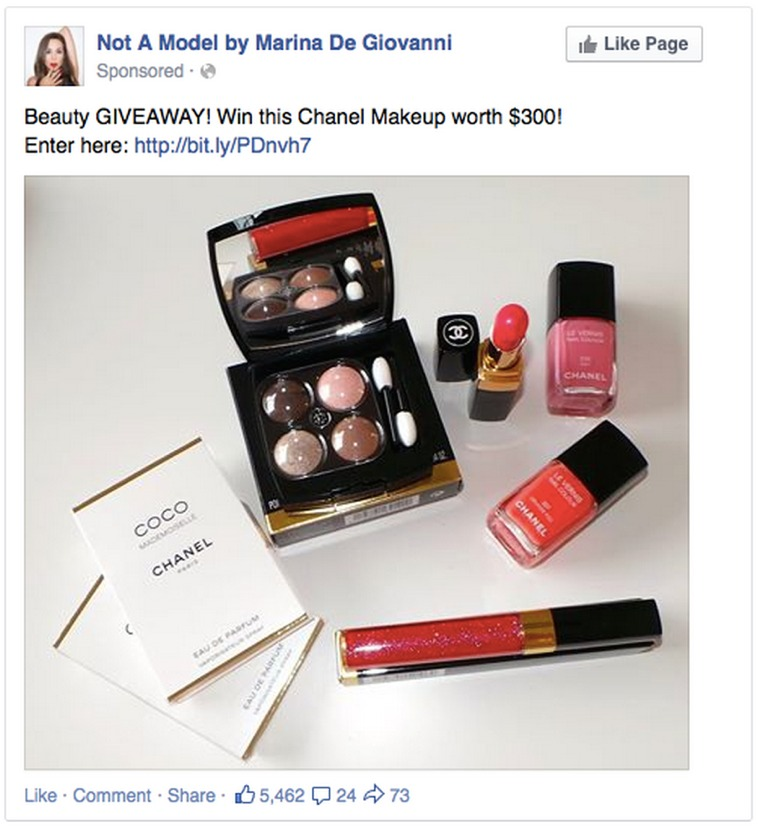
(Image source: Leadpages)
Wait a second…an ad for a giveaway?
Is she trying to flush money down the toilet? She’s already giving away something and then she’s paying to promote that?
Yup.
And, I don’t think she regrets a single dollar spent.
This campaign helped Marina De Giovanni collect 17,000 emails in 6 weeks.
She built an email list that it takes most people years to build, in less than 2 months!
To pull this off, she gave away a $300 item every month. Sometimes, it was a piece of jewelry, sometimes a box with cool makeup, etc.
She then created a landing page, which she published as a tab of her Facebook page, where people could sign up to enter the giveaway in exchange for their email address.
The final part of her set up was using Facebook ads to drive traffic to the sign-up page.
Simple? Yes.
Easy? No.
Efficient? Hell yeah!
Yes, she spent some money on this, but she’s also monetizing her blog and email list, for example, through private coaching sessions for $225 each (which is fully booked, btw).
The question is: Would you spend $1,000 to make $10,000?
Of course, you would!
Some other success factors of her campaign were:
- Using video to welcome people and tell them how to enter
- Letting the traffic stay on Facebook, which makes it more likely for people to sign up (since they trust Facebook)
- Constantly testing and tweaking her ads and doubling down on the best ones
You might have heard that you can expect to make $1 per month per subscriber from your email list.
Even if you only do half as good, you can still make a good living off an email list the size of Marina’s.
Okay, fine, it works for bloggers, but does it also work for startups?
I’ll show you that it does.
Look at this ad this ad via WPCurve:
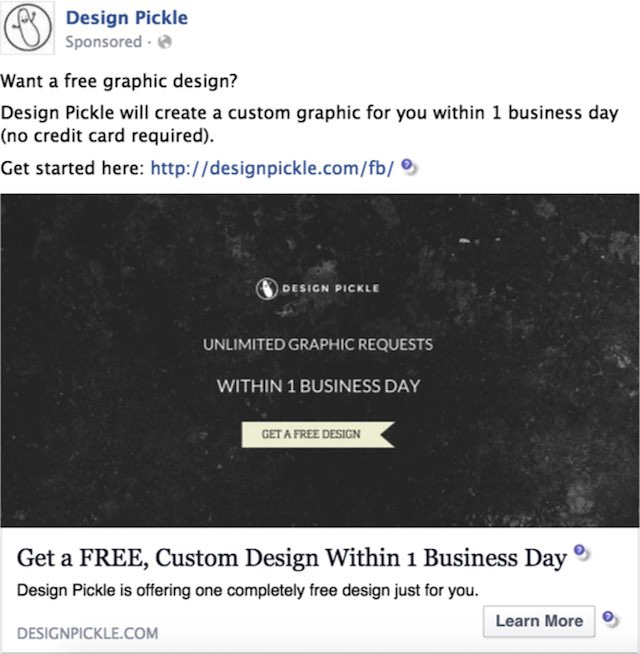
Design Pickle offers unlimited graphic requests, something which would typically make people skeptical.
This ad with its “Ah, a free design can’t hurt” attitude is directly responsible for almost $6,000 in monthly recurring revenue for Design Pickle.
They used it to target highly qualified leads, which were then sent to this survey.
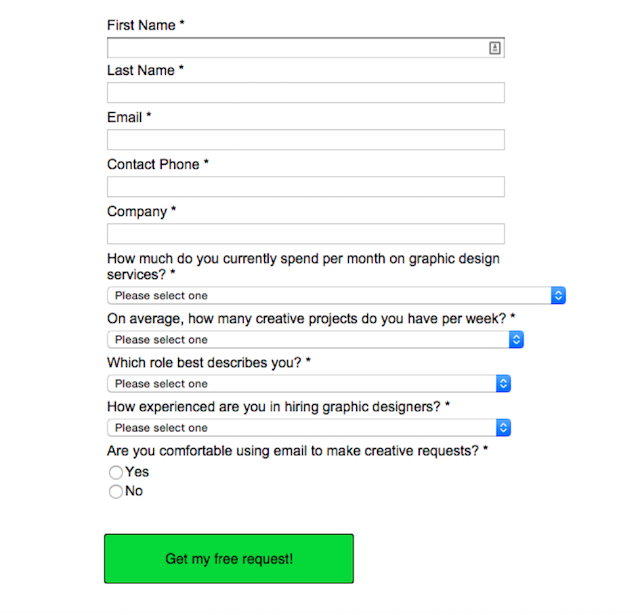
What? So many questions? Ugh!
Won’t that drive down conversions?
Yes. But, they chose to do that, on purpose. They decided to weed out the freeloaders, so they only got leads which were likely to convert.
Doing a free graphic design within a day is a lot of work and they follow up with each client via phone within 24 hours of delivering, so the last thing they need is thousands of people to call who won’t buy a thing.
Instead, their campaign generated around 500 leads, 30 of which turned into subscribers to their $200/mo service.
What’s more, they estimate their customer lifetime value (CLV, the average expected money a customer will spend with them, once a customer) to be around $1,100, resulting in an awesome 633% ROI for the campaign.
Okay, okay, so it works for bloggers and startups. But, what about big brands?
Well, how about Pedigree? Should ring a bell? They’re the folks with the dog food?

(Image source: SIUC English)
They used Facebook ads to create awareness for dogs in shelters, growing the likes on their Facebook page from 55,000 to over a million and raising over $600,000 in donations.
The list of brands who’ve been successful with Facebook ads goes on and on.
Adidas, AT&T, Pepsi, Baskin Robbins, American Express…
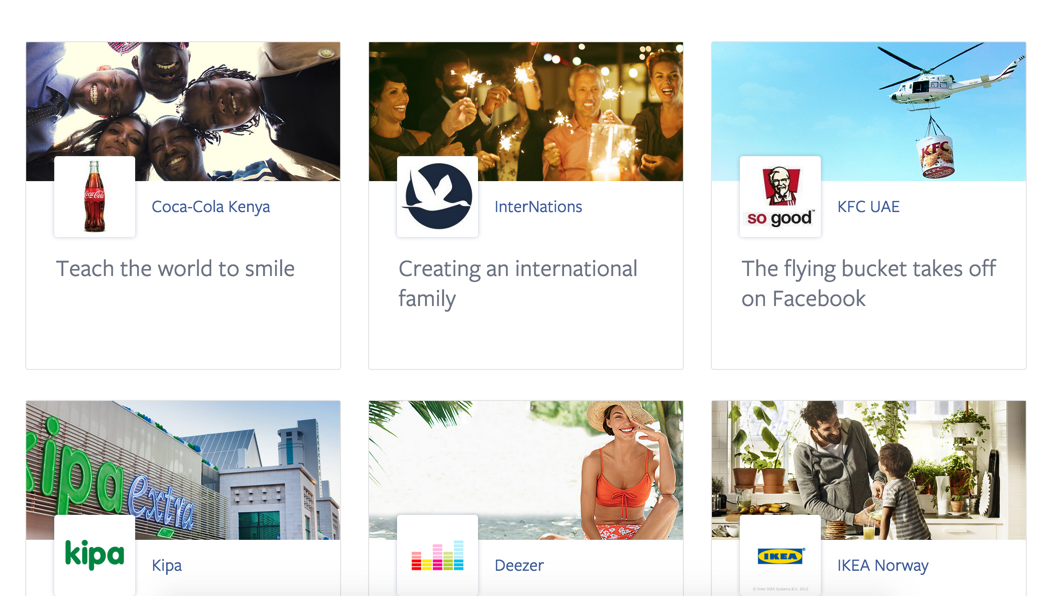
By now, Facebook has an entire database of successful case studies.
Alright, enough with the bragging, how about we get to work?
It’s time to set up your first Facebook ad campaign.
How to Setup Your First Facebook Ad Campaign
Facebook gives you two ad management tools that we just discussed:
- Facebook Ads Manager
- Power Editor
Both are free. (So there are no excuses to delay.)
You’ll probably use the Power Editor once you get a little experience. But for now, it’s a little overkill for what we’re trying to do.
So instead, let’s stick with the Facebook Ads Manager for now. Go ahead and click here to pull it up. The Ads Manager will let you do everything we’re going to talk about today, including:
- Setting up new campaigns
- Create new ads for each of these
- Manage your bids (or how much you’re spending on each ad)
- You can create different audiences to target
- Optimize, enhance, or improve these campaigns while running
- Even track and test ad campaigns, too.
When you’re on Facebook, you can also click on the menu in the upper-right hand corner to Manage Ads inside the Ads Manager.
Got it up? Good.
Let’s talk about how this thing works.
At the top, you should see different tabs to organize your account. There’s a ‘hierarchy’ to help organize how you manage everything. Here’s how it looks:
- Account: Holds all of your campaigns, ad sets, and ads. Typically, you’d have a single account for your business.
- Campaigns: Individual campaigns can be created for almost anything. Some might be for specific products or services. While others are merely for driving traffic back to your site. (Ideally, you want both. As we’ll discuss soon.)
- Ad Sets: Exactly what it sounds like. Useful for organizing different groups or categories of ads.
- Ads: Last but not least, all of your ads. This is the only part that people will see eventually.
- Ad Sets: Exactly what it sounds like. Useful for organizing different groups or categories of ads.
- Campaigns: Individual campaigns can be created for almost anything. Some might be for specific products or services. While others are merely for driving traffic back to your site. (Ideally, you want both. As we’ll discuss soon.)

So you can have multiple campaigns. And then each campaign will have multiple ad sets under each. Which will then contain a few ads of its own.
You’ll also notice that when you click on each option, they will display a few different Key Performance Indicators (KPIs). That way, you can quickly look at how your campaigns or ads are performing (and how they compare).
You can also customize which options show up in these columns by clicking on the link to the far right-hand side. For example, some of those metrics (like Reach) are vanity metrics that look nice on the surface but aren’t really helpful. Here are five metrics you should be adding to these dashboards instead.
The menu will house all of your other major ad options. For example, the pixel that you’ll need to install for conversion tracking or the audiences section to create and manage custom audiences (which we’ll dive into soon).
See? Not that hard, right?!
Pretty easy once you get the hang of it.
But before we dive head first into creating new ad campaigns, there’s something we need to discuss.
There’s a reason people say “Facebook ads don’t work.” (Even though we’ve already seen, multiple times, that they do.)
It’s because they’re doing it wrong. Plain and simple.
For example, they’ll try to force the same AdWords strategy… even though people use Facebook and Google Search completely differently.
Here’s what they’re doing wrong, and how you can avoid the same fate.
How To Fail-Proof Your Facebook Ad Campaigns
What do you do when you hit Google’s homepage?
You search. Right? I mean, that’s all there is to do, anyway.
But the point is that you look for something specific.
You type out a few words, looking for “red Nike running shoes.”
And then you see relevant results that contain red Nike running shoes.
Simple. But effective. And crazy profitable.
Get this:
Almost 70% of Google’s $75 billion in revenue in 2015 came directly from their ad network. That’s how powerful their search business is.
Because there’s nothing else like it. There’s a reason over 30% of new product searches all start on Google, according to BigCommerce. Nowhere else do people tell you exactly what they want and then let advertisers compete to show it to them first.
Especially not on Facebook.
Think about it.
Most people go to Facebook to avoid looking for stuff. They don’t want to shop. They don’t want to buy necessarily. They’re just looking to kill a few minutes and catch up with friends or family. They’re trying to pass the time while sitting at the DMV all morning.
That changes things. It means the way you approach Facebook advertising needs to be unique.
You can’t just throw up an ad for random, ‘cold’ people to buy your product… and actually expect any significant results. And that’s why people fail with Facebook advertising.
Instead, we need to build a Facebook sales funnel, first. That means a series of campaigns all with different objectives. Some get you attention and awareness. Others do the nurturing. So that one or two can do all of the converting.
For example:
Step #1. Awareness: First you need to get people’s attention. You do that through awesome content that makes them laugh or helps them solve some problem. Then you pull them back to your site.
You don’t just want website traffic per se. But this website traffic will help you create a new custom audience.
For example, let’s say you search for “Las Vegas Hotels.” You click on one’s website, like the Wynn Las Vegas. And then you go somewhere else without buying.
But everywhere you go, ads from the Wynn follow you around! Those are retargeting ads. They placed a little pixel on your device when you visited their site. And now they can send you follow-up messages to get you to come back to eventually spend some money.
That’s exactly what we’re going to do with custom audiences. They’re like retargeting on steroids because you can see who visited which pages on your site. And then automatically send them ads for something related to what they just looked at.
So you might start out with something lighthearted to get their attention. Or a useful blog post.
For example, this ad from The New York Times (via HubSpot) has almost 5,000 likes, 600 comments, and 1,200 shares. One reason? It’s a blog post talking about advice for people in their 20s, targeted and sent directly to people in their 20s.
In the early stages here, you need enough eyeballs to get fast, relevant data. (Facebook’s own system will self-correct over time, so it needs a large sample size to work with.)
So you can target a fairly large audience of roughly 500,000 up to two million people at this point. (Smaller budget? Narrow that audience down even more — to as small as 10,000 if you’re just starting out.)
You’ll find this audience based on identifying interests (like people or brands they follow, etc.). Then you can refine with demographic criteria (like location, age, gender, etc.).
And now you should be ready for the next level.
Step #2. Consideration: The first campaign built up awareness for who you are. Now you can capitalize on that by sending those people offers that will transform them from strangers into leads.
We’re going to create ads tailored to the folks who were just on your website. For example, if they were looking at something related to “new truck tires,” you can serve them a new free eBook on new truck tires.
The point is to get some basic information from them for the least amount of money possible. Typically that’s with some kind of lead magnet, like giveaways, a checklist, an eBook, or even a webinar.
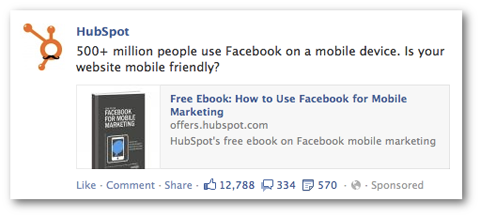
Here’s a perfect example of a HubSpot ad from Social Media Examiner. They’re giving away a free eBook that covers all things Facebook for mobile.
Your audience targeting at this step should be easy, too. Simply send these ads to the custom audience of past website visits you just created!
If you have a large site, you can also limit that audience to the past 30 or 60 days to make sure you’re only reaching the most engaged people.
That way, your brand should still be fresh in their minds. And the right offer will still catch their attention.
Step #3. Conversions: You’ve now done all the hard work. You’ve built up attention and started generating leads. Here’s your time to shine.
You’ve already done all the hard work. You’ve generated new attention and nurtured them over time. So now you just need to send them product offers that are too good to be true so they hand over their payment info.
Do you sell high priced products or services? No problem. You too can sell using Facebook ads. You just need to scale down your offer, first.
Have you ever seen a Wall Street Journal ad to sign up for just a $1 subscription? That’s called a tripwire. It’s a simplified version of the big product or service that you sell.
If you don’t have one of these already, you can even ‘splinter’ off part of your product or service to create it out of thin air.
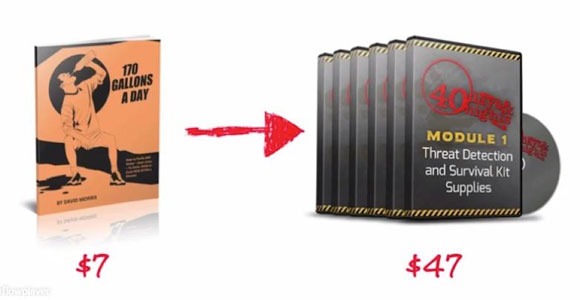
These low priced versions remove all of the risk from the customer.
So they shouldn’t hesitate to buy!
Once again, you’ll target the brand new leads you just generated in the last step. They should be ready, willing, and able now.
This looks a little time-consuming because it is. But that’s OK because it’ll be worth the effort.
The first campaign will bring people in. The second will warm them up. And the third will get them to convert.
Step 1: How to Create a Realistic Budget
Now you know the secret. You need to have a few campaigns running, simultaneously, to slowly but surely transform strangers into loyal customers.
But… how are you supposed to come up with a budget for something like that? What is a ‘reasonable’ amount to spend? Especially if you’ve never run a single Facebook ad before?!
That’s a good question.
Let’s start with a few other questions, first:
- How much is your product or service?
- How many do you want to sell?
- What’s your conversion rate already?
If you don’t have the answer to any of these, that’s OK. We’re just trying to put together a few rough ranges. That way we can start estimating your sales.
For example, let’s say:
- Product value: $100
- You want to sell: 10
- Conversion rate: 1%
Now a little basic math can help us figure out that in order to make $1,000, off of 10 sales with a 1% conversion rate, you’re going to need 1,000 visits (or clicks on your ad).
So… how much is it going to cost to get those 1,000 clicks? That’s what you want to figure out here.
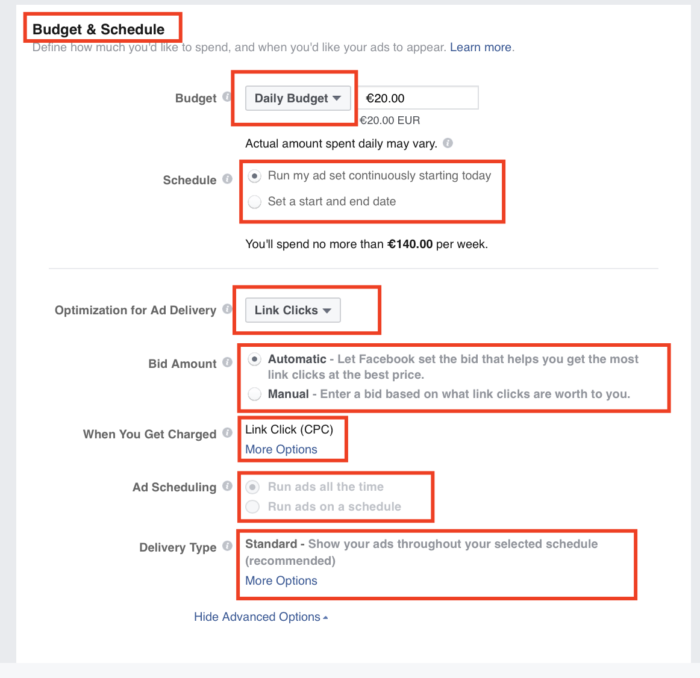
Because it will tell you how much to set aside for a Daily budget. This is the max number you want to spend each day to hit your goal. It’s just a small piece of the overall Lifetime budget for the entire campaign.
After defining budgets, you can select an objective so that Facebook will automatically help you do a better job of reaching your goals. For example, you can select either Conversions or Link clicks as your Ad Delivery Optimization method to get the best results.
Why mess with these options?
Because Facebook will help you out. For example, if you select clicks, their own system will monitor and adjust in order to get you the most clicks.
If you choose conversions, they’ll watch patterns for what’s working (like what types of people, what times of day, etc.) and help self-correct the campaign as it runs.
So over the first few days, you can actually expect results to improve a little bit.
That’s how you determine what you should be spending in total. Here’s how to adjust the incremental bids (like how much you spend per click) in order to get the most bang for your buck.
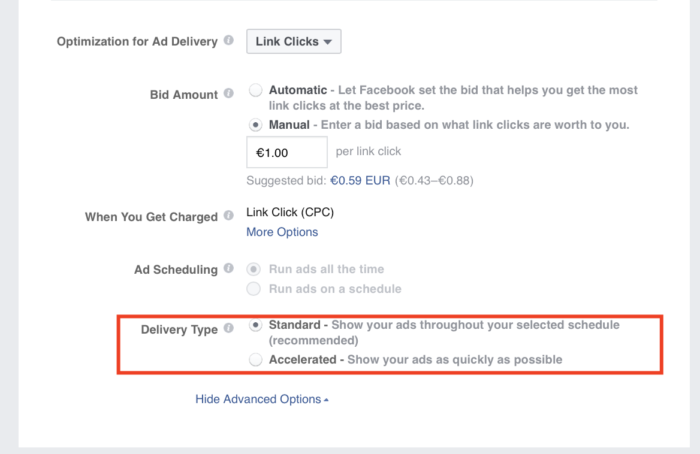
Your two main bidding options are manual and automatic.

Manual means you can control the limits for how much you spend. But automatic is good when you have no prior experience of what an ‘acceptable’ limit should be.
The other important point here is that your Cost Per Click isn’t the primary metric you should be watching. Instead, the Cost Per Action (or Lead or Acquisition) is when you’re driving product or service sales. So by selecting Automatic bidding, it will help adjust things for you to maximize what matters: sales.
You can also use Delivery Schedules to adjust how much you’re spending by day of the week (or even time of the day). For example, it makes no sense to show ads on weeknights or over the weekend if your office is only open from 9-5 to take phone calls and respond to new leads.
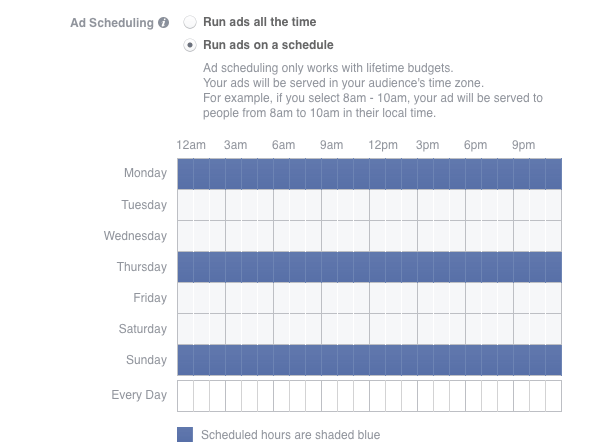
After running campaigns for a few weeks, you might also notice that certain days or times generate the best results for the least amount of money. So you can use this option to control how and when your ads are shown throughout the course of the week.
Last but not least, Delivery Type dictates how frequently you want ads shown. For example, you can have them shown as quickly as possible (exhausting your daily budget the soonest). Or you can spread them out evenly throughout the day.
Not too complicated once you break it all down.
It’ll make more sense when you actually start creating your first campaign. So let’s stop wasting time and get into it.
All new ad campaigns require a fan or brand page to go with it. If you don’t have one of those yet, go on to the next step to see how you can set one up within a few minutes.
Already got that part covered? Go ahead and skip over to Step #3 to see how to create your first campaign.
Step 2: Create a fan page
If you don’t already have a fan page, you must create one. Facebook ads can only be attached to businesses, never individuals.
Go to the create page site and pick an option.
(Facebook is one of the best places for personal branding)
For example, if you want to create a personal brand page, like my facebook page, you would choose “Artist, Band or Public Figure.”
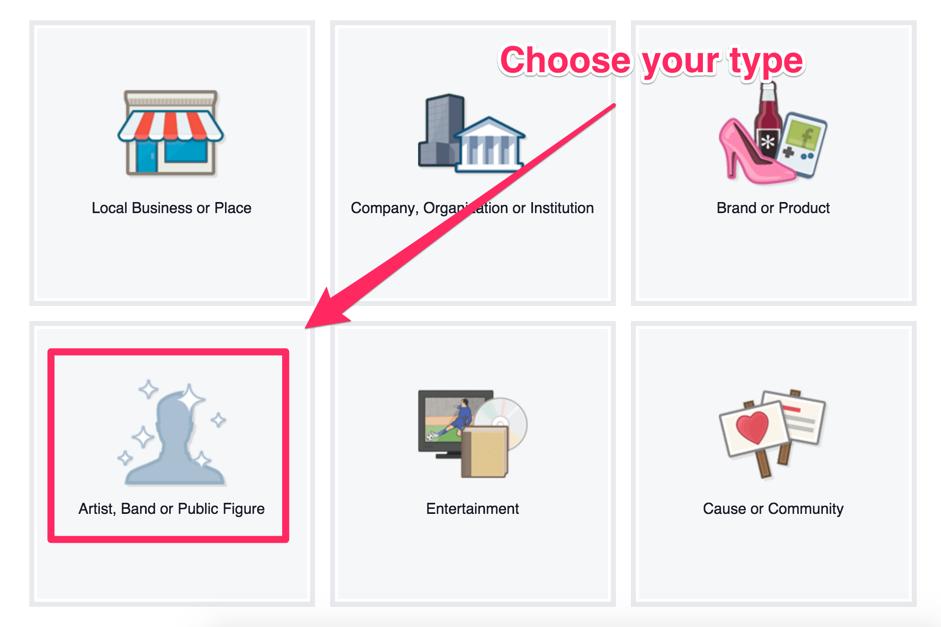
Then, you need to pick the category…
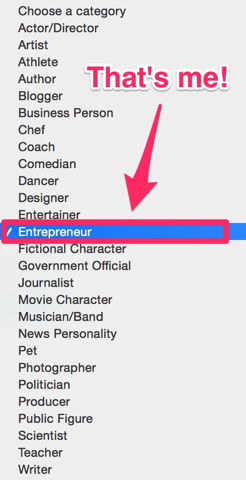
…and pick a name.
Next, you have to enter some info about your page, a website and what you want the page name to be, inside Facebook.

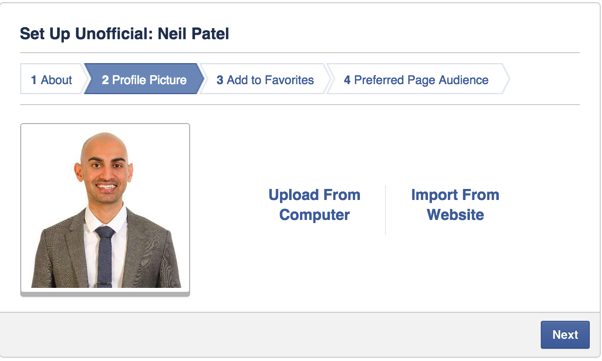
Then, it’s time to set a profile picture. Smile!
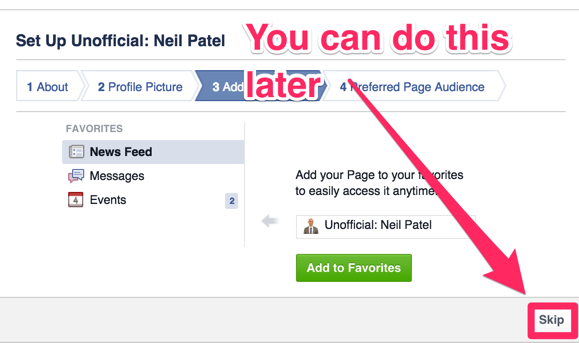
Skip adding it to your favorites (or do if you feel like it).
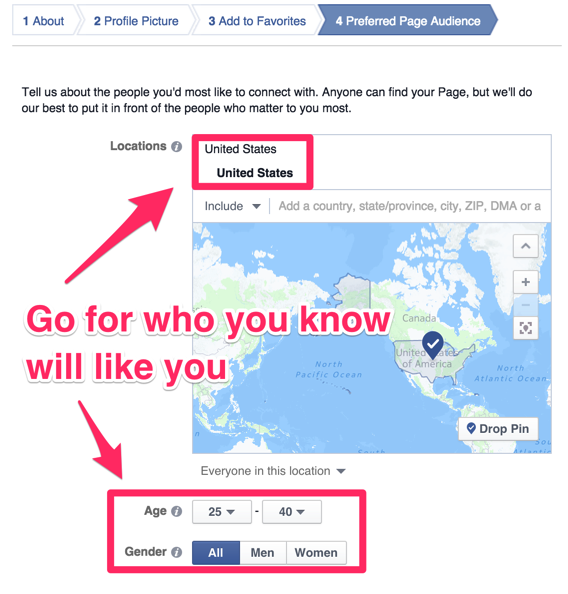
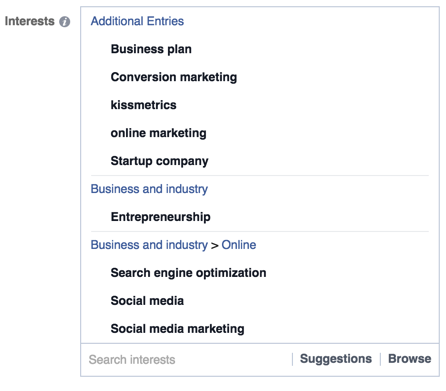
After that, you can describe your ideal target audience a bit, so Facebook has an idea of who to suggest your page to.
Set a country, or even specific states and cities, as well as the right age and gender categories.
Under interests, select a few likes that they share with you or your brand. These can also be other influencers in your industry or products or companies.
Once you’ve saved, you’ll be redirected to your page. Congrats!
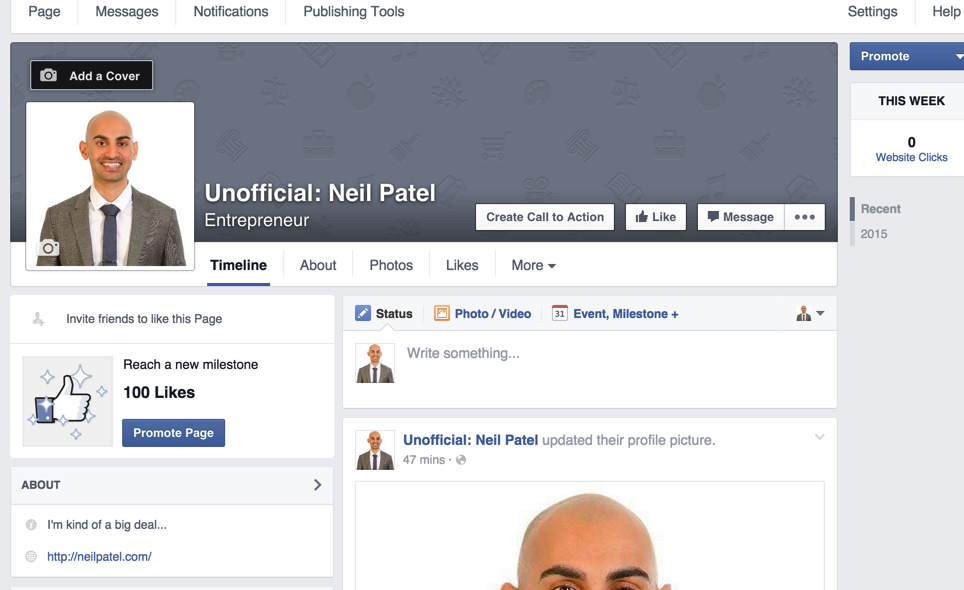
But, before starting to create ads, you should do at least two things. Add a cover and create a call-to-action.
You can set a cover by clicking on the button in the top left corner.
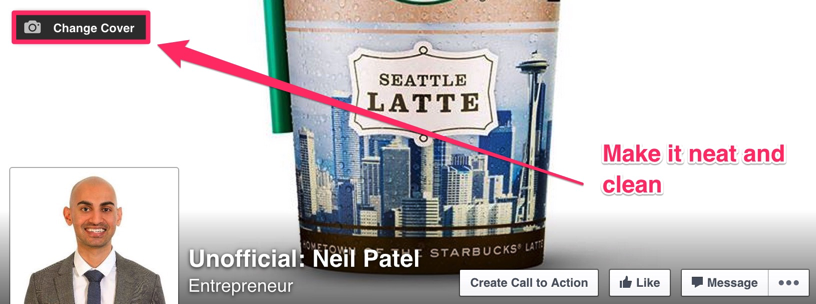
Your cover should be simple, uplifting and ideally, if you have a company tied to your name, just show its logo.
Don’t overthink this.
You can use this cover creator to craft one in 2 minutes.
If you want to get it right (and you should, the cover takes up 25% of the entire page!), take a look at Hubspot’s cover photo do’s and don’ts first.
Second, the call-to-action.
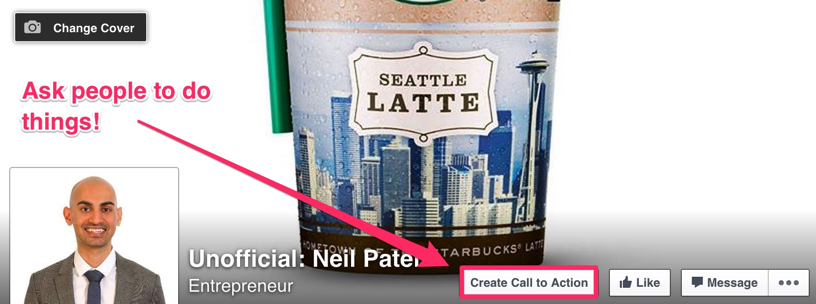
Facebook gives you a pre-selected range of options here, depending on your goal, similar to what’s possible within ad sets.
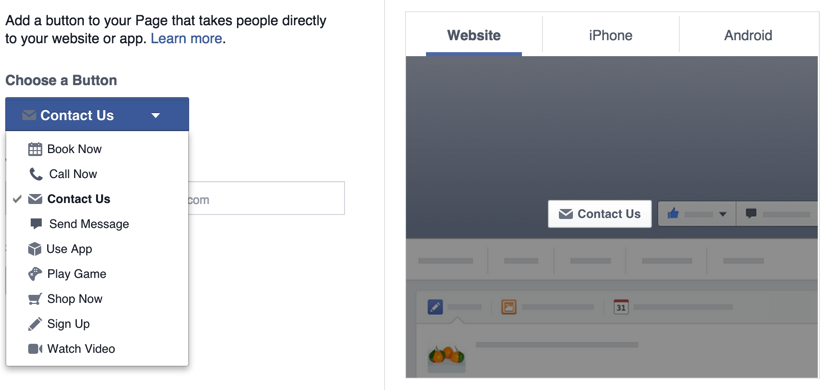
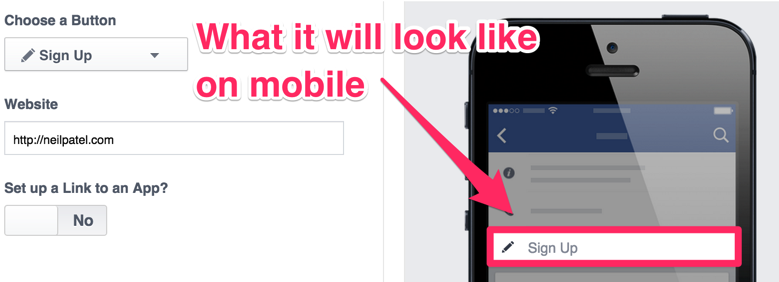
In my case, ‘Sign up’ makes the most sense, since I want people to sign up to my email list on my homepage, which is where I will send them when they click.
You can even preview what it will look like on mobile.
That’s it! You’re all set and ready to go and start running Facebook ads!
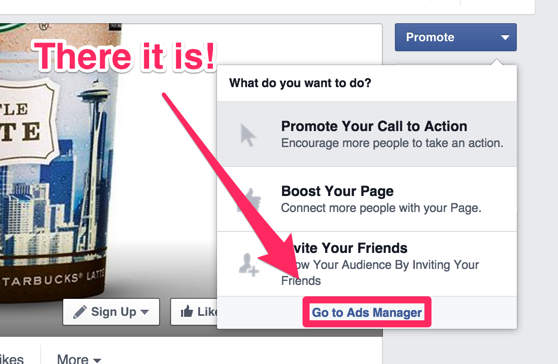
Step 3: Create your first campaign
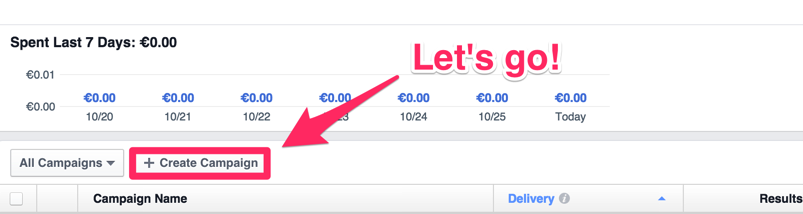
To get started, go to the top right of your fan page, click promote and then select ‘Go to Ads Manager.’
You will then be redirected to the dashboard that I showed you earlier, where you should click ‘Create Campaign.’
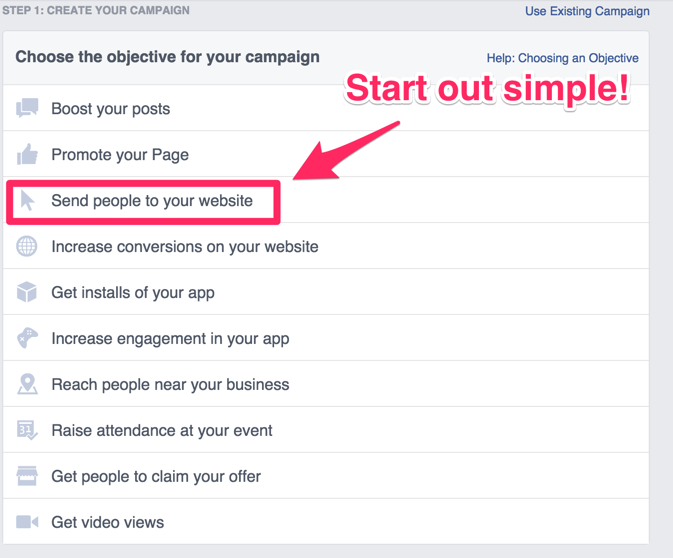
Then, you can choose your objective. As with our Google ads, we want to keep it as simple as possible, to just get started.
So, choose ‘Send people to your website.’
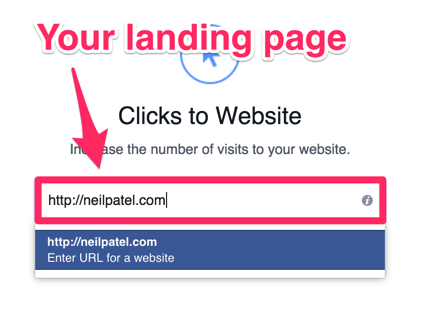
Now, enter the link to your website. If you’re promoting a product, this would be the sales page. If you’re promoting an event, make it the sign up page.
In my case, I’ll send traffic straight to my homepage, since people have a chance to sign up to my email list there.
Note: This is just an example, I don’t encourage you to spend money on email addresses, especially if you don’t have a way of monetizing them yet. Remember, profit is the only thing that counts!
That’s it. Creating a campaign is as simple as that, because it’s just the top part of the structure.
Step 4: Create your ad set
You’ll then be taken to the ad set creation section, where you first must decide on your target audience.
Starting with the size.
This part’s kinda tricky depending on how big or small you are. For example, 10,000 might be an OK audience size if you have a tiny budget and are just dipping your toe into Facebook ad waters.
But if you’ve got a healthy budget, you can go up to between 500,000 and a million. (You’ll need enough people to allow Facebook’s technology to help optimize your campaigns as we discussed back in Step #1.)
You can even go up to two million people for a new audience if you’re savvy and have the bucks to spend.
But 186,000,000 like the example below? Never.
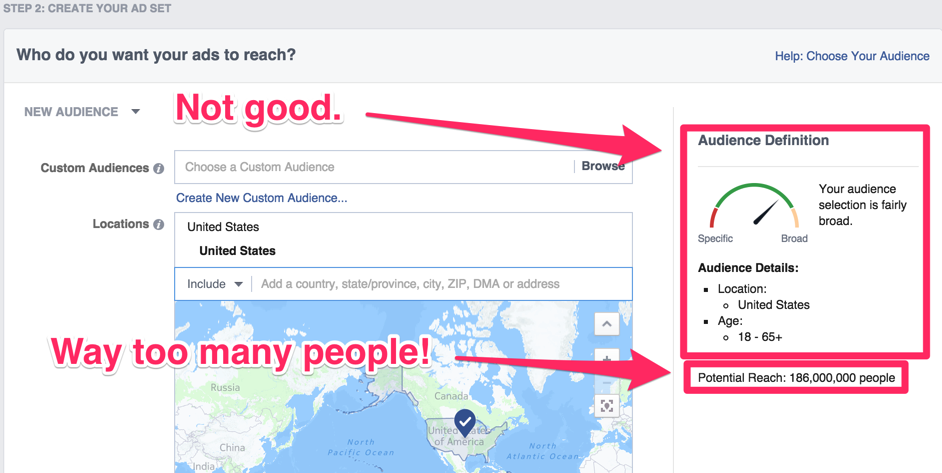
That’s way too big.
Starting a campaign now with an audience like that and you’ll completely squander your budget on people who have zero interest in what you’re talking about.
So start small. You can always expand later.
Let’s start by using different demographic information in order to continually refine your audience.
For example, pick a few specific cities in the countries that you want to target (even better to focus on one country) and narrow down the age span to about 10 years.
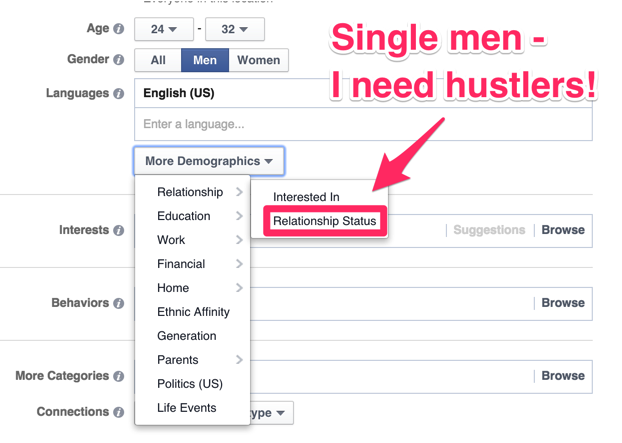
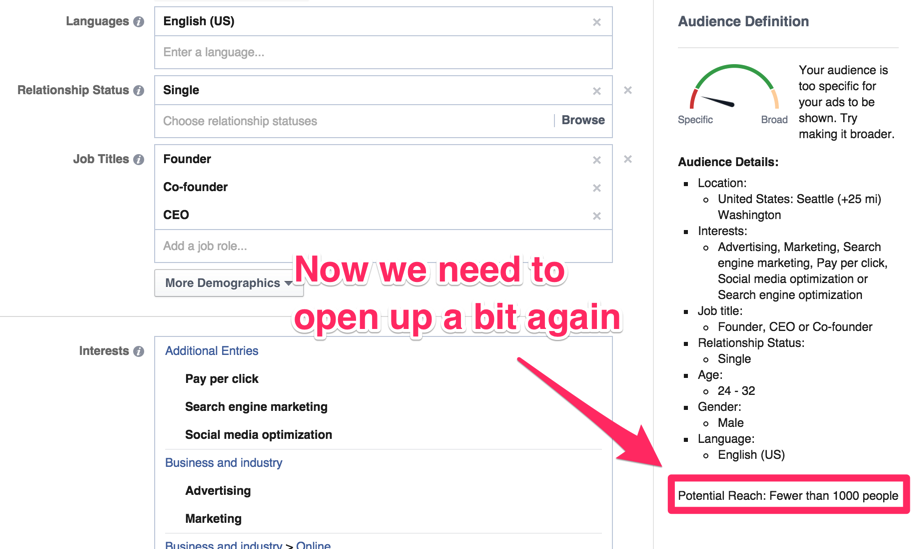
If I want to get young entrepreneurs to sign up to my email list, I can narrow down the age group to 24-32, then select that I want only men in Seattle and specify even further.
If I find a statistic that shows that most entrepreneurs in that age category are single, then I can set that as criteria for my targeting, too.
After selecting a few interests and behaviors, my audience immediately shrinks down to less than 1,000. That’s too little, but you can easily open it up again, by adding a few more locations.
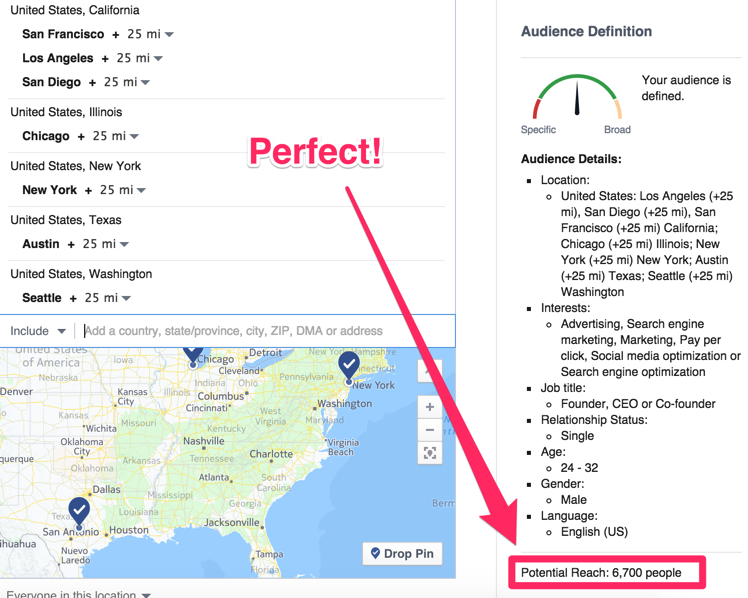
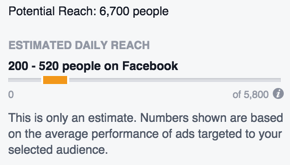
I just added a few more big cities, especially ones with high concentrations of tech entrepreneurs, like San Francisco, New York and Austin.
Voila, my audience jumps to 6,700 people. Perfect.
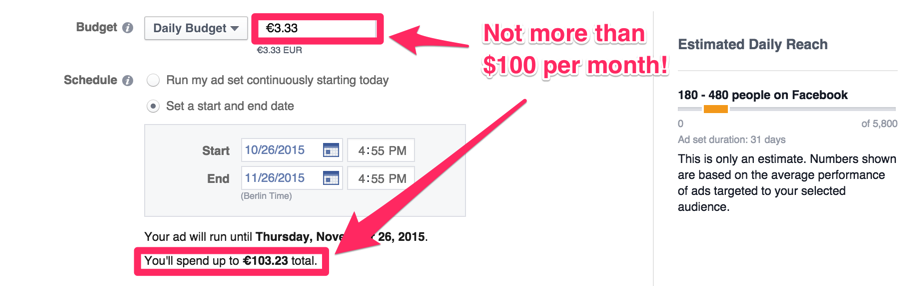
Next up, you need to set a budget.
You want to start small, remember? This is just an experiment.
So, set your daily budget to $3.33 and fix the end date for the ad campaign to be a month from today. That way, you won’t spend more than $100 to start.
That way, you won’t spend more than $100.
Otherwise, Facebook will happily show your ad to as many people in your audience as possible, instead of trying to get them to actually click (by maybe showing them the same ad more than once).
Under ‘Optimize For,’ set it to ‘Link Clicks to Website.’ You don’t want to pay for impressions, you want to pay for actual clicks.
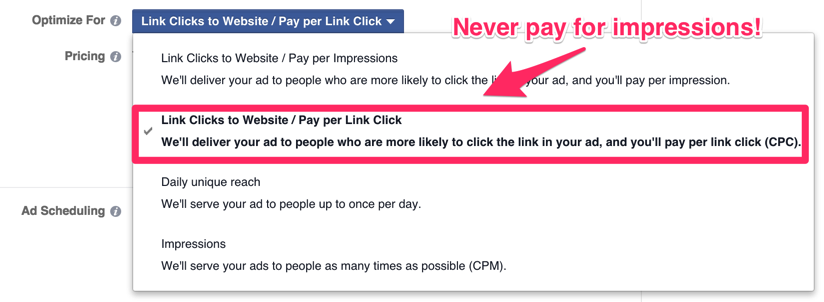
Otherwise, Facebook will happily show your ad to as many people in your audience as possible, instead of trying to get them to actually click (by maybe showing them the same ad more than once).
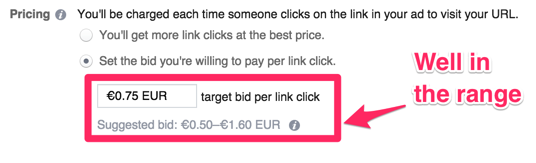
Under ‘Pricing,’ change the bid to manual and make it $0.75. This should also be in the range that Facebook suggests, but on the lower end.
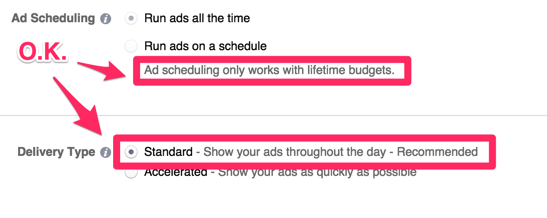
For ‘Ad Scheduling,’ you have to leave it set to running ads all of the time, since your campaign has a fixed start and end date. You could change this by setting it to ongoing and then just turning the ads off manually at the end date.
You can also just select Standard for ‘Delivery Type’ right now, too. That way your ads will be shown evenly, and you have enough time to make adjustments along the way.
Alright, time for the good stuff!
Step 5: Create your first ad
Now, you get to choose the layout of your ad and what content to put in it.
If you choose multiple images in one ad, you will get a carousel that looks like this example:
The images will slide through the ad, giving you more space to advertise. You can also use video in your ads.
Do we want that?
No!
Again: Keep it simple!
Videos, carousels, and all of these other ad types have their place. For example, carousel ads might be great for showcasing various blog posts so that hopefully one will appeal to almost everyone you’re targeting.
But simplicity is key when you’re first starting out. You don’t want to get too fancy, too early, and bogged down in all of the details.
Only when you’ve been doing this awhile, with a few profitable campaigns up-and-running, should you come back to these other ad types.
So let’s start with a single image ad first.
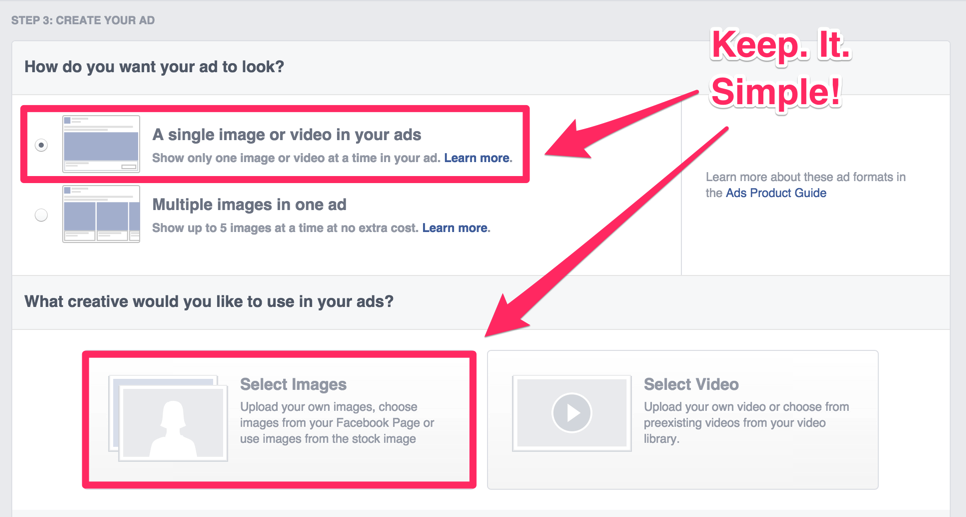
Stay with a single image and then choose ‘Select Images.’
You can then choose to upload your own picture or browse free stock images. Always use your own pictures.
But, take a look at the right sidebar. Facebook has some guidelines as to the types of images that you can use and those that you can’t.
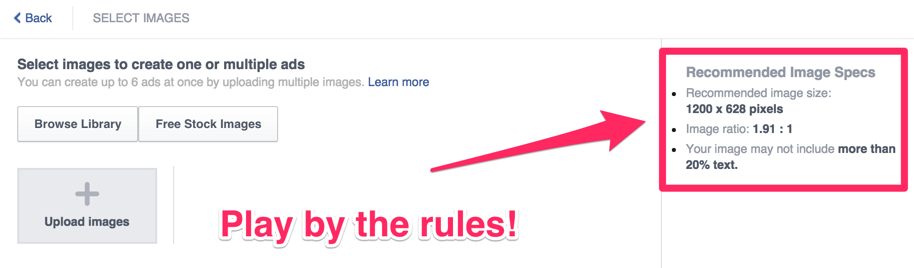
One quick thing to note, here.
Facebook used to have a ‘20%’ rule. Basically, their system wouldn’t allow any ad that had over 20% covered with text.
In the past year or so, they’ve started relaxing that requirement a little bit. (So you may not get automatically disapproved like before.)
But you should still abide by that rule. Generally speaking, the less text, the better on Facebook ads.
Instead, use wordless images that show examples of what people are going to get. Or ones that convey some emotion that you want people to have (for example, scared, triumphant, etc.)
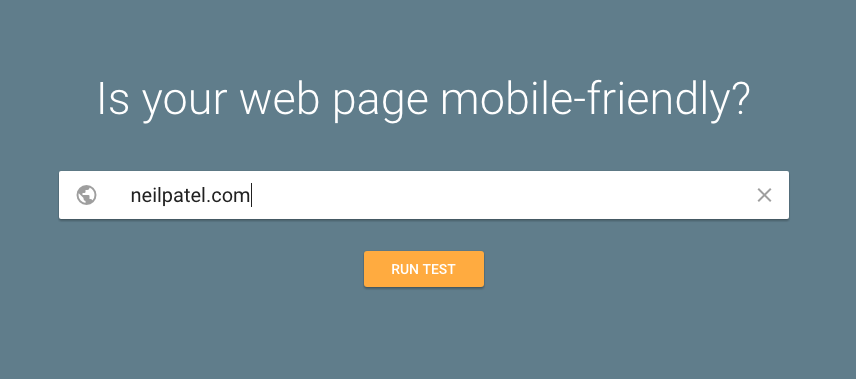
It’s hard to guess how much 20% is, too. So, fortunately, there’s a free tool that you can use to find that out.
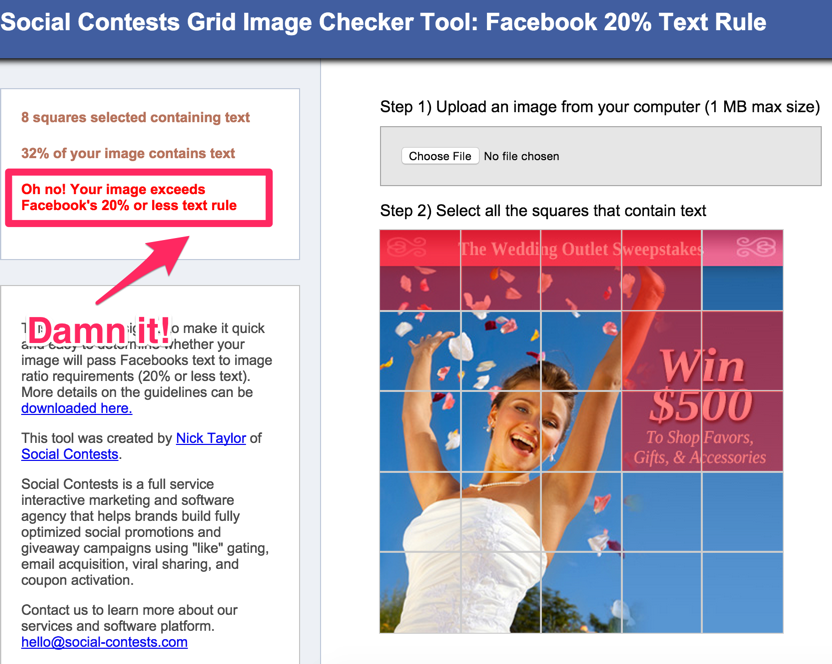
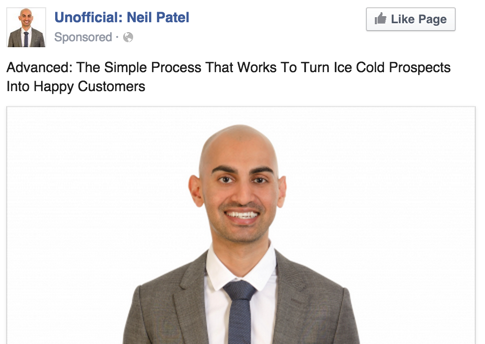
Play around until it fits. Or, if you want to skip the hassle of this altogether, just go with a nice head shot of yourself.
It’s always worth a try, especially if you appear trustworthy in your picture. It’s even more important if you’re building a personal brand.
Once you’ve cropped the image and formatted it correctly, you’ll see a simple preview of your ad.
Now you need to write the copy for your ad and choose your CTA button. Your Facebook fan page will be automatically connected (unless you have multiple ones).
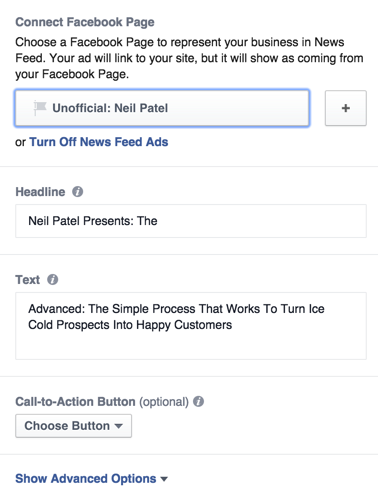
Headline: This is easy. Make sure that your headline grabs your reader’s attention.
How do you do that?
The trick is to tap into the underlying primal motivations that move people. Physically, emotionally, and literally. The ones that get people to sit up and take notice. To stop what they’re doing and pay attention.
You already know most of these feelings by name:
- Lust
- Greed
- Joy
- Fear
- Sorrow
- Guilt
These are the waves of emotion we go through constantly. And the best headlines zero-in on them.
For example, finding good backlinks for SEO is tough. But it’s not just the difficulty. The worst part is how time-consuming it can be.
What if I said you could get 50 backlinks in only 20 minutes? Now I’ve got your attention, right?!
It’s a shortcut. I’m taking something you struggle with. Something that’s difficult and complex. And giving you immediate gratification instead.

Now, how about blog posts. Creating good ones isn’t easy. Especially when some marketers spend anywhere from 4-8 hours creating a single post.
But what if I told you there was an easier way?
Not only could you speed up the time it takes to create a blog post, but it would be an awesome one. A Blockbuster.

Last but not least, you can also go negative.
For example, wasting money is bad, right?

Most of the time, yes. This example is perfect because it starts off by being negative. Outbrain found that negative headlines outperform positive ones by 69%!
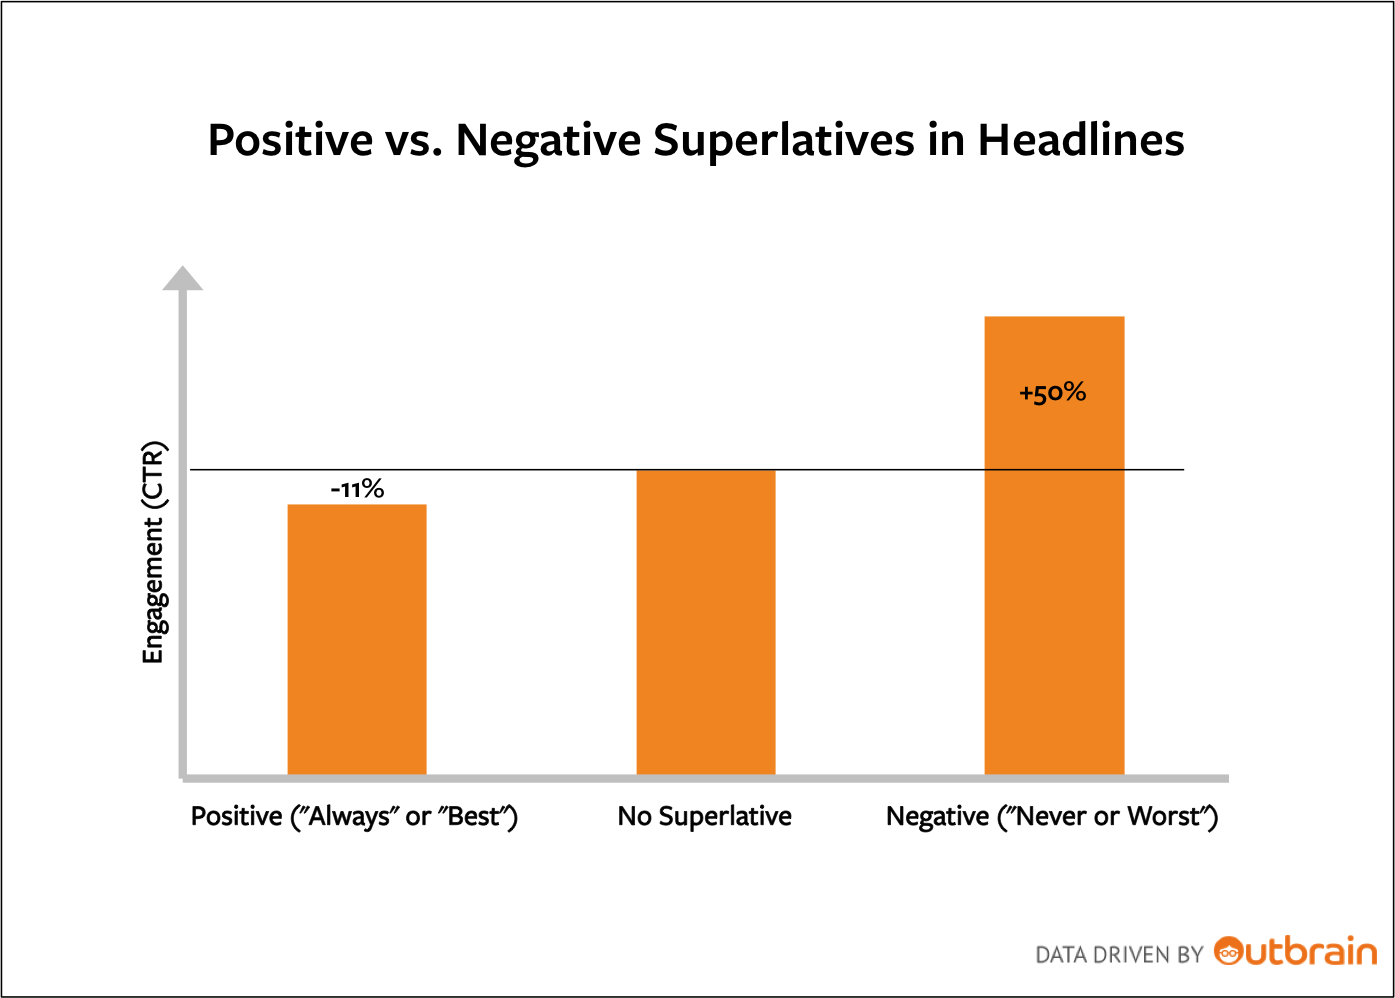
This example is perfect because it’s also an unexpected surprise. It’s implying that I’m wasting money (even though, when you read the rest of the article, you realize I’m not actually wasting but investing).
This is a pattern interruption. You expect it to be one thing when it’s another entirely.
So as you’re scanning different headlines, determining which one to read first, this one jumps out at you because it literally ‘breaks the pattern’ of what you’re expecting to see.
After the headline is the ad text: And fortunately, this part is fairly easy too. Try to get 2 things into this. A call-to-action and some social proof. Claire Pells has some awesome advice on what makes great ad copy.
News Feed Link Description (under ‘Show Advanced Options’): Provide a clear call-to-action for your readers that will be to their benefit.
CTA button: There are many different types of CTAs you can add to each ad. For example, Download vs. Book Now. But interestingly, one study by AdRoll says you should always choose “Learn more.” It’s been proven to convert the best.
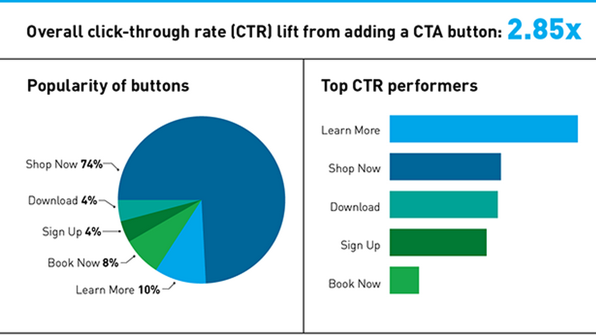
(Study done by Adroll)
And when it doubt? Give your prospects something for free. This could be a giveaway, as in Marina’s example, or an ebook or, as in my case, a free webinar that I’m running right now.
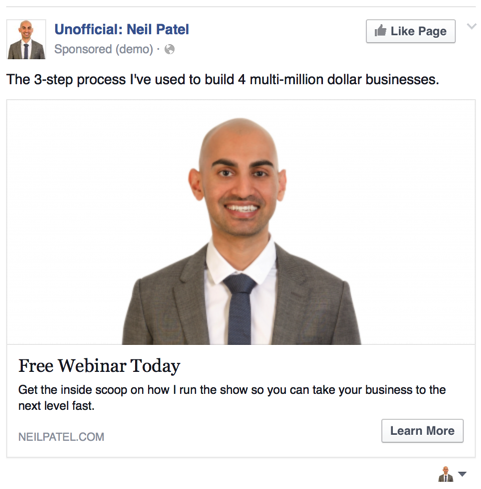
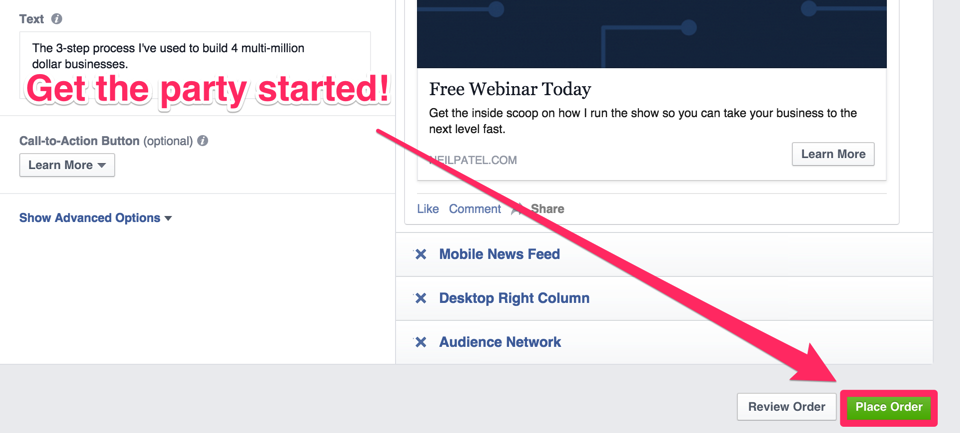
Here are the headline and copy I chose for my ad (just whipped this up in 2 minutes).
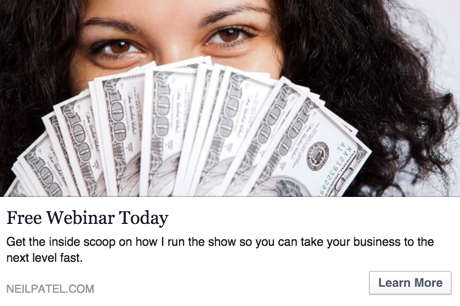
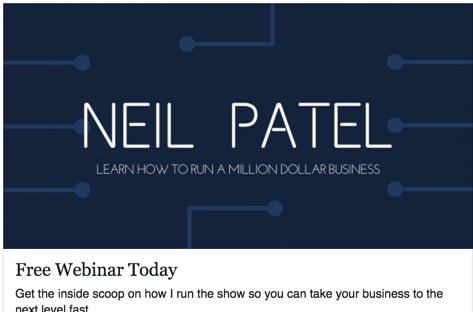
Headline: Free Webinar Today
Text: The 3-step process I’ve used to build 4 multi-million dollar businesses.
News Feed Link Description: Get the inside scoop on how I run the show, so you can take your business to the next level fast.
This is what the preview of the ad looks like:
When you’re done, hit place order (don’t worry, nothing will happen, just yet).
Your ad is now in approval mode. You will get a Facebook notification, once it’s approved.

You’ll then be redirected to your dashboard. While you’re waiting for your ad to be approved, you should do a few more things.
First, turn off your ad set, again.
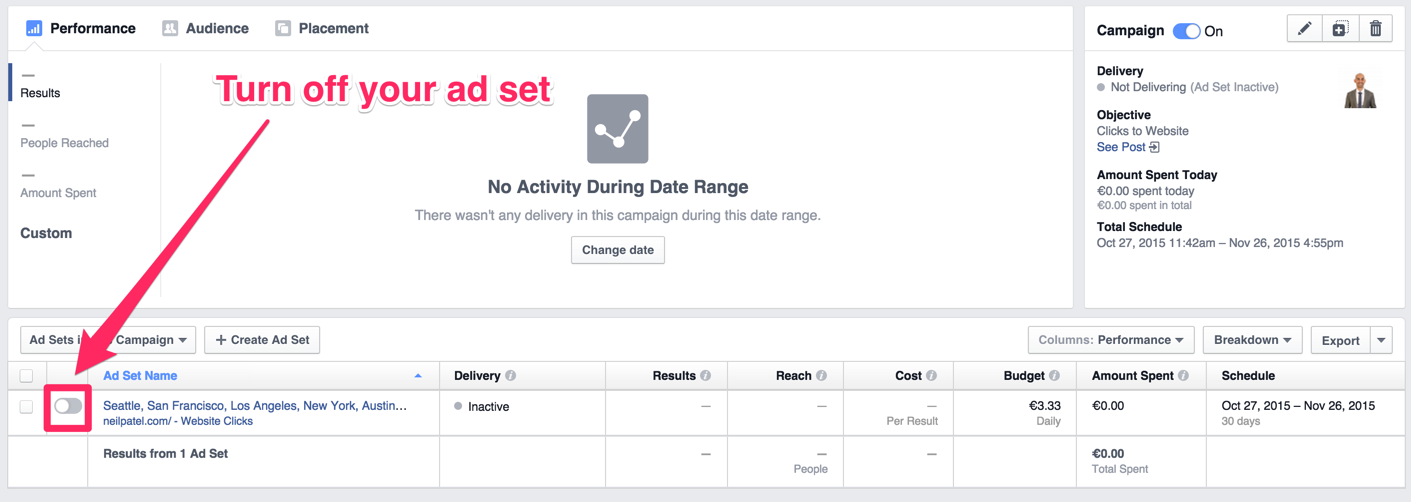
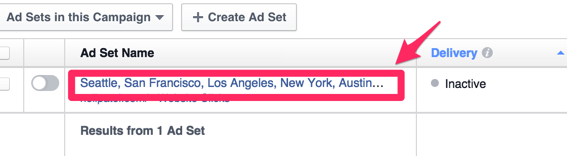
Then, go to ‘Edit Ad Set,’ (the button will show up right next to your ad set name).
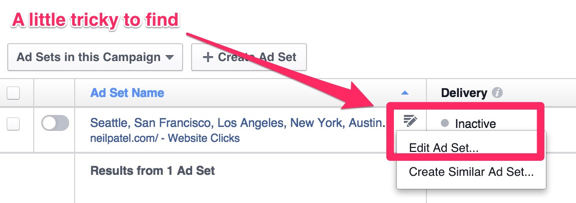
A tab will slide in from the right side, which, as a side note, shows you how many people your campaign will likely reach each day.
(this gives you a good idea of what to expect)
Scroll all the way down and uncheck everything, except ‘Desktop News Feed.’
This section determines your ad placements. For example, there are a handful of places your Facebook ad can show up (in addition to Instagram or their Audience Network).
The desktop news feed puts your ad right in the ‘stream’ that people see first when logging in. This one’s great for getting people’s attention. (And driving conversions.) But it can also be expensive because you’re bidding against the most competition here, too.
Then there’s the mobile variation of this news feed placement. Conversions might not be as good, but it might be a little cheaper to reach new audiences (because there’s less competition).
And then there’s the right-hand column on desktop devices, too. Many people dismiss this placement because it’s smaller and out-of-the-way. But if you know what you’re doing, it can be a perfect retargeting ad for people who already recognize your brand. (Don’t worry, we’ll get into this a little later.)

Once you start having some success, you can experiment with different campaigns on each placement. For example, sometimes you can get better costs (read: cheaper views) on mobile devices. But then you’ll want to reserve desktop ones to maximize conversions.
But for now, let’s continue to keep it simple. Let’s just select one placement to begin with (the Desktop News Feed).
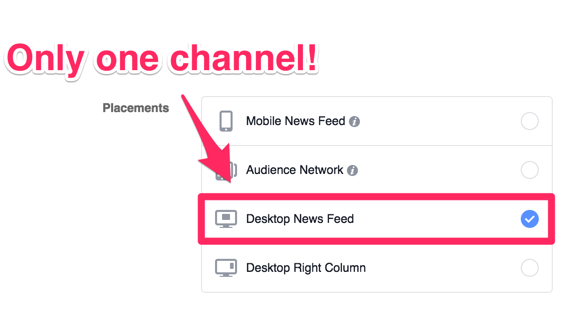
The reason is that we only want one ad in one channel, because otherwise, you won’t be able to analyze the results.
Running one ad simultaneously on mobile, desktop and in the right sidebar will give you data for all three combined, making it impossible to know which ad worked and which didn’t.
But, having just one ad on one channel also won’t give you much to analyze – the success of an ad can only be determined by comparing it to another ad.
That’s why you need to split test.
Step 6: Create 2 more ads for A/B testing
I want to let you in on a little secret. Here is the truth…
I have no idea what ad will perform best at this point.
Nobody does! It’s impossible. Which means the only way to still create a profitable ad campaign is to test a few different options and see which one works.
So now let’s take the same ad we just created, but give it a few minor tweaks in order to run a split test. The ads will mostly be the same, so there’s not even a ton of work involved. You can get a split test up-and-running within minutes after reading this next part.
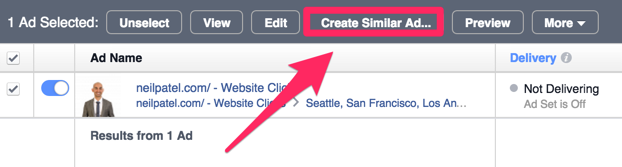
Go to your campaign and click on the name of the ad set.
You’ll then be taken inside of the ad set, where your first ad lives.
Check the box in front of your ad and click on ‘Create Similar Ad.’
You’ll be taken to a new ad screen.
Facebook already hints that we should tweak something. However, don’t change up too much…
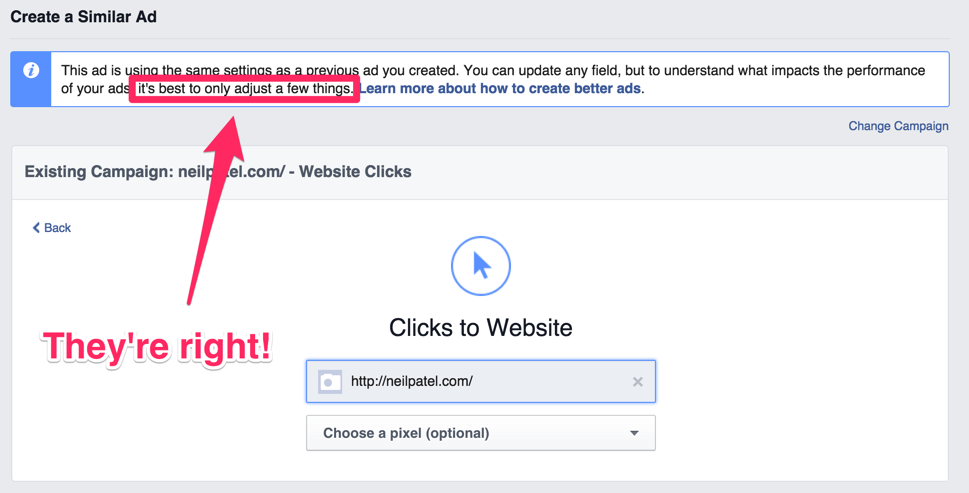
I have to correct them. You should actually just change 1 thing.
The only way for you to determine what works and what doesn’t, is by changing one single element, from ad to ad.
Why?
Imagine that you change both the copy and the image for the second ad. Then, you change these two things again and create a third ad.
How will you know what made ad B better than ad A and, eventually, ad C better than B?
Was it the new image? The updated headline? The CTA, maybe?
The only way to get absolute certainty of where your results come from is by changing one thing at a time.
Since images get 53% more likes, double the comments and 84% more click-throughs, we’ll start with only changing those.
They are also generally the biggest success factor for your ad. Always focus on the big wins first.
Just scroll down and upload a new image.
Besides my own, beautiful face, what else can I use?
According to Facebook image best practices, happy people have a good click-through rate.
Since I talk about making money on the webinar, maybe money + happy people = win?
How can we find out? Test it!
I’m showing my ad only to guys, so I’m definitely going to include a woman in the image, since we all know that they get more clicks than men.
I’ll just use this picture from Flickr.
The new ad will look like this:
While we’re at it, let’s create a third ad. Three is a good number to start testing with.
We’ll keep this one simple, with just an encouraging CTA in a simple design.
Canva.com makes this happen in a matter of seconds. They even have templates for Facebook ads, ready to use.
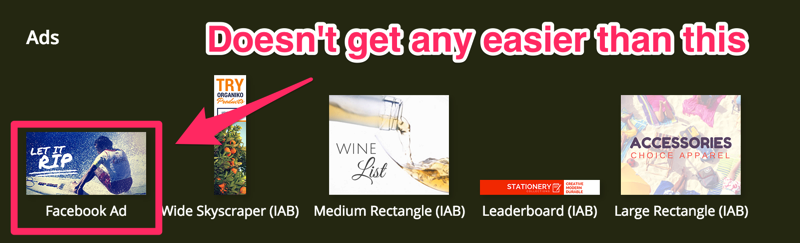
Using those, I whipped this up in less than 2 minutes:
Neat, huh?
Alright, time to get the party started. Hit ‘Place Order.’
There’s another reason you want to constantly run split tests like this.
Facebook ads will suffer from ad fatigue at some point. That means the performance of your ad will start to decline after a few days or weeks.
At first, you’ll be startled.
You won’t know what’s happening. Or why this ‘winning’ ad is collapsing all of a sudden.
Constantly split testing ads like this, though, will help you avoid that fate. It’ll keep things ‘fresh’ so that audiences won’t get sick of seeing the same ad every single time they login to Facebook.
The best part, like we just discussed, is that you don’t need to make big changes to avoid ad fatigue, either. Just little tweaks here and there.
So you might be able to take the same exact ad, but simply change the background color. Or flip the layout. Test a new headline.
The point isn’t to completely ditch what works. Finding a successful ad is tough. So you gotta stick with it and just test little variations to make sure performance won’t drop off a cliff.
Fire up a few variations to test.
Step 7: Wait for 24 hours
After the new ads pass the review, turn on your ad set and let it run for a day to get some results.
Play a little Candy Crush – just kidding, work on something else!
You need to give your ad campaigns enough time to get some meaningful results.
As discussed, Facebook’s platform needs a little time to help you optimize (or self-correct). So that means your performance can actually start to improve after a few days.
A huge mistake many new advertisers make is pulling the plug too early.
Results don’t look promising after only a few hours or a day. People will get nervous because it looks like an ad isn’t taking off. So they kill the campaign before it’s had a chance to start working properly.
For example, Digital Marketer ran the same ad to the same audience, but switched up the ‘objective’ (that Facebook was optimizing for).
After a few days, the first campaign generated 59 leads at $7.81 cost each. Not bad!
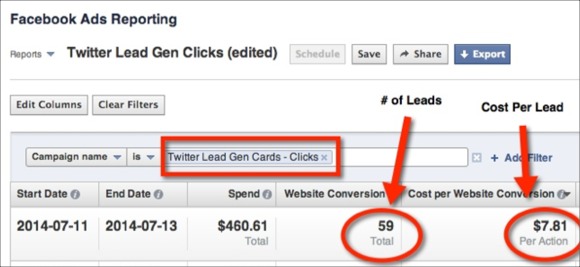
But the second one actually generated 332 leads for only $1.38 each!
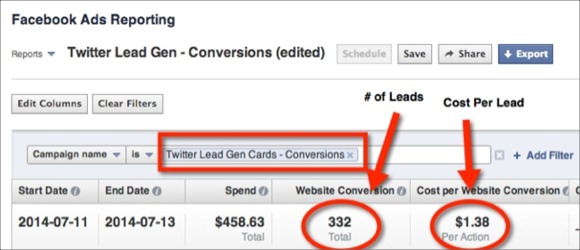
Just by picking a better campaign objective and allowing it to do its thing, they generated five times as many leads.
So give it a little time to run. Then come back in about a day or so to decide which one is outperforming the others.
Step 8: Kill the ads that don’t work
Once you have some data on which ad works the best, turn off the other two. Run with the best performing ad until it stops working.
This might be a week, although it’s usually more in the range of 4 to 5 days.
Then, you’ll have to change the image and copy, because everyone relevant will have seen your ad already.
It also depends on how big your audience is.
If your ad is served to 500 people per day, you’ll go through most people from a 3,000 people audience within 5 days.
Step 9 [Optional]: Increase your budget
Before you dump more money into the ads, make sure that you’re converting on the back end!
If your ads drive sales directly, that’s perfect. But, if you’re collecting emails or app download, make sure that the math holds up and that people end up actually paying you.
Otherwise, this step could lead to a big hole in your wallet, really fast.
However, if you’re positive that your ads are providing a positive ROI, you can start increasing your budget, slowly and creating more ads and reaching the news feed of more Facebook users.
For example, let’s say you’re able to generate a new customer who pays you $100 for only $10. That’s great!
It’s so great, in fact, that you can probably even afford to spend a little more to make sure that you’re getting each and every customer you deserve.
So why not increase your bids a little bit?!
You can simply go into your campaign and increase the cost you’re willing to pay per click, and then the daily or lifetime budgets.
Or, if you’re feeling advanced already, you can try automating this process with one of Facebook’s built-in Optimization Rules.
Admittedly, these are kind of advanced. But once you see how they work, you’ll see that you can easily re-create them on your own.
For example, if your costs are low and you can afford more (in order to get more total customers), you can set up a rule that says to increase bids a little bit (as a percentage) automatically.
That way you can set-and-forget it. Facebook will take care of the rest.
Don’t worry, though. You can also set-up another one of these to decrease bids if they get too high. For example, let’s say that Cost Per Click starts creeping up to $0.50 and that would threaten your profitability.
No worries. Just create another one of these that says to decrease bid by a certain percentage when your CPC starts reaching those heights.
You can even pause campaigns entirely, too, if things start to go awry. So if you start getting nervous when the CPC hits $0.50, just tell it to pause the campaign. That way, you can go into manually check it out before deciding whether to keep going or pull back.
These little tricks might take a few minutes to set up. But they’ll end up saving you TONS of time on a daily basis. So they’re worth checking out.
Now that we’re getting into more advanced techniques, I think you might be ready for another new one…
The highest performing Facebook campaigns usually have one thing in common: custom audiences.
Here’s what those are, and how to start using them.
Step 10 [Advanced]: Expand your reach with custom & lookalike audiences
So far we’ve mostly focused on creating a single campaign for a new audience.
Remember all that ‘custom audience’ stuff we touched on at the beginning? I’ve written this article about tools to enhance your Facebook ads success and this one about more advanced Facebook ad management.
But we can also go into a little detail here so you know what’s coming up next when you get one successful ad campaign off the ground.
Custom and lookalike audiences are a great way to increase the detail of your ad targeting (custom audience) and expand your target audience reach (lookalike audience) to maximize your ad campaign results.
Why go to all this trouble?
Two reasons.
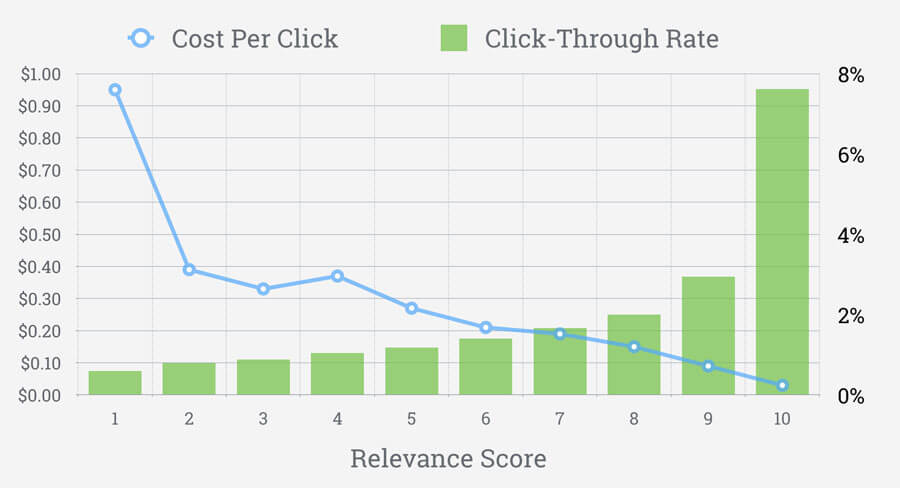
The first is that ad campaigns which target custom audiences get rewarded by Facebook’s own Relevance Score. This is a measurement they use to determine how well your ad is going to fit those people.
The higher the Relevance Score, the better click-through rates you can expect, and the lower cost per clicks, too.
AdEspresso found this out first-hand. They ran the same exact campaign and ad to two different audiences.
The first was ‘poorly’ targeted, while the other used a custom audience. And the results weren’t even close:
- ‘Poor’ Audience: 278 clicks at $0.142 CPC
- Custom Audience: 1,103 clicks at only a $0.03 CPC
At the very beginning, you won’t have access to creating a custom audience. You’ll have to use interest targeting, instead, to find new people. You plug in a few brand names or big blogs and it will target everyone else who follows those, too.
But once you start getting decent website traffic or Facebook engagement, you can switch over to fire up a new custom audience, instead.
Start by going back into the Facebook Ads Manager and looking for the Audiences section. (You should be able to find it under Assets toward the right-hand side).
Go ahead and click. Here you’ll see a few different custom audience options to get started with:
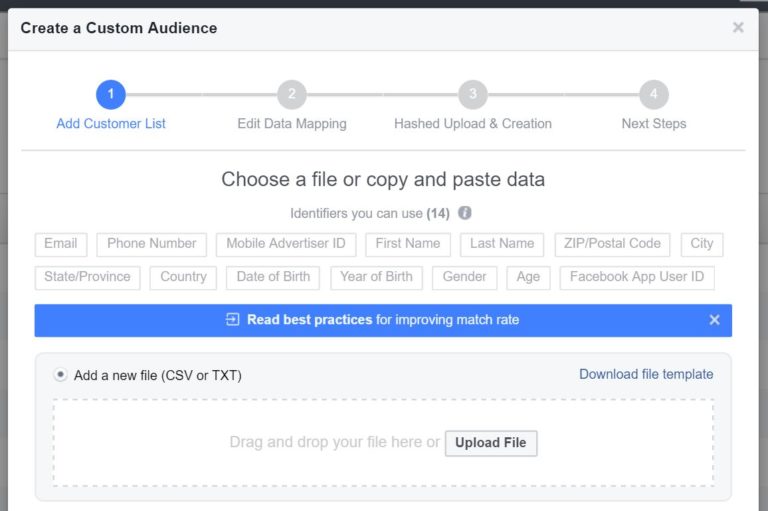
The Customer File allows you to upload a list of customer email addresses or phone numbers from your newsletter, for example, and Facebook will ‘match’ those records with user accounts. Depending on the industry you’re in, they might be anywhere from 50-80%.
This option is great for driving conversions because you should know about these people if you already have their phone number or email address.
If they’re on your newsletter, for example, you can segment the entire list into groups based on what kind of business they are, what problems they want to solve, or even what blog post topics they’re most interested in.
That way you can laser-target ads to them on Facebook that match these exact preferences.
The Website Traffic option will be one of the first you’ll use to capture everyone who now knows you by name.
Chances are, you promoted some content to them in order to get them to click. They browsed around your site and left before buying anything. But now you can use a custom audience to hopefully get them to come back one day.
You can even take this a step further by creating different custom audiences for different types of web traffic. For example, Facebook ad pro Jon Loomer uses different audiences based on the blog post topic that person was reading about.
So he has one for Facebook Ads and another for Entrepreneur (because those words show up in the URL).
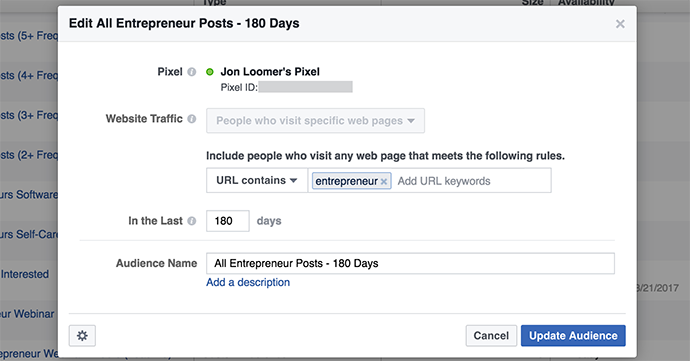
Now he easily knows what content to send each audience in order to get them to come back.
App Activity will act similar to your website traffic one. You’re picking up on a user’s behavior, but this time inside of your app (instead of on a website).
So many of the same tactics apply. You can watch logins, time spent in the app, and the actions they take (or don’t take) in order to personalize follow-up messages to them.
For example, you can create an event that looks for anyone who’s made an in-app purchase in the last 60-days. Now you know these are highly profitable, interested customers who might be ripe for a new upsell when it’s ready.
Those used to be your major options for years. But Facebook recently released the Facebook Engagement just in the last few months.
And it’s a game changer. Here’s why.
Let’s say you have a B2B website. Most don’t have a TON of traffic. And you typically don’t need a ton of leads or conversions, either, to hit your revenue goals.
So your odds at using one of the custom audiences mentioned earlier are slim-to-none. It just wasn’t practical, and you would have to spend a lot of money in order to have an audience big enough to be worthwhile.
The Facebook Engagement custom audience option changes that, though. You can easily build up engagement directly on your Facebook page, or by getting people to interact with your posts.
Your ‘engagement’ options include everything from:
- Page visits, to
- Liking, commenting, or sharing your page posts
- Clicking on your CTA buttons
- Sending a message to your page
- Saving any of the posts you make to your page
For example, one of the best ways to build an audience right now on Facebook is by putting up a video and driving video views. Facebook expert, Andrea Vahl, says you can build up audiences for literally pennies per view.

One final engagement criteria is for their Lead Ads.
Facebook Lead Ads are designed to help you generate opt-ins directly from Facebook, without the person ever having to leave the site. So instead of getting sent to a landing page, having to fill out a form, etc., they can just click a single button to submit their Facebook profile information.
But not everyone who opens one of these lead ads will convert. The conversion rate should be higher than you’d see from redirecting them to a landing page. Even better on mobile devices when you don’t make someone click through to fill out a ton of form fields on their tiny screens.
However, there will see be a certain number of people to drop off.
These new options now allow you to create a custom audience for all of those people who opened the lead ad in the first place, but didn’t end up converting.
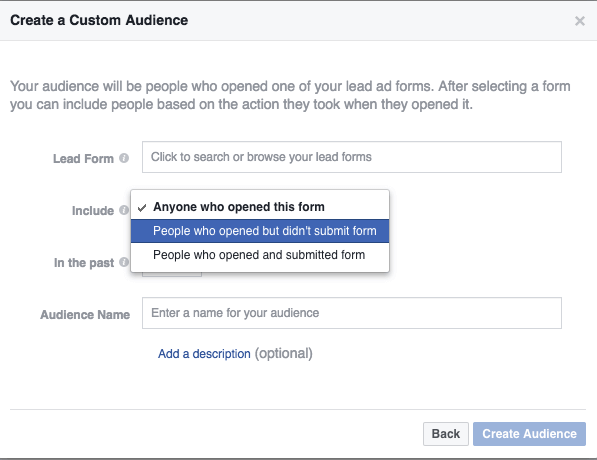
You know these people are potentially interested (because they clicked on the form to check out the offer). So now you can create follow-up messages to build on the intent they’ve shown.
Last but not least, Facebook’s Lookalike audiences can be used to expand your reach from an existing audience.
For example, let’s say one of your audiences (out of three or four) is converting significantly higher than the others. You can’t explain why, but you can’t argue with the results, either.
A lookalike audience will let you ‘clone’ that awesome audience so that Facebook will try to find more people just like them. You can select a country and percentage (like 1%, 5%, or 10%) to control how tightly defined you want that audience to be.
Conclusion
As you can see, Facebook ads aren’t rocket science.
This guide gives you everything that you need to get started today, in less than an hour.
You’ve seen the various uses and ways to make Facebook ads work.
You know all of the basic terms and how to set up your first campaign.
How will you use this new knowledge?
What will you advertise for?
Let me know the headline of your first ad and what you’re hoping to achieve with your first campaign.
Comments (360)