
Understanding basic HTML is absolutely necessary if you’re running a blog.
If you didn’t already know, HTML stands for Hypertext Markup Language. It’s a coding language that tells your web browser how to read a web page.
HTML tags are the containers for these different kinds of elements. They consist of angle brackets with the name or abbreviation for each code inside of them.
Tags usually open with <> and close with </>.
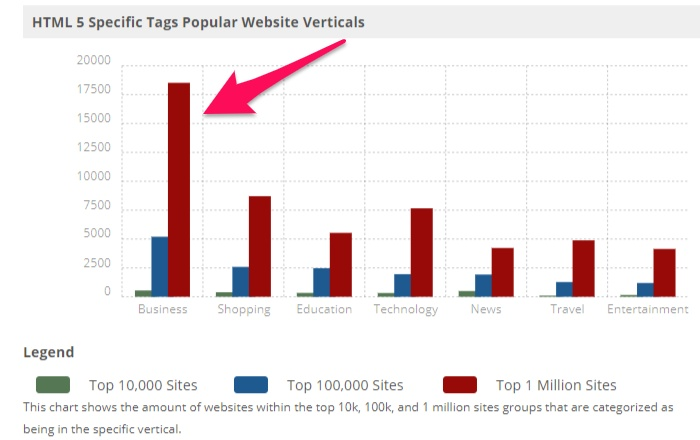
HTML5 is the fifth and current major version of the HTML markup language used across the World Wide Web.
The use of HTML5 is most common in the business industry, which is no surprise.
But HTML will come in handy for any serious blogger.
If you’re new to it, the entire code may look like a jumbled mess of letters, symbols, and misspelled words.
The good news is that you don’t have to be a genius or know advanced coding to add basic tags to your blog.
In fact, you can successfully use HTML tags without understanding large portions of the code.
But you will have to understand some terms and know how to use a few tags to increase the quality of your blog posts and your ability as a blogger.
In this article, I’ll tell you about nine HTML tags you should use on your next blog post.
But first, here’s why HTML tags are so important to include in your blog posts.
Why your blog needs HTML tags
Most top bloggers know how to write with HTML.
Why?
It allows them to do (pretty much) whatever they want to do with their content. These tags can give you the same freedom, too.
For example, if you want an image to stay in the center of your post, the right side, or the left side, HTML is the answer.
If you want to create lists quickly, add line breaks, or make block quotes on your own, HTML is exactly what you need.
If you switch the text editor in WordPress to HTML view rather than Visual, it will load much faster.

Just click the “HTML” or “Text” button to switch over. Here’s what the difference looks like:

It’s much faster to write in HTML because your hands don’t ever have to leave the keyboard. Plus, you’ll have total control over the structure and design of your content.
You can write HTML in any text editor, too. You won’t have to write exclusively in WordPress.
However, WordPress restricts some HTML, so keep that in mind as you become more skilled in coding.
WordPress restricts some HTML tags
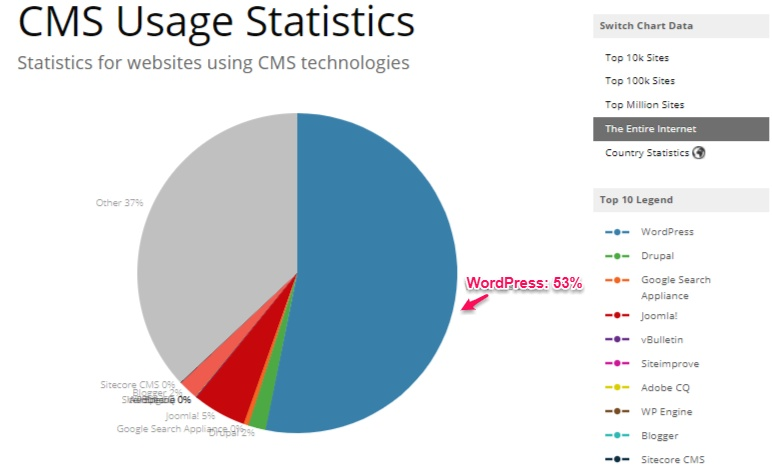
Out of all Content Management Systems (CMSs) on the Internet, WordPress is the most popular.
In fact, according to BuiltWith, 53% of all sites built with CMSs use WordPress.
When you enter the wrong code into the post content area in WordPress, WordPress will convert it to plain text with confusing characters, like this:
<bold>word in bold</bold>.
If you see these characters, it means WordPress has encountered an issue with the code you put in.
It’s also important to note that WordPress does not permit every HTML tag in a blog post. Codes like embed, frame, iframe, form, input, object, and textarea are not allowed.
But you can add buttons to the WordPress text editor using a plugin like AddQuicktag.
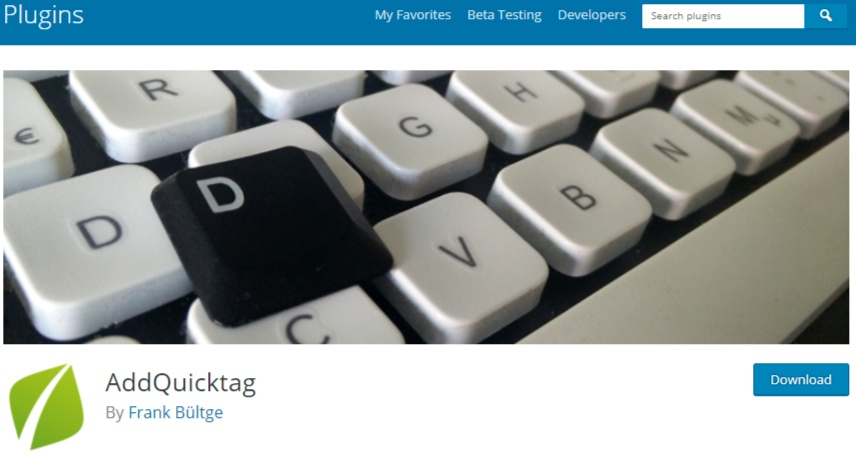
With this tool, you can customize your own tags like this:

Once you familiarize yourself with HTML tags a bit more, this plugin will be a game changer.
Now, let’s get into the essential HTML tags that you need to write blog posts, starting out with lists.
1. Creating lists
To create lists, you can use the following tags: <ul>, <ol> and <li>.
Here’s what an “unordered,” or bulleted list, will look like in HTML format:
<ul><li>Green beans</li>
<li>Potatoes</li>
<li>Tomatoes</li>
<li>Chicken</li></ul>
This displays as:
- Green beans
- Potatoes
- Tomatoes
- Chicken
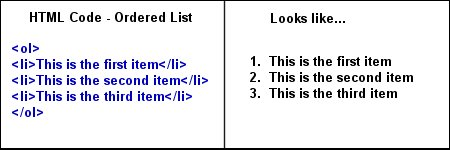
An ordered list looks a bit different. It will appear like this:
- Green beans
- Potatoes
- Tomatoes
- Chicken
To use numbers rather than bullet points, switch out the <ul> and </ul> for <ol> and </ol>. The result is a numbered list that looks like this:
It’s pretty easy to make a mistake when entering in codes if you aren’t careful. Be sure to close one tag before opening another.
You can also create nested lists within other parent list items.
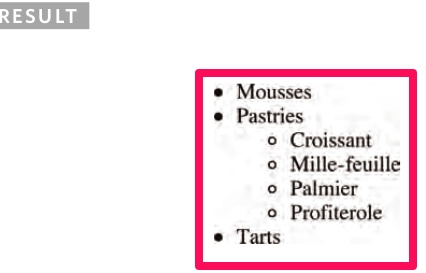
This is especially useful when you need to list more than one category of items or topics at once.
Images are a vital part of any blog. But do you know how to use image tags to customize images?
2. Image tags
Images make your blog visually appealing.
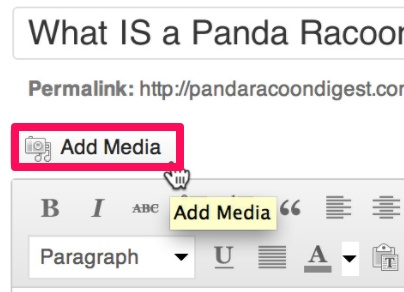
Image tag codes aren’t handwritten very often, but they’re useful for customizing the size of images you add to your blogs.
Most people use the “Add Media” button if they’re using WordPress instead of writing out the image code.
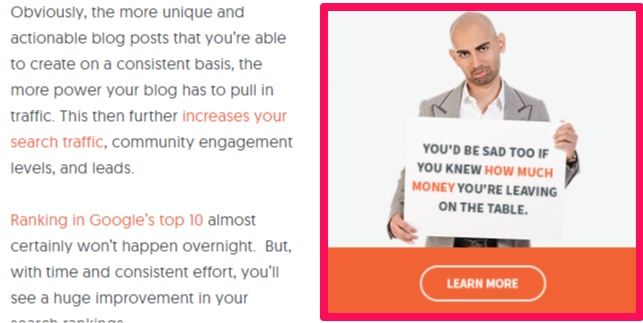
The <img> tag is what defines images on HTML pages. They might look something like this:
<img src=”https://neilpatel.com/wp-content/uploads/2015/11/neilad3.png” width=”350″ height=”350″ alt=””>
That’s the HTML tag for this image on one of my blog posts.
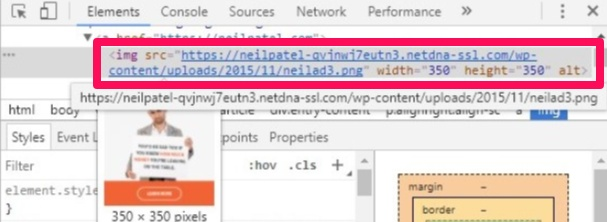
Here’s what the image tag looks like if you inspect the page’s code.
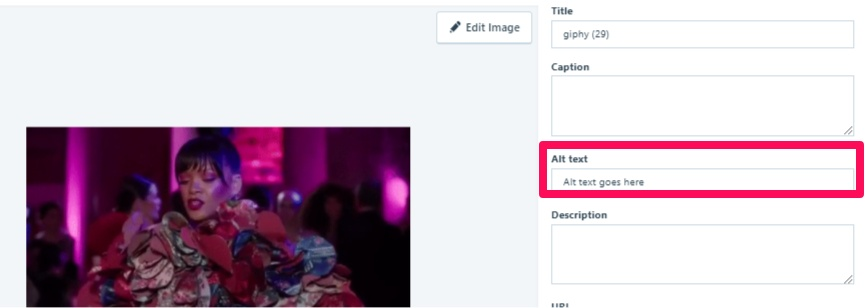
WordPress requires titles for images, but not alternative descriptions. I recommend adding alt text to images as often as possible.
Alternative text takes an image’s description to the next level, making your image (and therefore your blog post) more likely to appear in the SERPs.
When uploading and embedding images into your blog post, be sure to add alt text regardless of the CMS you’re using.
If you forget to add alt text in the media library, you can always add it in the text editor later.
If an image is too small or too large, you can resize it in the text editor.
If an image has a width=”400” and a height=”700,” then just delete the height and change the width. The height will adjust according to the width you enter.
Next, I’ll go over how you can add in links with HTML tags.
3. Links
Links increase your search rankings, so you absolutely have to include them in your blog posts.
In HTML terms, links are often called anchors.
Here’s what the code for a link might look like:
<a href=”https://www.quicksprout.com/2017/01/06/8-techniques-that-helped-me-improve-my-writing-during-ten-years-of-blogging/” target=”_blank” rel=”noopener noreferrer”>10+ years of writing daily</a>
The title at the end of the tag is what describes or titles the link, like this:
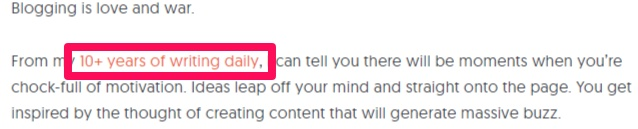
The “a href” tag creates the hyperlink.
You can add a link to a single word, phrase, or image.
This produces a link like this: How to Become a Better Blog Writer in 30 Days. That link then directs you to a separate web page.

In this case, the link will take you to a guide that I wrote that can help you become a better blog writer in just one month.
The anchor text is the part of the link that’s visible. It could be a word, a phrase, or an image.
A text link will look like this: <a href=”https://websitelink.com/” title=”Description of the Link”>
An image link will look like this: <img src=”https://websitelink.com/image.gif” alt=”Ball” /></a>
You can also add some additional features to your link. For example, if you want the link to open in a new window or tab, it should look something like this:
<a href=”https://www.websitelink.com” target=”_blank” title=”This link opens in a new window/tab”>”Description of the Link”</a>
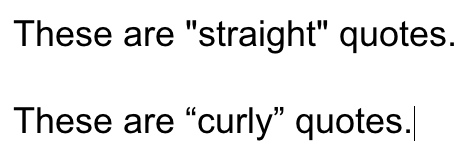
If your link doesn’t work, make sure that the URL you entered starts with “https://” and that you haven’t left out a quotation mark. And be sure to use straight quotes, not curly quotes.
Horizontal lines are another useful kind of tag since they break up your text.
4. Horizontal lines
A horizontal line creates a line that runs across your web page to break up different areas of content. It looks like this:
You can use the <hr /> tag to signify changes in the topic of your writing, to split up different sections of content, or to give a specific section more importance than others.
The line usually runs from the left to the right side of the page and is typically a light grey color. You can change the width of the line by adding to the subcommand like this:
<hr width=”40%”>
It’s a regular horizontal line tag with width=”%” added, and you can set the width to any percentage that you would like. “Hr” stands for “Horizontal Reference.”
Keep in mind that you can easily overuse these lines. Only use them if you really need them. Less is more.
Blockquotes are another way to format your text for readability.
5. Blockquotes
Chances are, you’ve probably quoted or referenced someone in a blog post before. I know I have.
As you know, it’s important to cite your sources when adding a quote.
It packs a punch to add quotes with a blockquote in HTML like this:
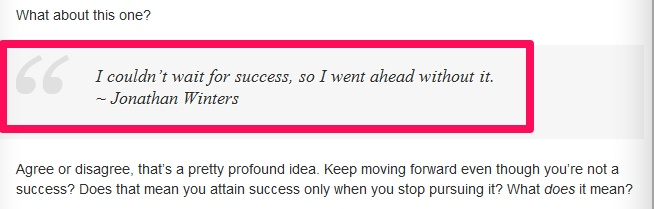
All it takes is a quick <blockquote> tag.
It should look something like this:
<blockquote>”Your quote here.” – Person who said quote</blockquote>
Here’s what the code will look like:
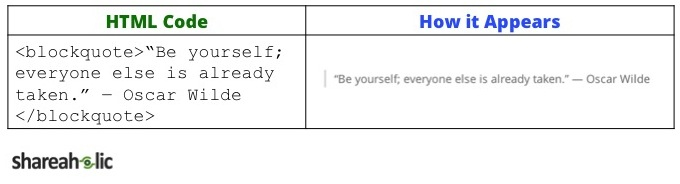
You can add a link to a blockquote by combining the two codes.
Blockquotes not only look visually appealing, but they also take your credibility to the next level by citing a source.
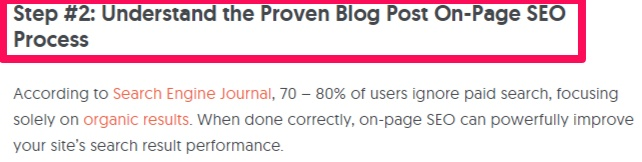
Heading tags are another HTML tag you need to know about.
6. Headings
Creating powerful headlines can be hard work.
But headings divide different sections of text for your reader.
I use them in all of my blog posts. They help structure articles and show readers where to look for certain topics.
Here’s a header from my blog post, “The Ultimate Guide to Writing Blog Posts That Rank in Google’s Top 10.”
There are six different heading tags that you can use on most sites: <h1>, <h2>, <h3>, <h4>, <h5>, and <h6>.
As each number gets larger, headings get smaller. For example, an h2 heading is larger than an h4 heading.
Different WordPress themes might use different headings differently, though.
You would typically use a heading as large as h1 for the title of the blog post. Subheadings usually consist of h2, while “sub subheadings” are generally h3 or smaller.
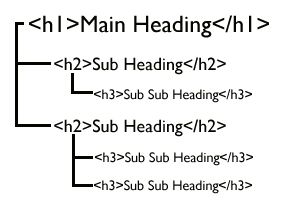
Keep hierarchy in mind when using headings and try to keep your styling consistent.
For example, if you decide that your headings are going to be h2, don’t write a random blog post with h3 headings.
Never put links in headings, either. They can easily get lost in the crowd. Be sure to only add links to sentences rather than headings and subheadings.
Now, let’s go over some other important formatting tags.
7. Formatting fonts
Bolded, italicized, and underlined lines of text are an easy way to add emphasis to words or phrases.

The original tags for bold and italic text were <b> and <i>, but the Semantic Web movement later made it more common to use the tags <strong> and <em>.
To bold text, write out the code <strong>”Your text here”</strong>.
Italicizing text might look something like this: “Italicized text puts a <em>great emphasis</em> on certain words.”
I don’t recommend combining bold and italics together, though.
You can also underline text, like this, with the <u> code. This can add emphasis or immediacy just like bold or italicized text does.
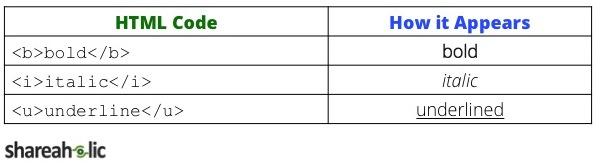
However, it’s easy for readers to confuse underlined text for a hyperlink, so be careful when using underlined text codes.
If you aren’t using line break tags, the readability of your blog could be better. Here’s why.
8. Line Breaks
Line breaks create a single space between certain lines of text like this:
You can add line breaks with the <br/> tag. These tags are self-closing, and writers often use them for poetry, writing out recipes, or entering addresses.
Here’s what a line break code might look like:
“This is a <br>
line break.”
Line breaks can also make your blog posts easier to read.
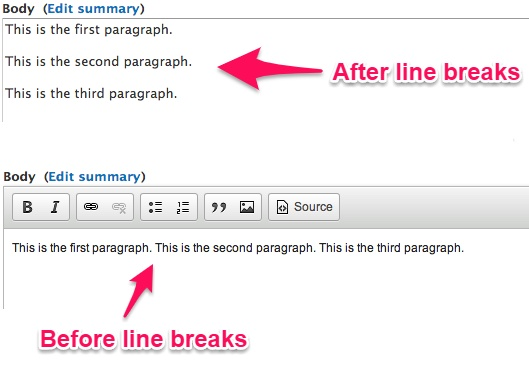
Which grouping of text did you enjoy reading more? You probably prefer the first one, right?
That’s because of the extra whitespace. Use it to your advantage!
Many people think that whitespace is bad, but it actually guides the eye to the next line of text, keeping pieces scannable.
Aligning elements is another simple way to keep your blog posts consistent.
9. Align elements
Nothing is more frustrating than trying to get an image to align, only to fail.
When you align objects in a synchronized way, your content will look much more sophisticated and organized.
I like to center certain images in my blog posts like this:
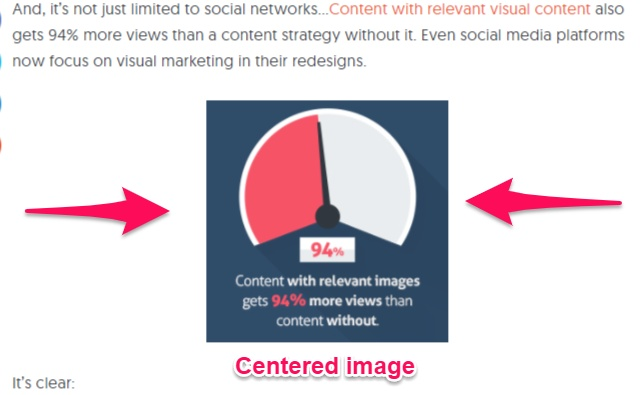
To specify a certain alignment, just add in the tag <p align=”center”> before the image or line of text you want to align, and then insert </p> in after.
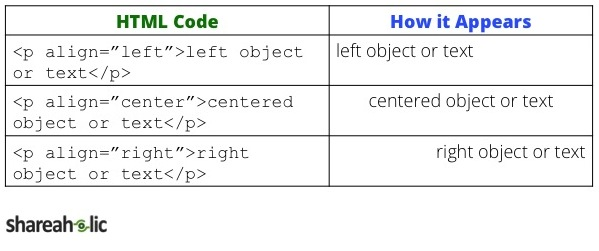
The same applies to aligning text or an object to the left or the right.
This is a great tag to keep in mind if you’re ever having a hard time trying to align an image or line of text. It’s quick and easy to pop it right into the body of your blog post.
Conclusion
If you’re running any kind of blog, or if you’re planning on creating one, you can’t always depend on CMSs to customize your content exactly how you want it.
If you use these basic HTML tags, you’ll save yourself tons of time. HTML5 is incredibly popular, but you don’t have to be a coding genius or a professional web developer to use it.
In WordPress, the text editor will load much faster if you’re using the HTML version rather than the visual preview version.
Plus, if you know how to add in HTML tags manually, your hands never have to leave the keyboard. That’s huge if you’re already busy writing away.
Create lists with the <ul>, <ol> and <li> tags to list out different items. You can create either bulleted lists or numbered lists.
You can use image tags to insert photos by adding <img>. You can manually adjust the height and width of images to fit your web page, too.
Link tags, also called a href tags, are tags that insert links into the body of your blog posts. They allow you to link out to other content. You need those to improve your visibility online.
You can insert horizontal lines with the <hr /> tag. But remember: Be careful not to overuse these.
Format your fonts to be bold, italic, or underlined with <strong>, <em>, and <u>. Try to use one at a time to keep the body of your text looking professional.
Enter in line breaks by using the <br/> tag, which will increase the readability of your blog posts.
And align elements to appear in the left, center, or right of your web pages with the tag <p align=”left, center, or right”>.
You’ll take your blog post to the next level with these HTML tags, and probably save some time while you’re at it.
Which HTML tags do you use the most in your blog posts?
Comments (56)