
Creating an app can be a lot of work.
You’ve got to find the right team of app developers to design and create it. Then, you’ve got to watch these people closely, to make sure that the mobile application turns out the way that you want it to and is attractive to a mobile device user.
Then you must keep them, hoping they have a positive user experience, after all, one push notification too many might result is a loss of users. All this is important for app developers to consider in a mobile app rollout.
However, that’s not necessarily the hardest part.
For many, the tough bit is marketing your app and making sure that the people who need it download it and make it a part of their daily life.
After all, there are over 1000 apps submitted to just the App Store every day. Making yours stand out among the increasing app installs daily is going to be hard. Even free app downloads are difficult to achieve.
If that’s the part that you’re stuck on, you may want to consider using Google AdWords as a means of encouraging app downloads.
Known for its ability to market websites, AdWords can also be incredibly powerful when you use it to drive mobile app downloads.
In this blog post, we’ll take a look at how you can use AdWords to drive app installs.
We’re going to go through all of the various ways that AdWords allows you to advertise an app and how you can make the most out of each option.
By the end of this post, you should feel much better, as you’ll now know how to get your app downloaded by the right people, with the help of AdWords.
Let’s begin.
Setting up conversion tracking
Before you do anything else, you’ll first want to set up conversion tracking for your mobile app.
Later on, this will help AdWords to come up with bids for your ad, so that you can get the best results for the best price. Installing conversion tracking will also allow for you to monitor how well your ads are performing.
To get started, sign into your AdWords account and then click on ‘Tools.’ You’ll find it in the header bar. Then, select ‘Conversions.’
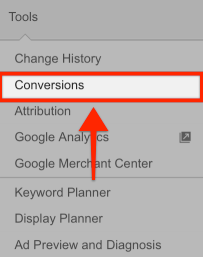
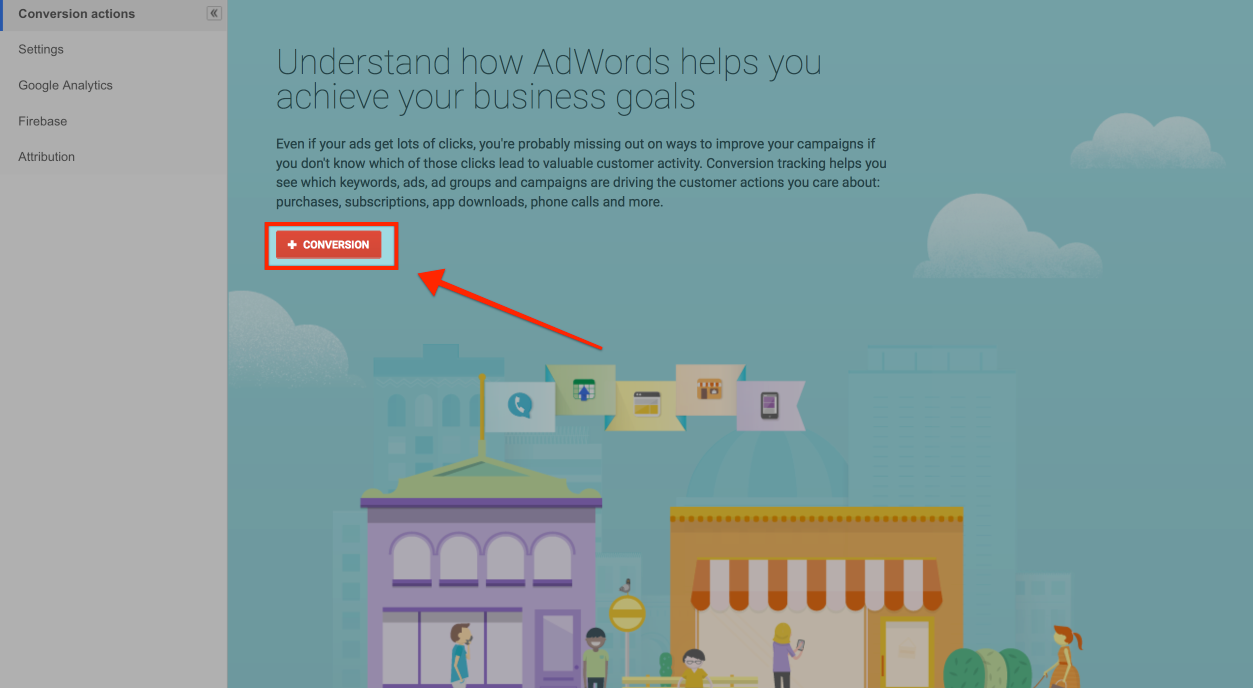
Click on ‘+Conversion.’
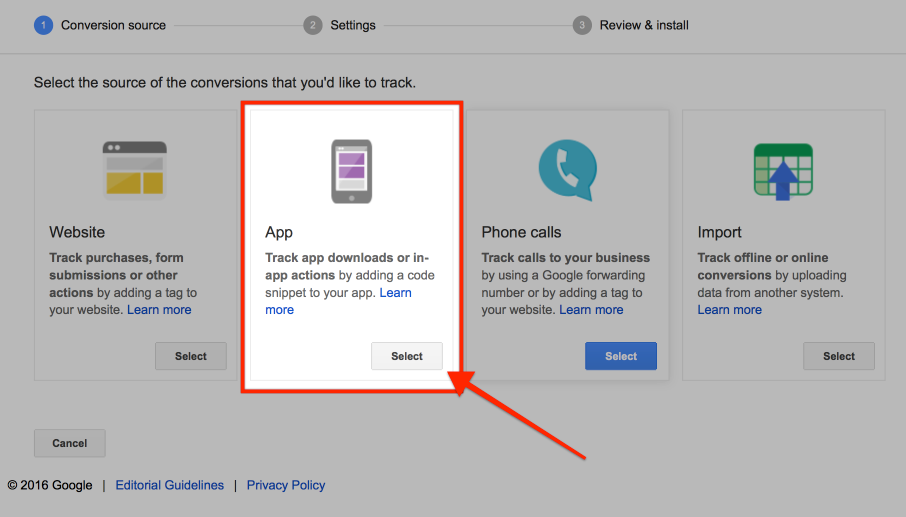
Then, select ‘App.’
Now, here is where it gets a little bit tricky.
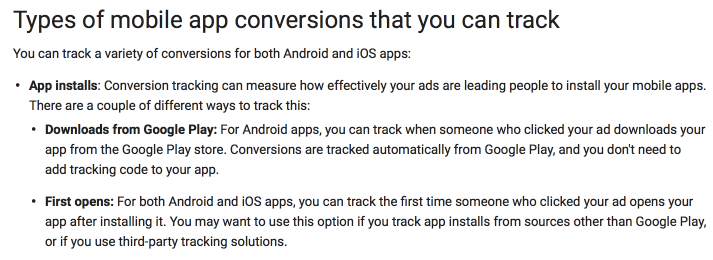
For Google Play apps, you don’t need to install any code in your app to track conversions of mobile application installs from ads.
Google will automatically record conversions when someone clicks on your ad and then downloads your app from the Google Play store.
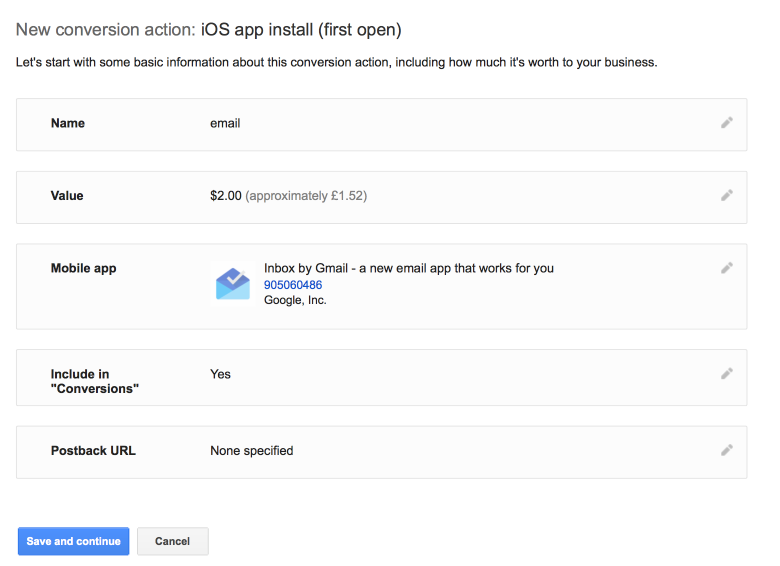
However, for App Store apps, you’ll be tracking a conversion, in terms of the first time someone opens your mobile app, after having installed it. This is also known as ‘First opens.’
Here’s an explanation from Google –
So, if you’re looking to monitor Android app installs, select ‘Google Play,’ when you see the next section.
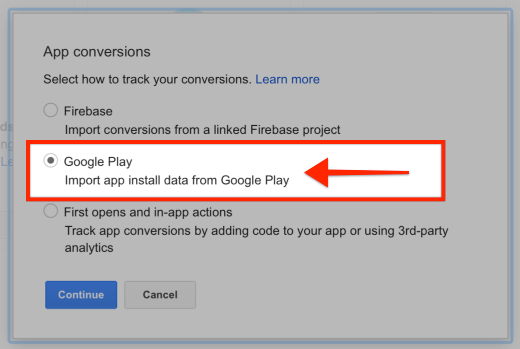
You should then see the following.
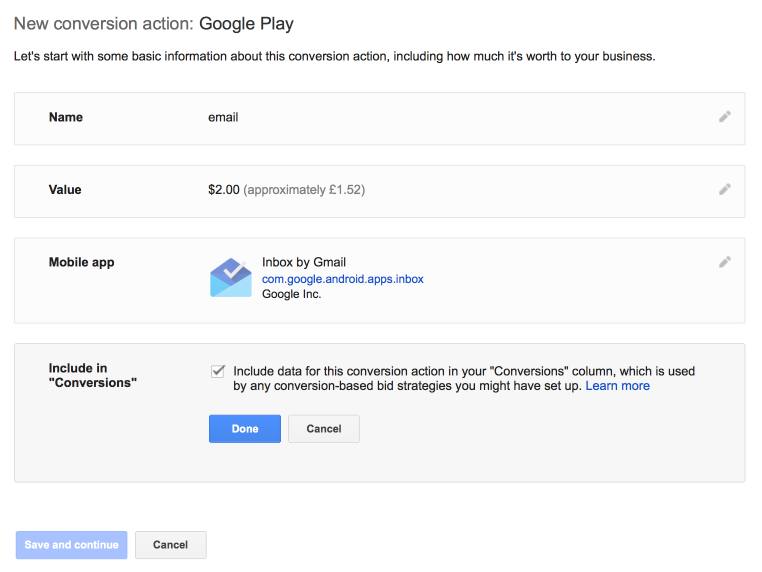
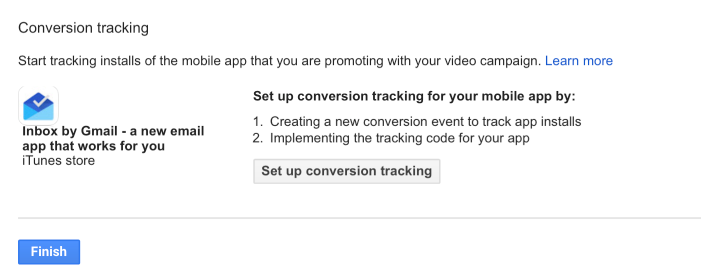
Note: For the sake of this post, we’re going to pretend that we’re marketing ‘Inbox’ – a mobile app with Google its own app developer.
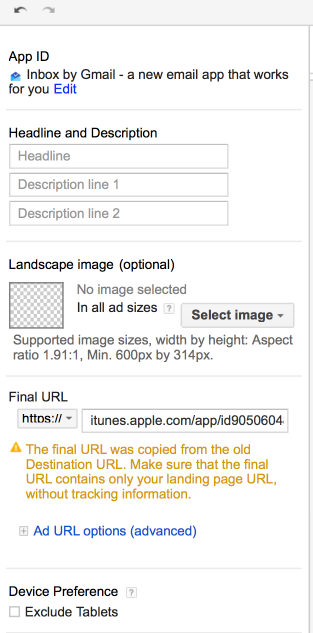
As you can see below, there are a number of fields that you need to enter. What you enter here is going to depend on your own situation.
For the ‘Value’ section, input the price of your app.
Make sure that you tick the ‘Include in “Conversions”’ box. This will ensure that you can take advantage of ‘Target CPA’ bidding later.
Once done, click on ‘Save and continue.’
If you’re looking to track conversions for apps in the App Store, the process is a little different.
This time you need to make sure that you have some code installed in your app that will allow you to track conversions, hopefully seeing increasing app installs.
It’s a little complex to cover here, so you might want to head over here, to learn more.
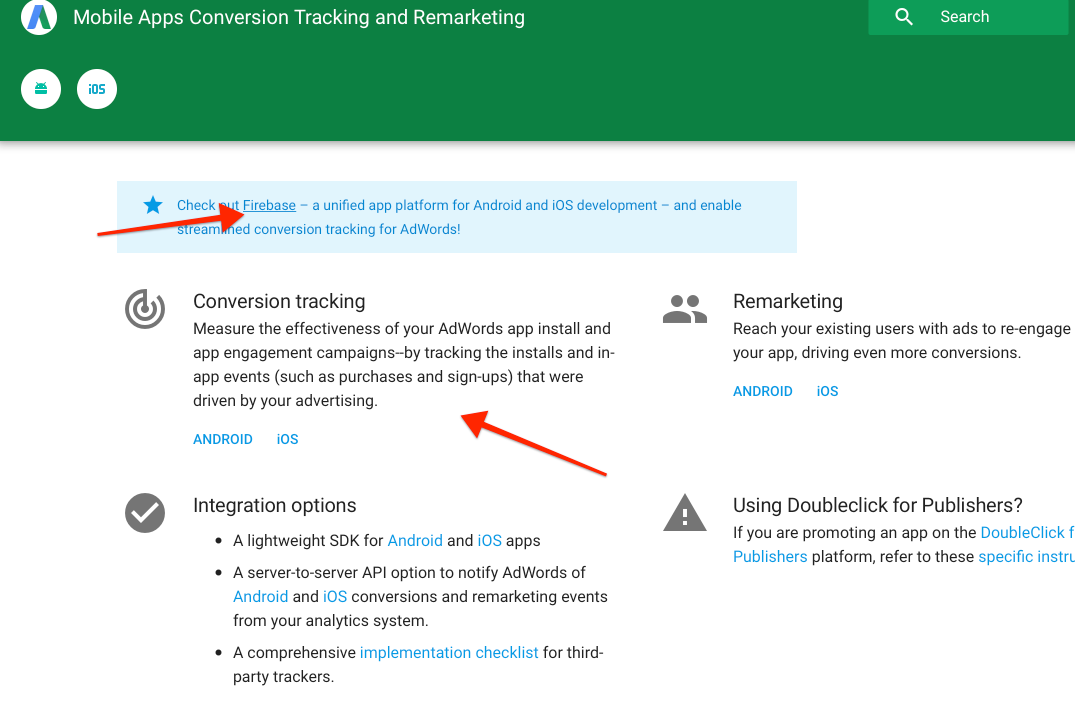
There you’ll be able to learn the traditional ways to install tracking codes. You’ll also see information related to tracking apps, using a new platform by Google called ‘Firebase.’
It’s okay if you find this a bit complicated and you may just want to just ask your developers to take care of this for you. If you don’t have any developers, you can always hire a freelancer on Upwork.com.
In any case, once the conversion tracking code is installed, you then need to click on ‘First opens and in-app actions.’

When you click on that, you’ll then see some additional options.
Pick ‘iOS’ and select ‘App installs (first open).’
Also, take note that iOS conversion tracking only applies to the Display Network.
The process after this step is pretty much the same as what I covered earlier.
Once you’ve set up conversion tracking, you’re then free to move on to setting up ads.
Different ways that you can advertise on AdWords
When it comes to advertising your app on AdWords, you have the following options –
- Search Network
- YouTube Network (TrueView)
- Display Network
You have quite a lot of control with any of these options targeting any iPhone and android user to the app store.
Or, you can create something known as a Universal app campaign.
This is where Google simplifies the process of marketing a mobile app and takes care of a lot of the details.
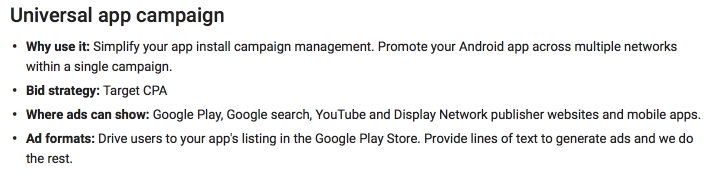
Google will create ads on the fly and display them wherever possible on their network, with the intention of making them as relevant as possible when doing so.
All you need to do is to provide some basic ad copy and targeting information, like location and language. Google will then do whatever it can, within the budget allocated.
For this post, we’re going to focus on the Search Network, Display Network and YouTube Network.
Search Network app install campaign
When you create a Search network ad, you’re going to be showing your ads to those using the Google Search app and the Google Play Store (if you’re promoting Android user Apps).
If you want to market your app on the Search network, do the following.
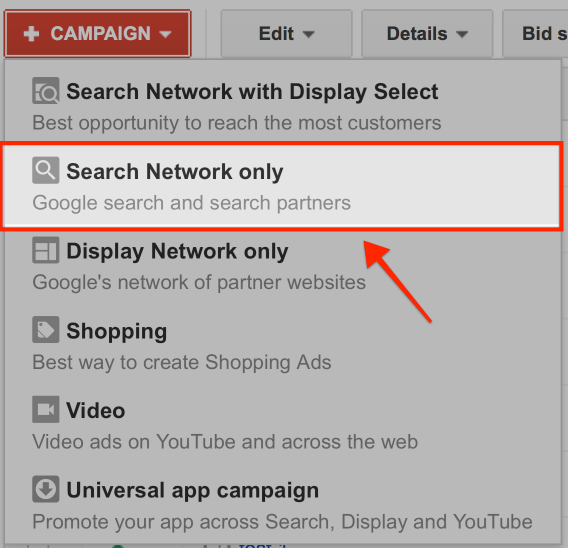
Log in to AdWords, go to the ‘Campaign’ dashboard and click on ‘+Campaign.’ Then, select ‘Search Network only.’
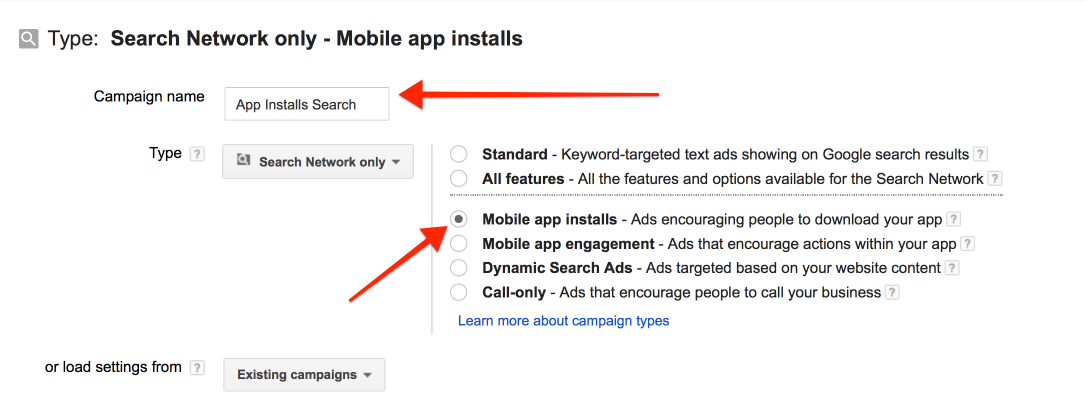
Give your campaign a name and then select ‘Mobile app installs.’
You’ll also notice that there is a bit where you can select your app.

When you click on that, you’re given the option to provide the mobile app that you want to promote.
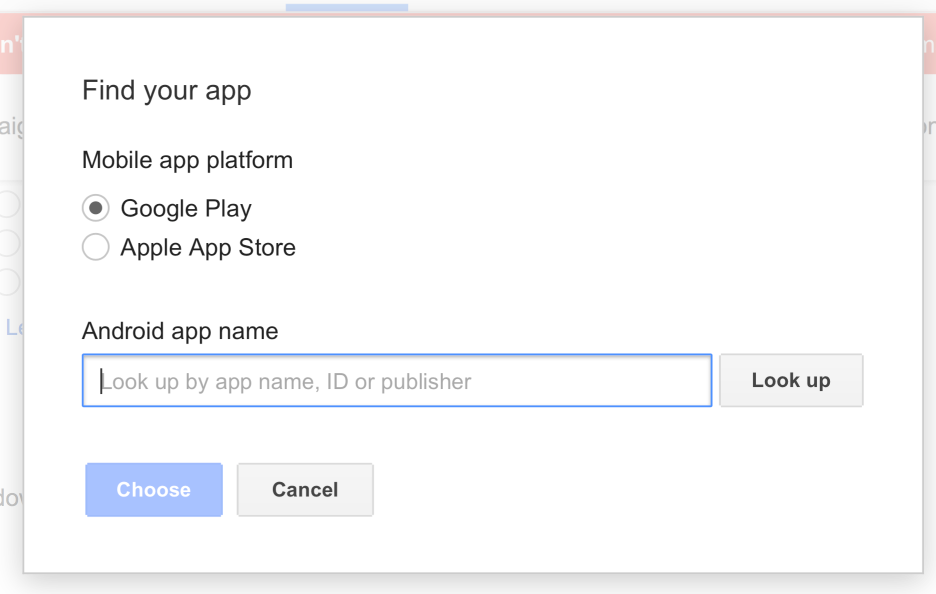
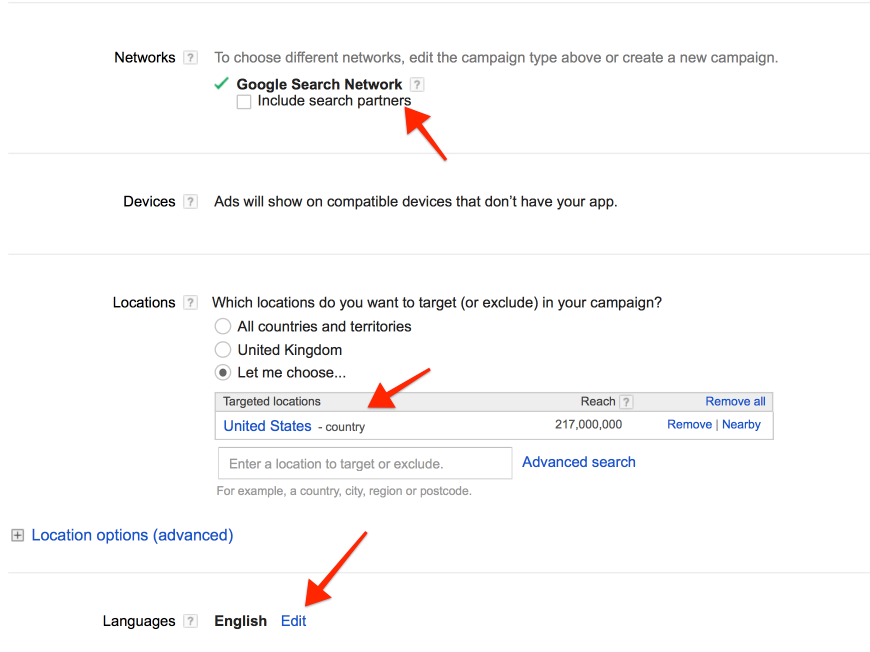
When you’ve selected your app, deselect ‘Include search partners’ and pick a location that you want your ad to be shown within.
If you’ve not done so, you may also want to select the language as ‘English.’
You then get to move on to the ‘Bidding’ stage.
What you pick here depends on which mobile device platform you’re promoting, an Android app or an App Store app.
If you’re running an Android app promotion, you’ll notice that there’s a ‘Target CPA’ option.
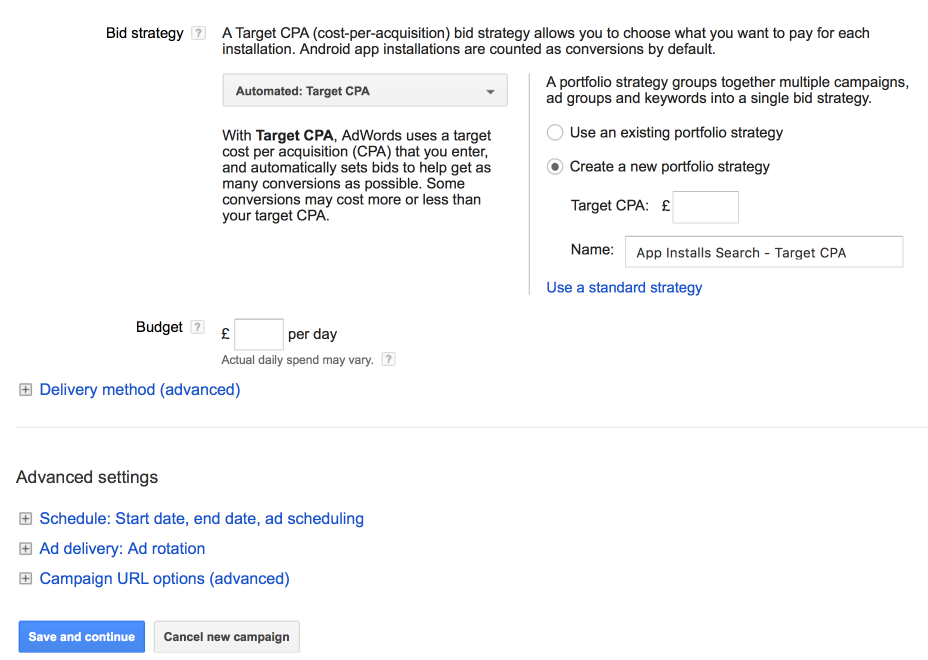
This means that you need to decide how much you’re willing to pay, per installation. AdWords will then take care of the rest for you.
To keep things simple, it’s a good idea to use this option and leave the settings as they are.
Note: If you find that your results are poor, you can always raise your Target CPA, later on down the line.
If you’re running an App store campaign, there is a ‘Maximize clicks’ option.
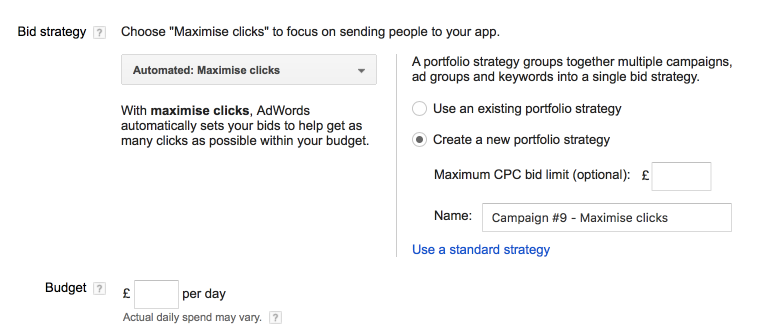
Again, as above, it’s better to just leave the settings as they are, for now.
Pick a maximum CPC that you’re comfortable with and then move on to the budget section. If you want to, you can always start with a low bid and slowly raise it until you get the desired result of increasing app installs.
Note: There is also an option called ‘Target search page location.’
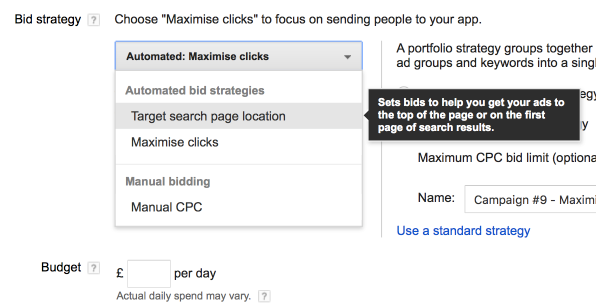
This is where AdWords will set your bids, to increase the odds of your ad appearing at the top of the results.
You’re free to experiment with this. Be warned, however, that it could get expensive.
Budget relates to how much money you’re willing to spend per day and applies to whether you’re marketing Android apps or iOS apps.
It’s a good idea to work backwards here. If you want to drive 10 installs a day and your target CPA is $3, then you daily budget needs to be $30.
Now, let’s work on creating your ads.
This step is pretty much the same as when you’d normally write ad copy for a Search ad. I won’t go into writing ad copy here, as it can be quite technical.
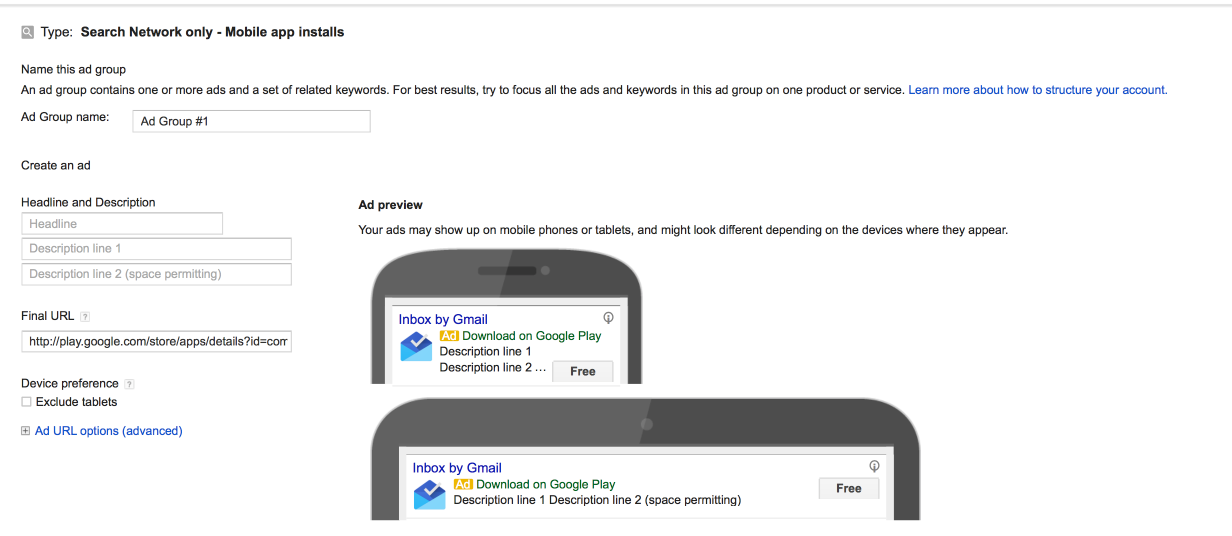
If you want to learn more about writing Search Ads, check out the post I created here. The key thing that you need to focus on is the benefits of your app and what sets it apart from other apps in the same niche.
The next step is really important. It’s where you get to pick the keywords for your Search Network campaign.
Picking the right keywords is a science and you’ll want to refer to my post that I linked to, just above, to learn how to pick the right keywords.
If you’re new to AdWords, make sure that you set it so that your keywords are ‘Exact Match.’
You can make your keywords exact match, by using ‘Square brackets’ – [Like this].
This will make sure that your ads only appear for the keywords that you have chosen and no variations of them.
This can help you control your ad spend, when you’re starting out.
Once you’ve have some experience, you can then experiment with things like ‘Broad match modifiers.’
When done, click on ‘Save and Continue’ and then wait for AdWords to approve the ad.
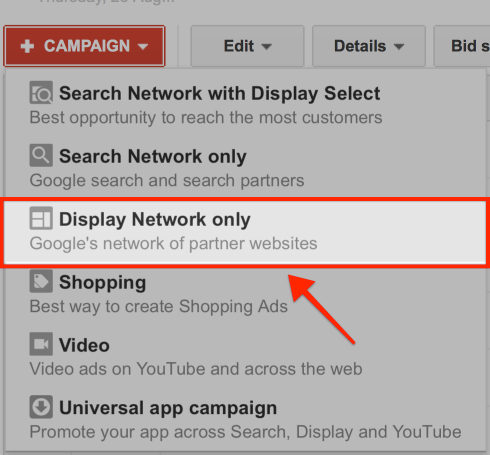
Drive app installs using Display ads
This time, click on ‘+Campaign,’ on the AdWords Campaigns dashboard, but select ‘Display Network only.’
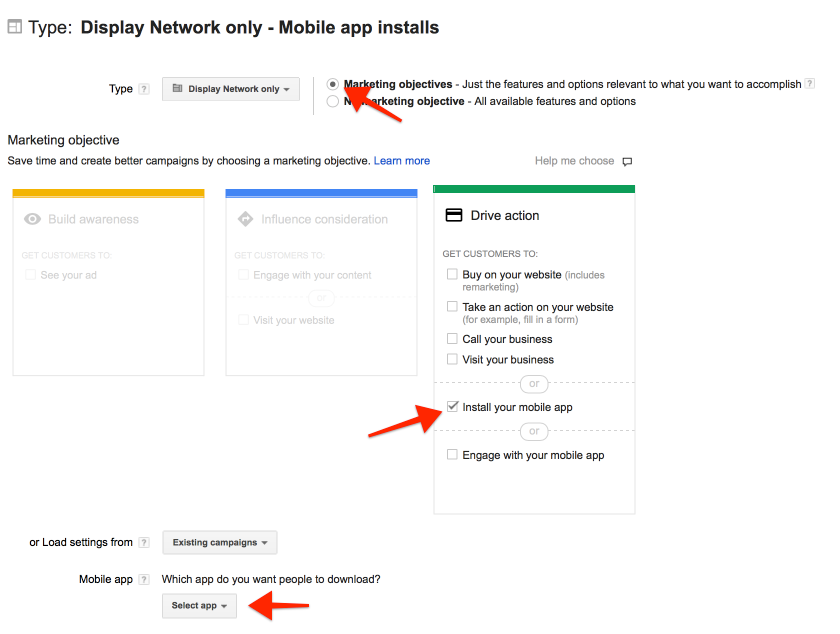
What you see in the next section is going to depend on what you’re marketing- an App Store app or an Android app.
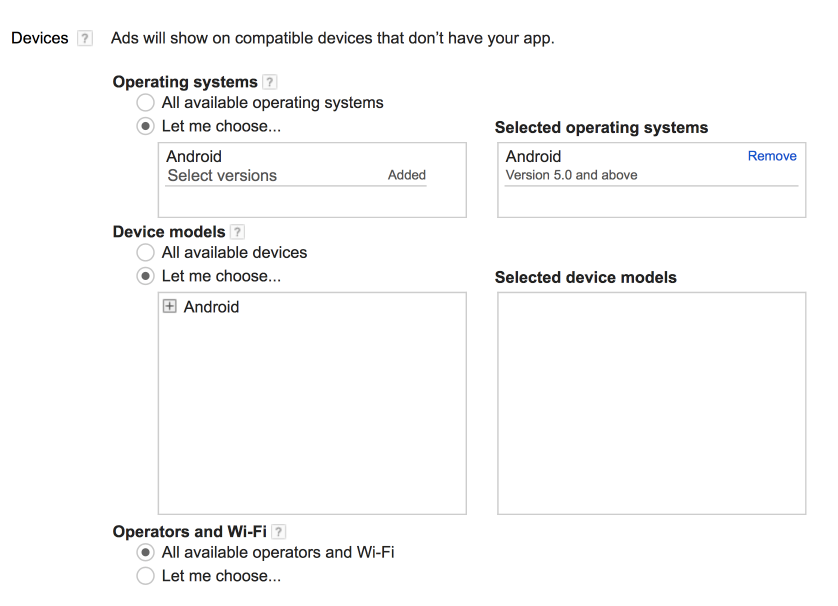
If you’re marketing an Android app, you’ll see the following.
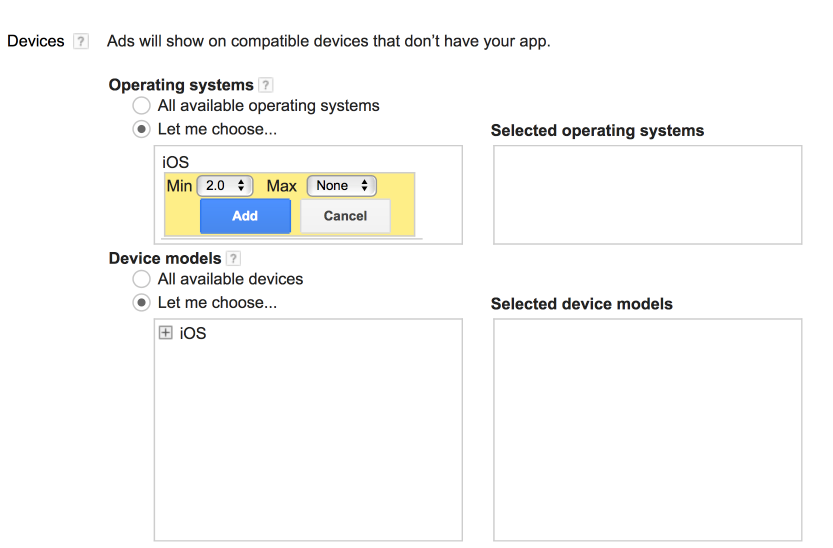
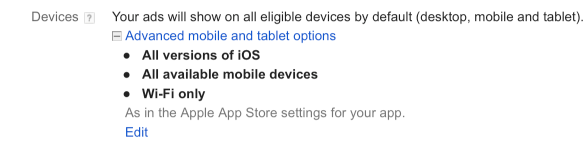
If you’re marketing an iOS app, you’ll see this.
You don’t want to over-complicate this.
The best choice here is often to pick a minimum OS version that is recent, but maybe not the latest. This applies to both Android OS and iOS. Of course, what you pick is also going to depend on what OS version your mobile app works on.
You don’t have to adjust the ‘Device models’ section, but can, if you need to.
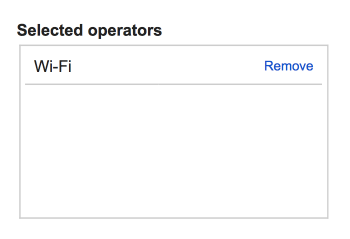
It’s also important to note that there is a another choice, called ‘Operators and Wi-Fi.’
If you’re app has a large file size, you might want to make sure that it is only advertised to people when they’re using their mobile device on Wi-Fi.
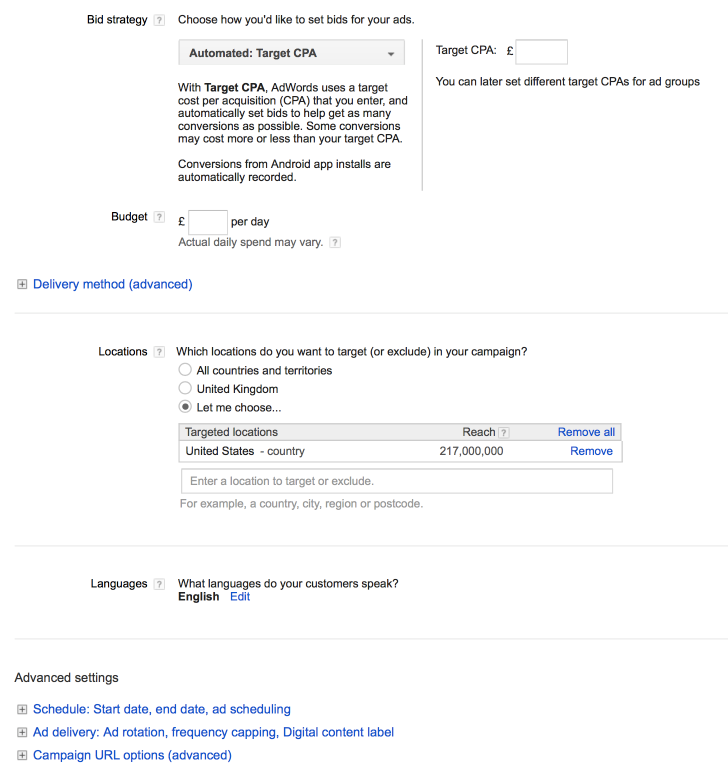
Moving on, you next get to decide Budgeting and Locations.
Again, what you see here will vary, depending on the store you’re working with.
If you’re promoting to an Android user, you’ll be able to use a ‘Bid strategy,’ known as ‘Target CPA.’ This is similar to what I covered for the Search ads earlier and it’s advisable that you stick with this option if you’re just starting out.
If you’re promoting an iOS app, your bid strategy will be ‘Manual CPC.’
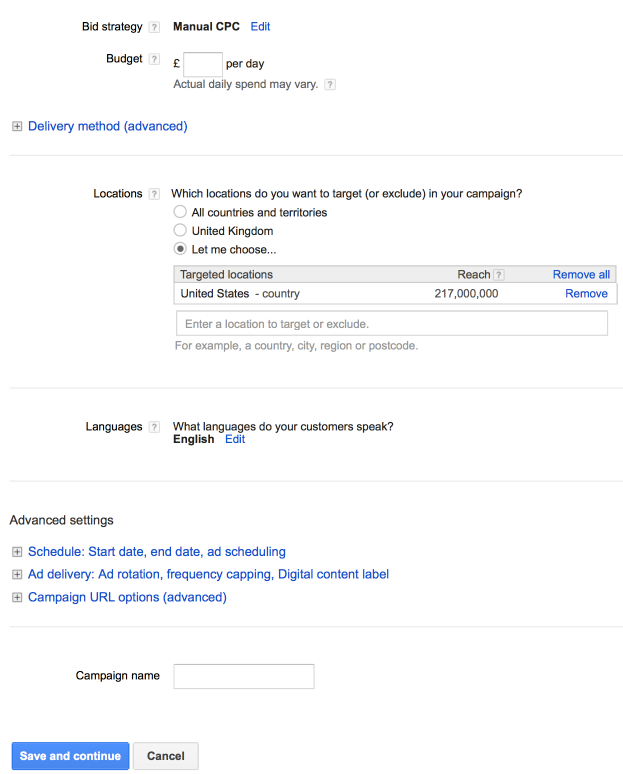
CPC relates to how much you’re going to pay, per click, on your ad.
When optimizing your bids, pick a small manual CPC, like 0.15c and then gradually raise it until you see results.
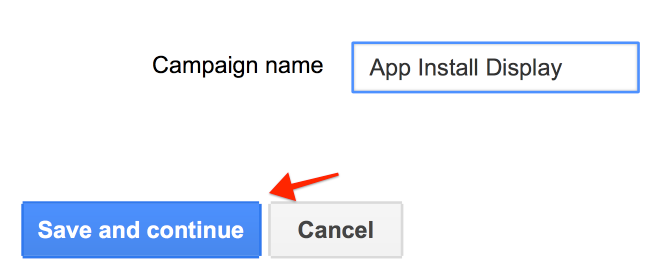
Next, give your campaign a name and click on ‘Save and continue.’
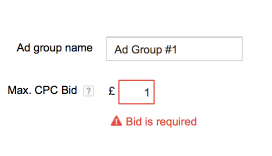
You then get to adjust the targeting for your ad.
Decide on a Maximum CPC bid, for this ad group, if you haven’t already.
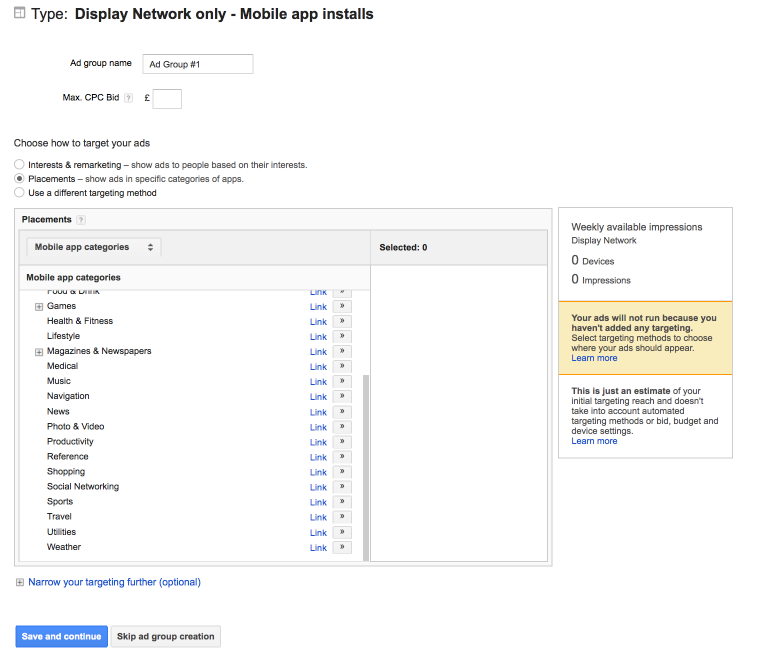
Then, scroll down and pick the targeting options that best suit your approach.
You can check out this post, if you want to learn more about how to target Display Ads properly.
There are a few unique things to note here, however.
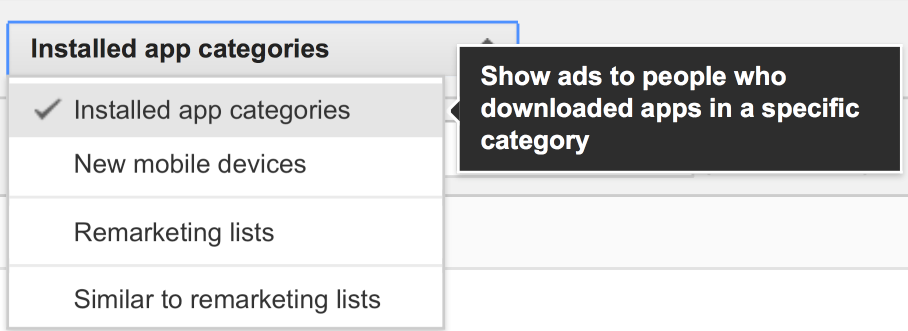
The first relates to the ‘Interests and Remarketing’ option.
Here, you can target people, based on the categories of apps that they have already installed. It’s a good idea, therefore, to think about what other apps your ideal user might also download from the app store.
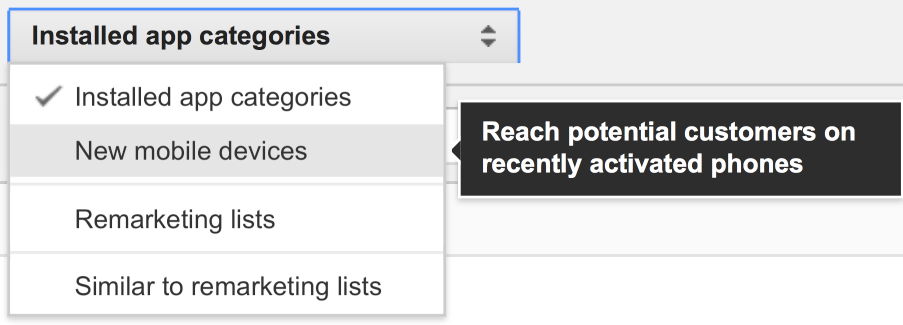
You can also target people, if they’re on a new mobile device, which is a novel way of reaching people.
Note: If you’re targeting people this way, you might want to make it obvious in the copy, as this may increase engagement. For example, you may congratulate the user on their new phone.
The next section relates to the ‘Placements’ option.
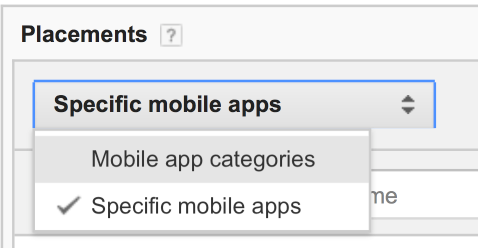
Here, you can make it so that your advertisement appears in specific apps or categories of apps.
This can be a valuable way to target apps, if you know that there are some apps already out there that share the same audience as you want to target.
Click on ‘Save and continue.’
Next, you get to design your ad.
There are three formats that you can go with here.
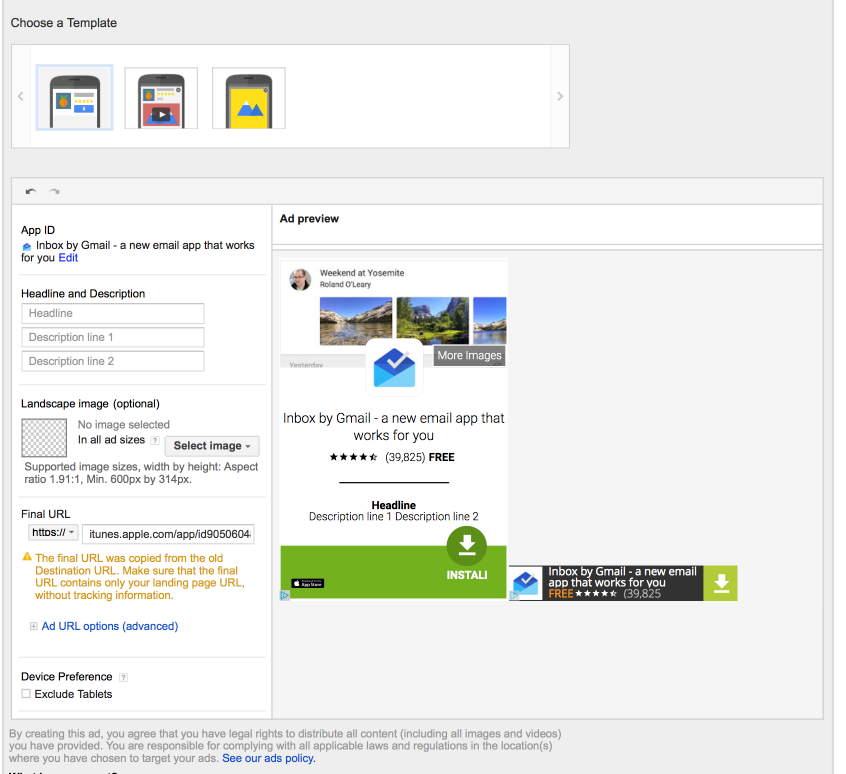
‘App Install Ads,’ that people can click to download your app.
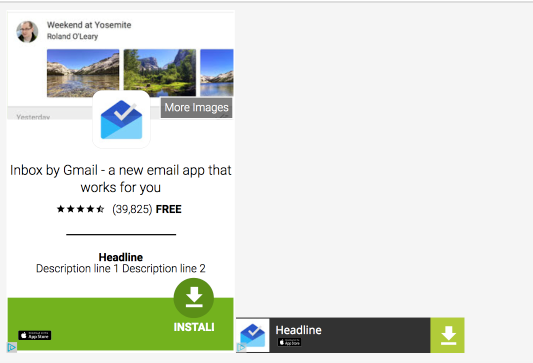
Video Ads that show a video related to your app (you provide the video).

Or, ‘Image ads’ that you’ll need to create and upload.
If you’re new to this, it’s better to go with the ‘App Install ad’ for now. When you pick that option, provide some copy that details the benefits of your app.
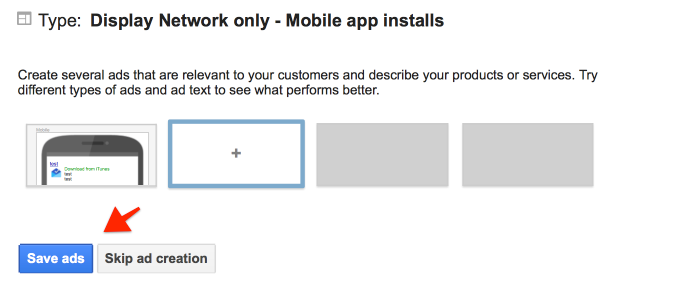
Then, click on ‘Review and Finish’ and then click on ‘Save ads.’
You may get a notice, like this, if you haven’t set up conversion tracking.
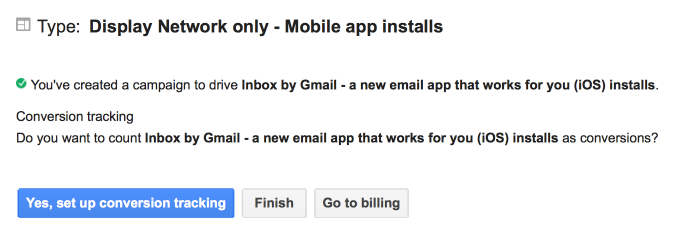
If you haven’t already, make sure that you go through the necessary steps to set up tracking.
Once you’ve taken care of that, you just have to wait for AdWords to approve the ad.
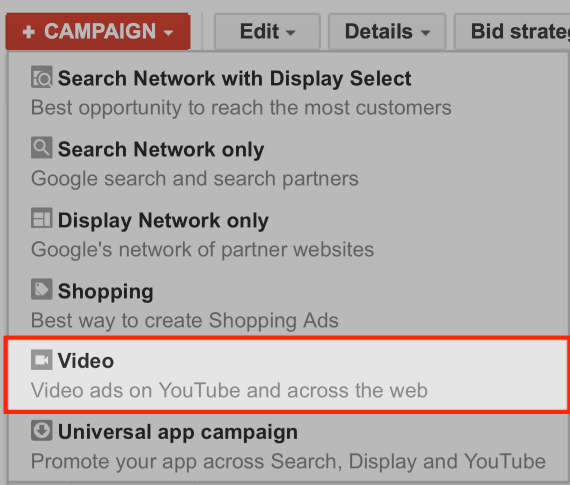
Drive app installs using YouTube Ads
Now, let’s talk about increasing app installs, using YouTube Ads, otherwise known as TrueView Ads.
Go to the ‘Campaign’ dashboard, click on ‘+Campaign,’ but select ‘Video.’
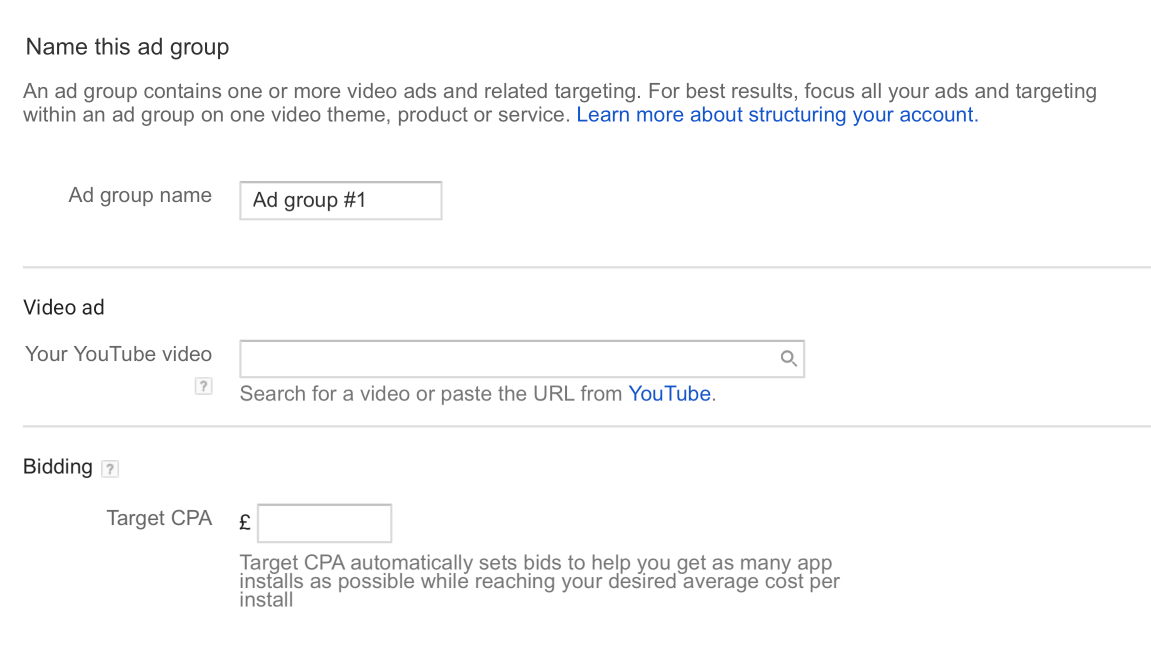
Then, give your campaign a name and select ‘Mobile app installs.’
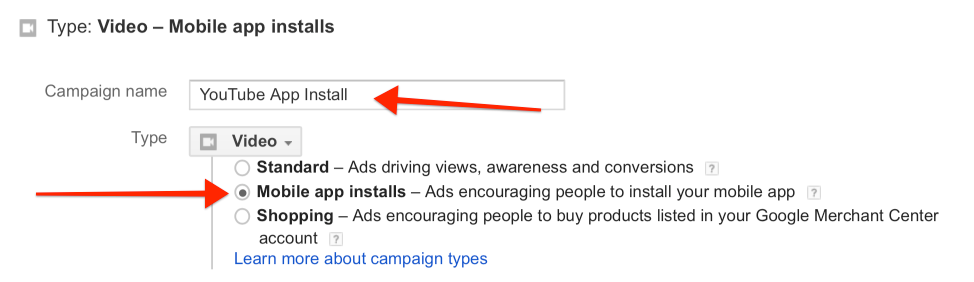
Pick your mobile app. As before, you get to either pick something from the Google Play Store or the App store.
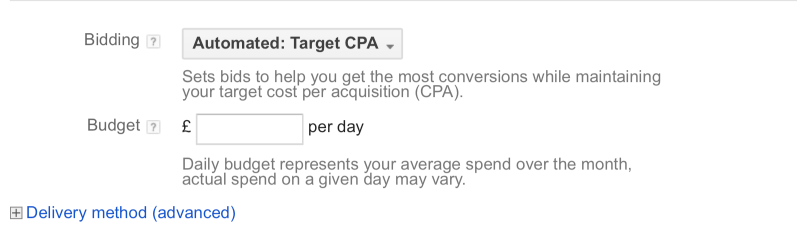
If you’re promoting an Android App, you’ll again be able to bid using ‘Target CPA.’ Pick this option and use the tips that I mentioned earlier.
Note: This time, if you’re promoting an iOS app, you still get to target your apps based on Target CPA – so it’s worth sticking to this option for now.
Moving on, you then need to pick ‘Location’ and ‘Language.’
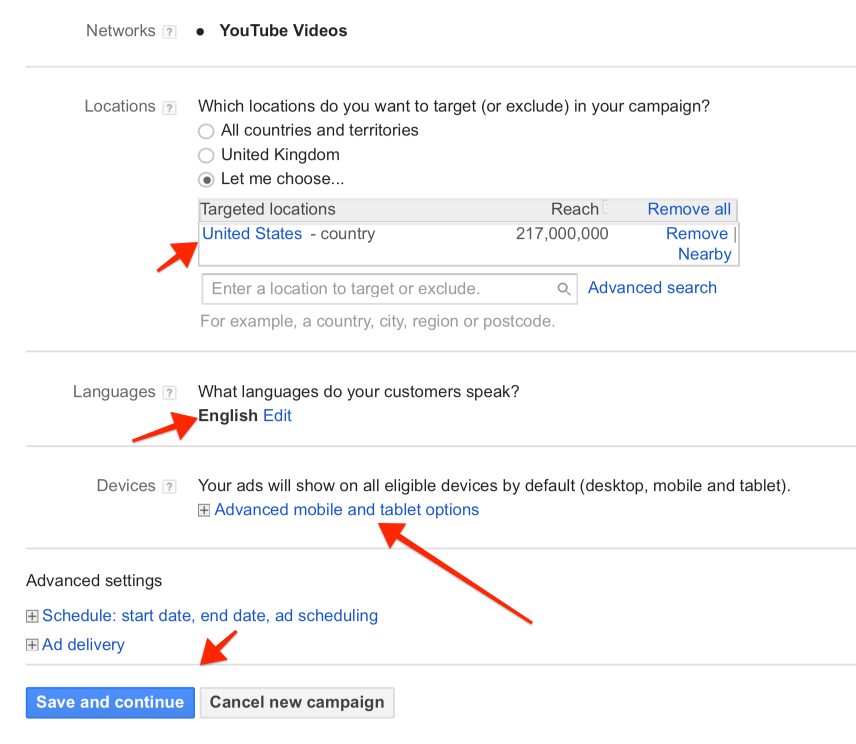
There is also the option to pick devices and whether or not you want to target devices connected to Wi-Fi, just like before.
When done, you can then click on ‘Save and continue.’
Next, you need to provide your YouTube Video and set a Target CPA bid that you’re willing to pay.
You then have to target your ads.
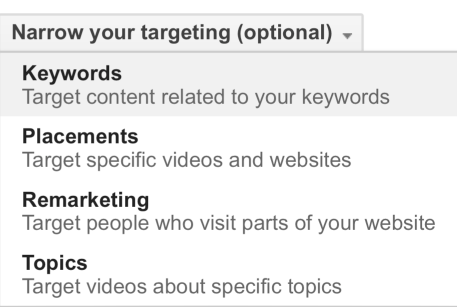
You can learn in-depth information about targeting YouTube Ads here.
If you’re new to YouTube advertising, it can be a good idea to go with ‘Placements’ – meaning that you pick certain videos that will trigger your ad, provided that they have monetization enabled.
You can also go with ‘Topics’ and ‘Keywords,’ though those can be a little more tricky to work with.
When you finish with this section and you click on Save Ad Group, you’ll see the following.
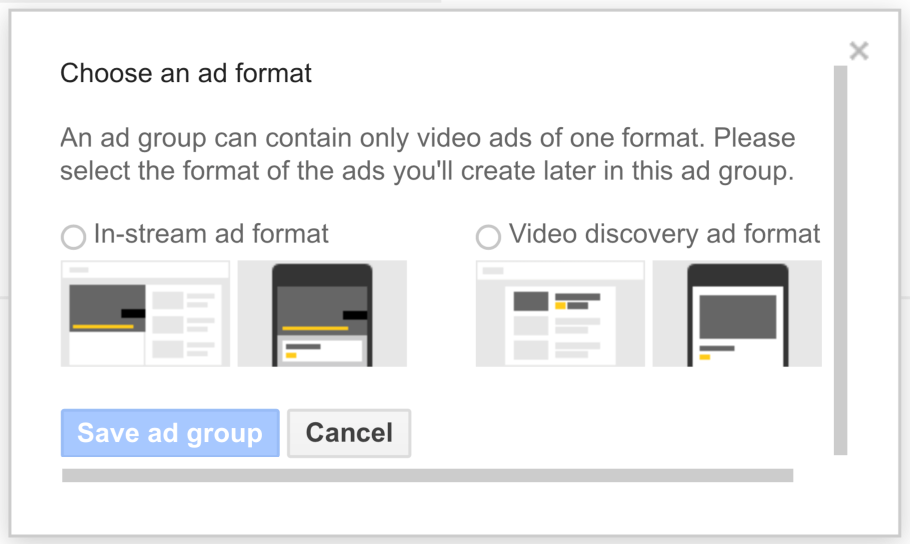
This relates to the ad format that you want to use.
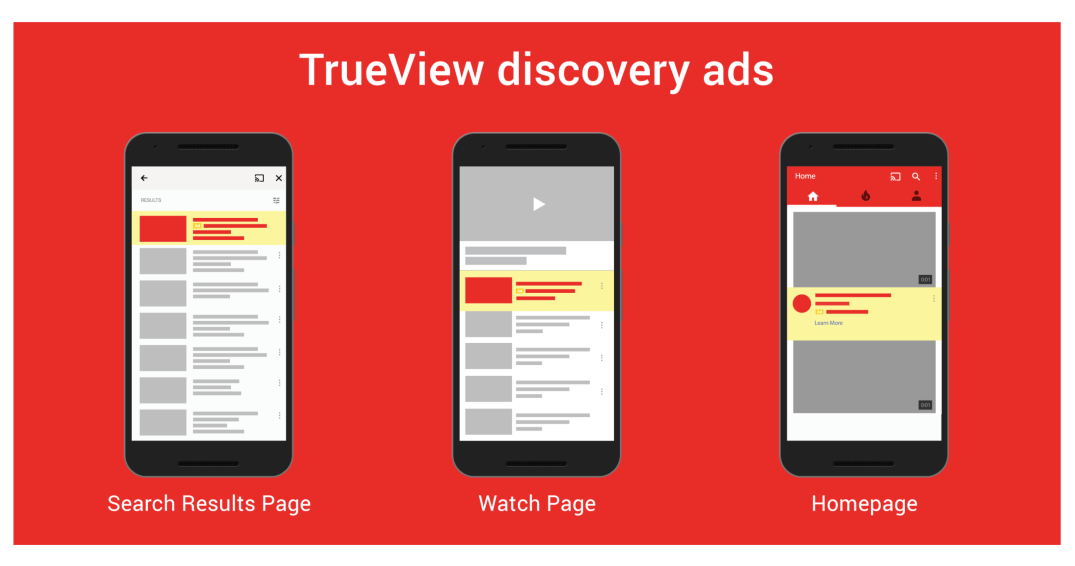
You can have ads that appear at the beginning or during a YouTube Video, known as ‘In-stream.’ Or, you can have Ads known as ‘Video discovery ads’ that look like ‘Text Ads.’
When people click on these ads, they’ll be taken to a normal YouTube video. This video doesn’t have the same restrictions as a normal YouTube video ad.
Video Discovery Ads tend to look like this.
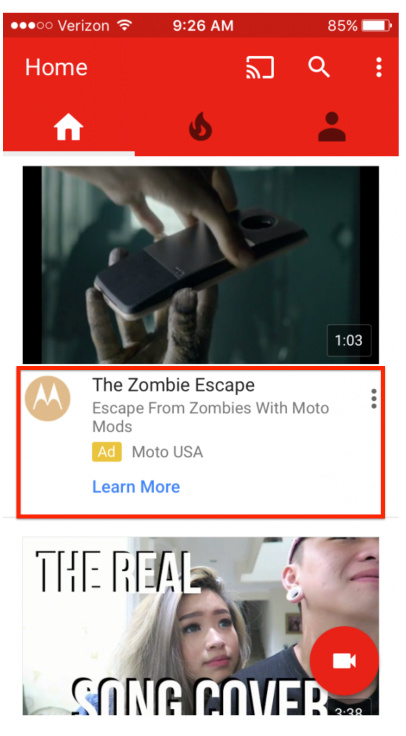
These appear in the following locations.
In any case, once you’ve selected the right format, you’re then asked about conversion tracking, if you haven’t taken care of it already.
Once you take care of conversion tracking – using the tips at the start of this post, you just need to wait for your ad to be approved.
Conclusion
Getting people to download your app can be a hard thing to achieve.
However, with the use of Google AdWords, the task should be much easier.
After all, you can now reach people when they’re using YouTube, searching Google or even when they’re using other apps.
Advertising is a tricky thing to get right and you’ll want to get started as soon as possible. This way, you can quickly iterate your approach and develop a campaign that delivers results.
Start using the platform now and see how many downloads you can get!
Do you have any tips you can share in terms of marketing an app using AdWords? Please let me know below!
Comments (28)