Have you ever been part of one of those big Facebook groups, and thought “Wow. It would be cool to create something like this myself.”
I was in that position myself a few years ago. I was part of a massive Facebook group with tons of interaction, valuable discussion, and engaged members.
The group was thriving, growing, and providing value.
The group managers were benefitting, too! They were growing their personal brand, passively marketing their products, and helping others.
About that time, I started my Facebook page. (Which is different from a group; I’ll explain in a minute.)
I created my Facebook page for my personal brand since that was the easiest thing I knew to do.
Then, I worked to build the page’s audience.
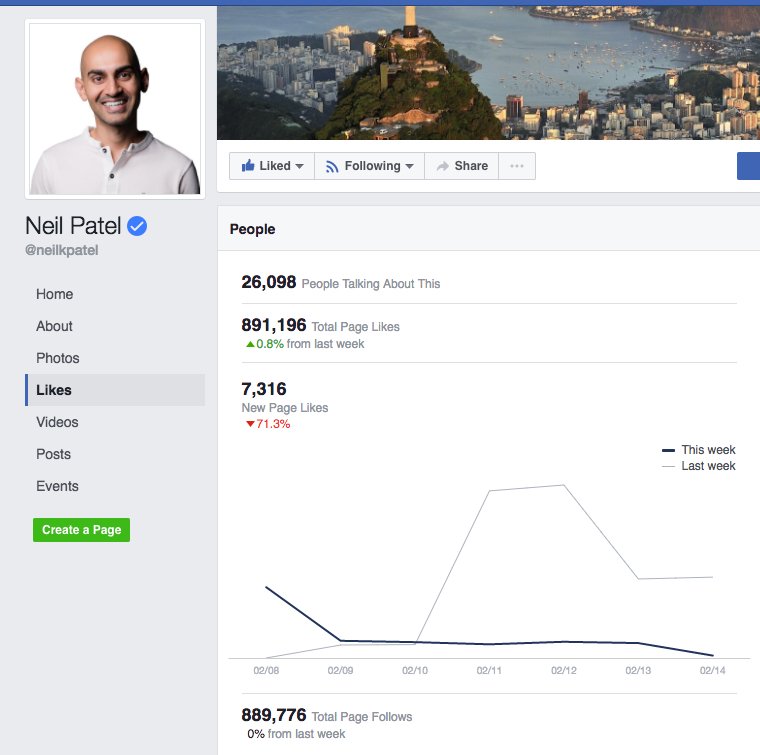
At the time of writing, my Facebook page has 891,191 likes. Over the past seven days, I gained 7,311 new likes. 26,098 are “talking about this” page right now. Overall, there are 889,770 users who are following my updates.
Those numbers sound big and impressive. And, sure, my page has grown a lot in the past couple of years. But soon, I discovered there was something even more valuable.
The number of likes (or members) wasn’t as high. But the engagement was insane.
It was Facebook groups.
When I started looking into it, I realized a massive marketing opportunity just waiting to happen.
Sure, Facebook pages were great. I had learned the basic skills required to build a nice page audience. But for many marketing purposes, groups were even better!
A Facebook page allows you to stake out your claim on the world’s largest social media platform. But a Facebook group gives you more control over that platform, influencing people in a bigger way than a Facebook page.
I could roll off a list of the benefits of starting and creating a Facebook group, but instead, I’m going to do something more valuable.
I’m going to explain how you can create an engaged Facebook group from scratch.
Recently, I worked with one of my clients to build their Facebook group. After 6 and a half months of work, they reached 11,284 members.
The value is there. All you have to do is build the group.
Learn how I generate 195,013 visitors a month from Facebook without spending a dollar on ads.
Um. What are groups?
If you’re lost at this talk about groups, let me give you a quick answer.
What are groups? Simply, they are Facebook communities centered around a cause, idea, or theme.
First, Facebook. Groups are part of Facebook.
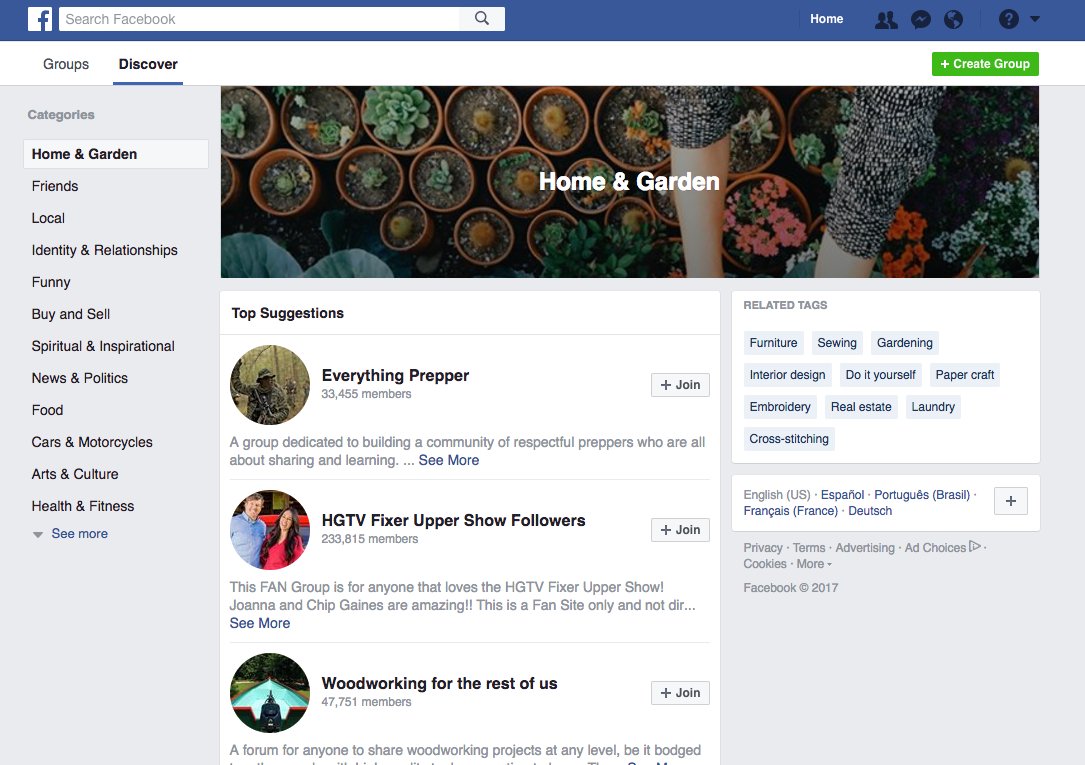
To find groups, open up your Facebook page. Look on the far left side, and find Groups.
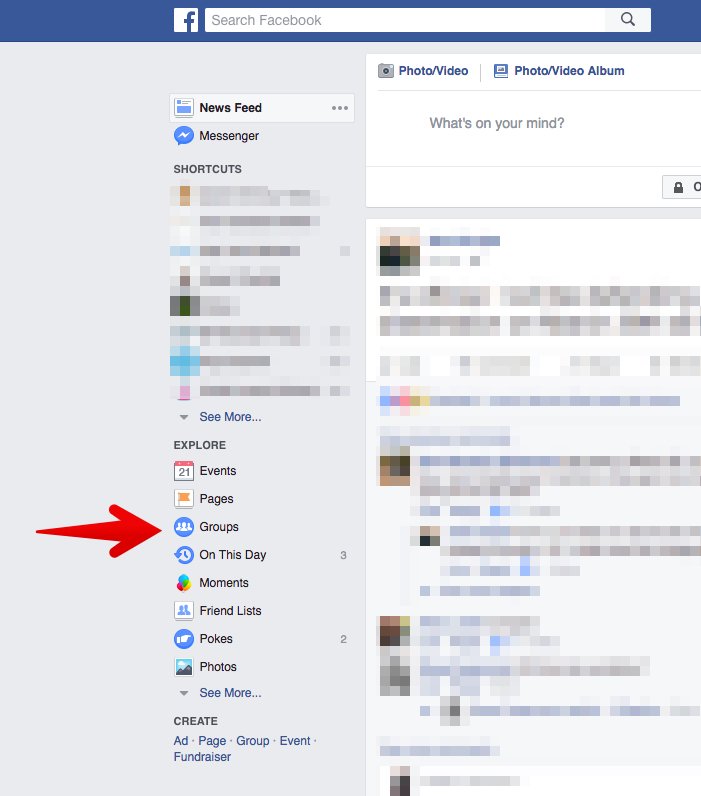
When you click Groups, you’ll be taken to a Discover page where you can browse different groups.
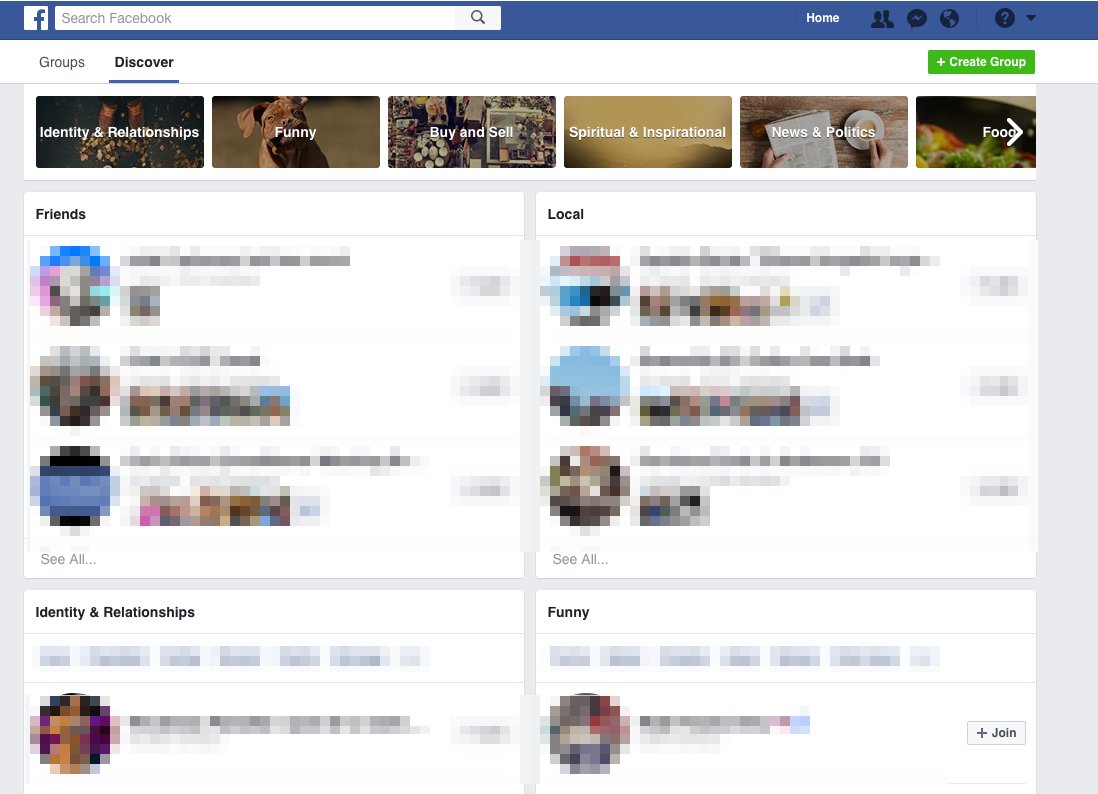
There are 28 different categories of groups. You can browse according to these categories:
- Home & Garden
- Friends
- Local
- Identity & Relationships
- Funny
- Buy and Sell
- Spiritual & Inspirational
- News & Politics
- Food
- Cars & Motorcycles
- Arts & Culture
- Health & Fitness
- Support & Comfort
- Travel & Places
- Style
- Sports
- Animals & Pets
- Science & Tech
- Parenting
- Outdoor Activities
- Photography
- Neighborhood & Community
- Professional Networking
- Business
- School & Education
- Hobby & Leisure
- Trending
- Games
This, for example, is the Home & Garden category. Find a group, click +Join, and you’re now part of a Facebook group!
(You may be part of groups already. These appear in your Shortcuts menu.)
First, what’s the difference between a Facebook group and a Facebook page?
Before jumping into the details of how to create your own massive Facebook group, let me address one more simple question.
What is a Facebook page, and what is a Facebook group? What’s the difference? Which one should I choose? How do I decide?
Great questions. Here’s my simple answer:
- Create a Facebook page for your brand or business.
- Create a Facebook group for your cause or passion.
Both can be used for marketing. But they each have distinctions that make them valuable for certain types of marketing.
Let me unpack that.
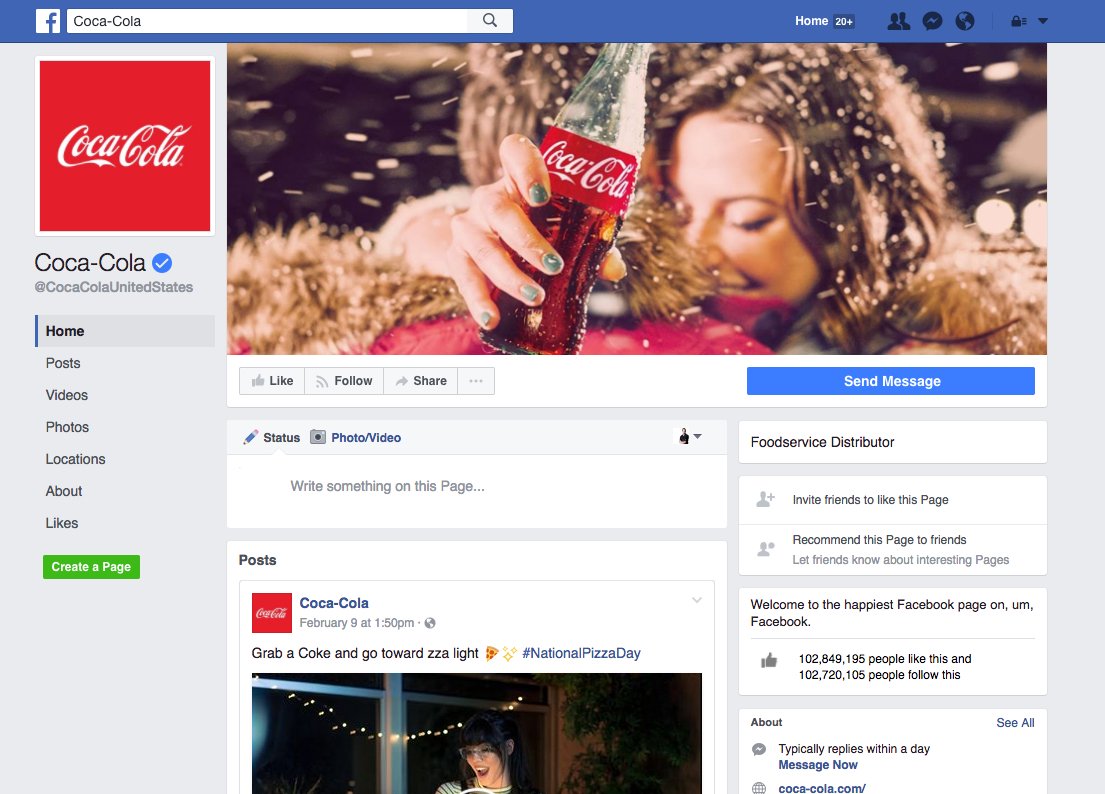
A Facebook page is your brand name. For example, I created my page, Neil Patel. Coca-Cola has a Facebook page.
You can have page likes and follow. You can spread the message of your brand, share content, and have fun.
A Facebook page is advertising, plain and simple.
But a Facebook group is for engagement around a certain cause.
This group caters to location independent families.
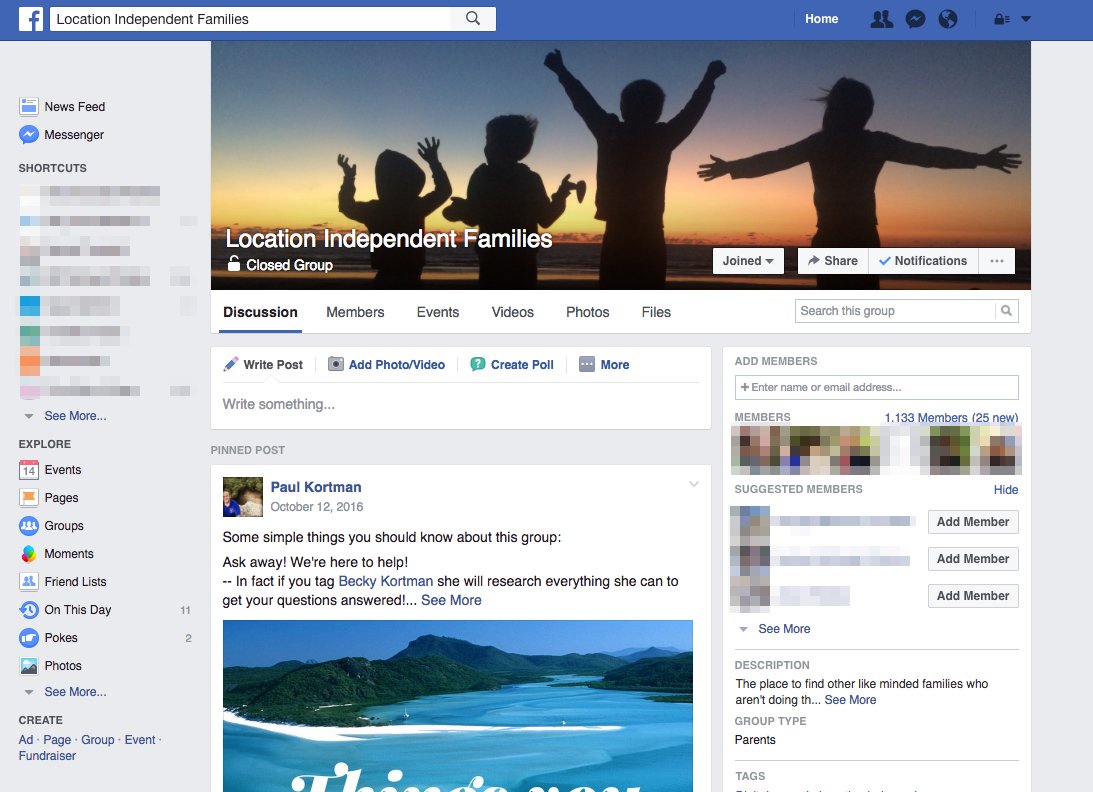
They’re not selling anything. They’re not pushing any product. They are simply providing a community for like-minded individuals.
Wait a second. Does this mean a Facebook group is devoid of marketing?
Not exactly.
For example, here’s the Facebook group for ClickFunnels.
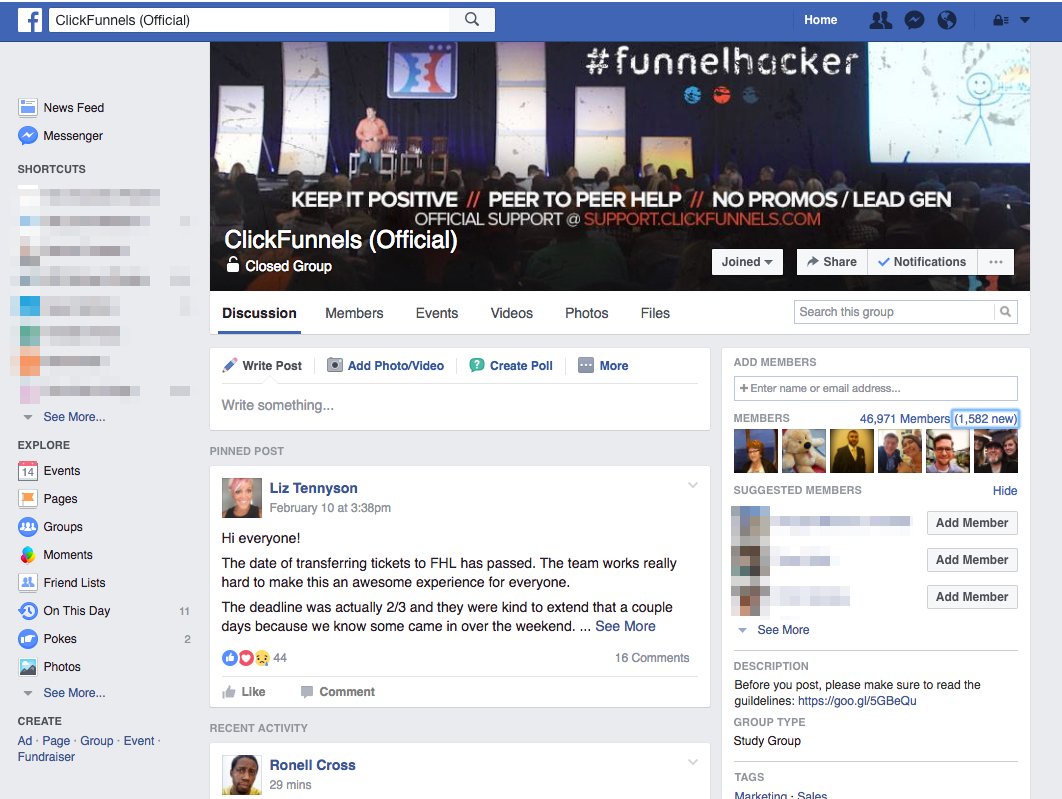
Okay, ClickFunnels is a brand. They’re a business.
They are selling something, right?
Right.
So what’s the deal? Why would 46,971 people want to join a closed group simply to be pitched a product?
Here’s why. ClickFunnels created this group in order to provide help for people who need support, encouragement, and marketing funnel advice.
They’re not just pitching a product. They’re engaging with their customers, advising potential customers, and helping marketers succeed.
The group is exploding with tons of help, interaction, comments, and posts.
Take a look at this comment posted in the group.
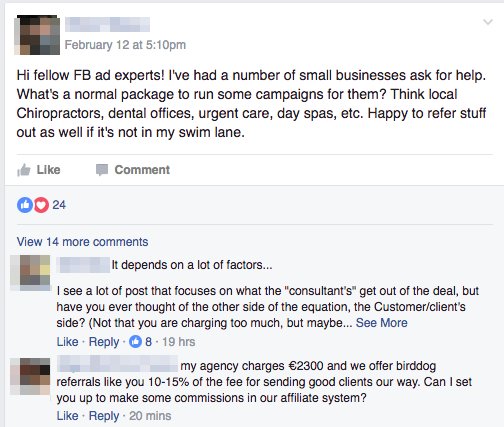
More than 15 people chimed in to provide some help.
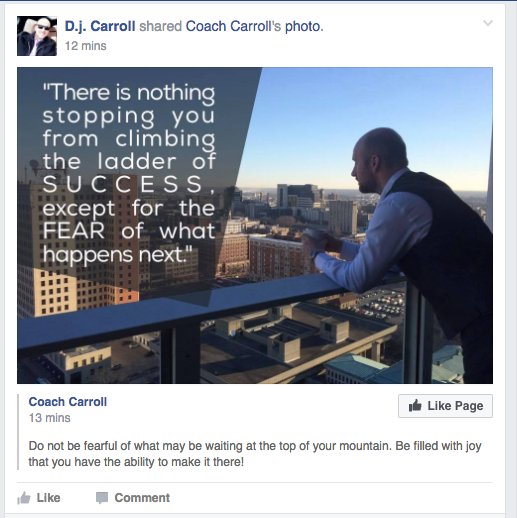
Someone else posted this inspirational quote on the page.
When you create a Facebook group, the purpose is not to pitch a product or service. Erase that idea from your mind entirely!
The purpose should be to provide help, support, community, and guidance around a specific subject matter or cause.
There are two important points about Facebook groups that I want to point out, then I’ll explain how to create one.
First, groups are usually closed.
The most successful Facebook groups are those that are closed. In other words, you can only join the group if someone approves you as a member.
All groups require that you join. To join some, it’s as easy as clicking the +Join button. Done.
For other groups — and this is what I recommend — your join request must be approved by an admin or manager of the group.
Second, groups usually have guidelines.
In order to keep the group from getting out of hand, most have guidelines.
The guidelines usually explain to members that they are not allowed to promote their product, be mean to other people, etc.
Here’s an example of some group guidelines.
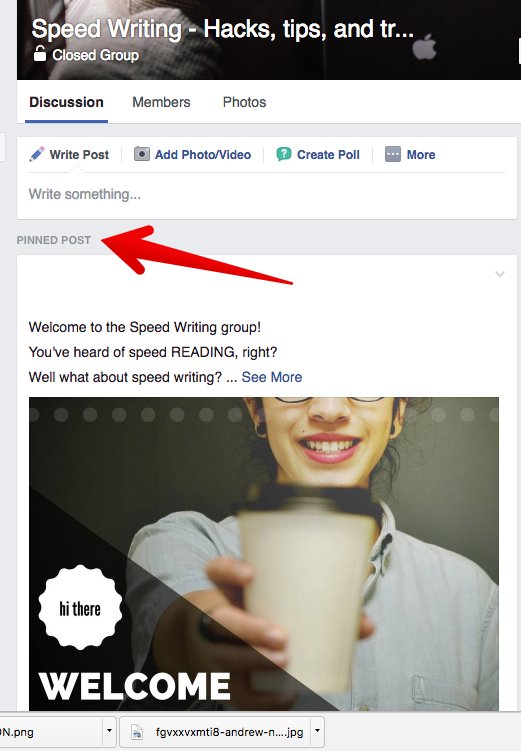
A lot of Facebook groups choose to pin their guidelines at the top of the page (as a “pinned post”). That way, group members can see it whenever they visit the group page.
The best Facebook groups that I’ve participated in are really strict about these rules.
I’ve seen flame wars erupt in group page comments. The group admins kicked the offending members from the group!
Other times, if a group member gets pushy about his or her product or service, the admins will remove the person from the group.
This seems harsh, but it’s actually a good thing.
With a Facebook group, you’re in control. You get to set the tone, atmosphere, rules, and regulations. You can create a valuable environment for the people you’re trying to serve.
Now, let’s start a group.
Step 1: Start your Facebook group.
We’re going to start at the very beginning.
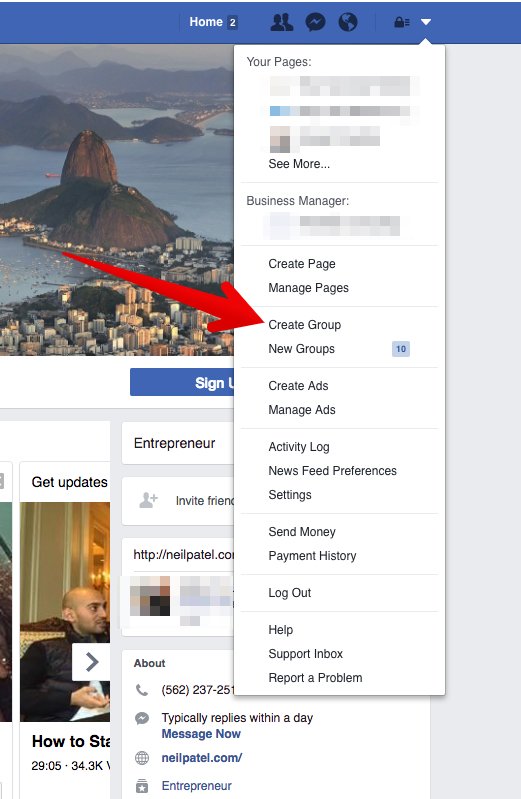
In Facebook, click the menu button.
This is a small down arrow on the far right of your Facebook page.
Click Create Group
In the drop-down menu, click “Create Group.”
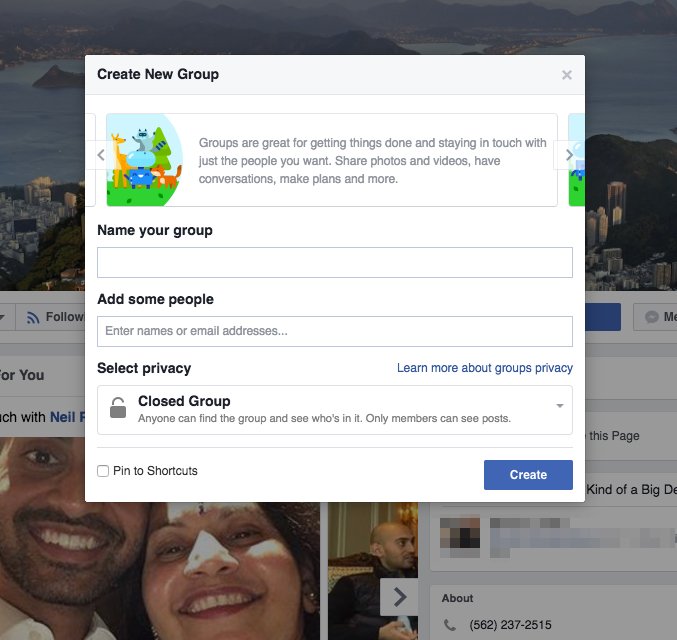
You’ll see a popup for creating your new group.
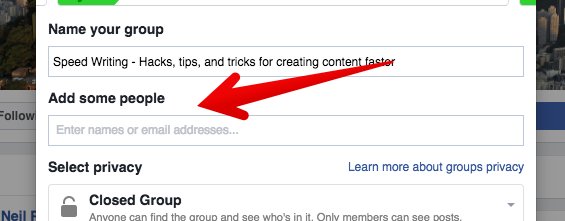
Name your group.
Create a name for your group that is creative, but also clear. You want people to know what the group is about simply by reading the name.

Add some people.
Next, add some of your Facebook friends to the group.
You have to add at least one friend to your group in order to create it.
Select your privacy.
You have three options for your group’s privacy settings. Here’s how Facebook describes it.
- Public Group – Anyone can see the group, its members and their posts.
- Closed Group – Anyone can find the group and see who’s in it. Only members can see posts.
- Secret Group – Only members can find the group and see posts.
I recommend leaving the default setting of “Closed Group.”

A closed group provides just the right level of privacy, without completely hiding your purpose or brand from the world.
Check the “Pin to Shortcuts” box.
If you want to easily come back to your group later select the “Pin to Shortcuts” option.
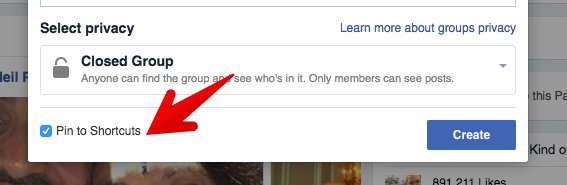
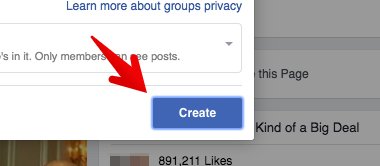
Click “Create.”
Now you’re ready to click “Create” and get your group going.
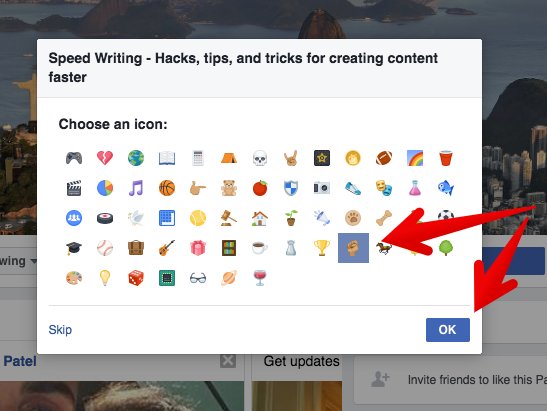
Pick an icon (optional).
To add a bit of visual flair to your group, select an icon for it.
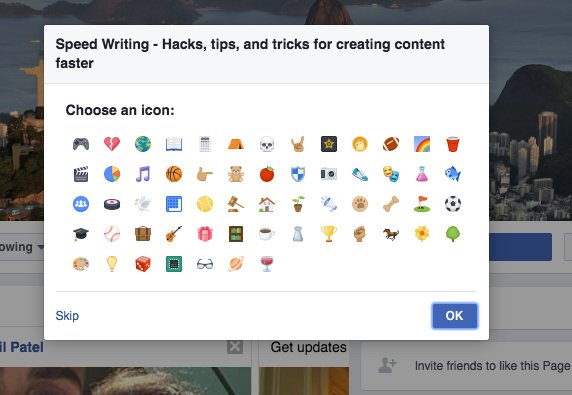
The selections are a bit random but just pick one. Then click “OK.”
That’s it! Your group is created.
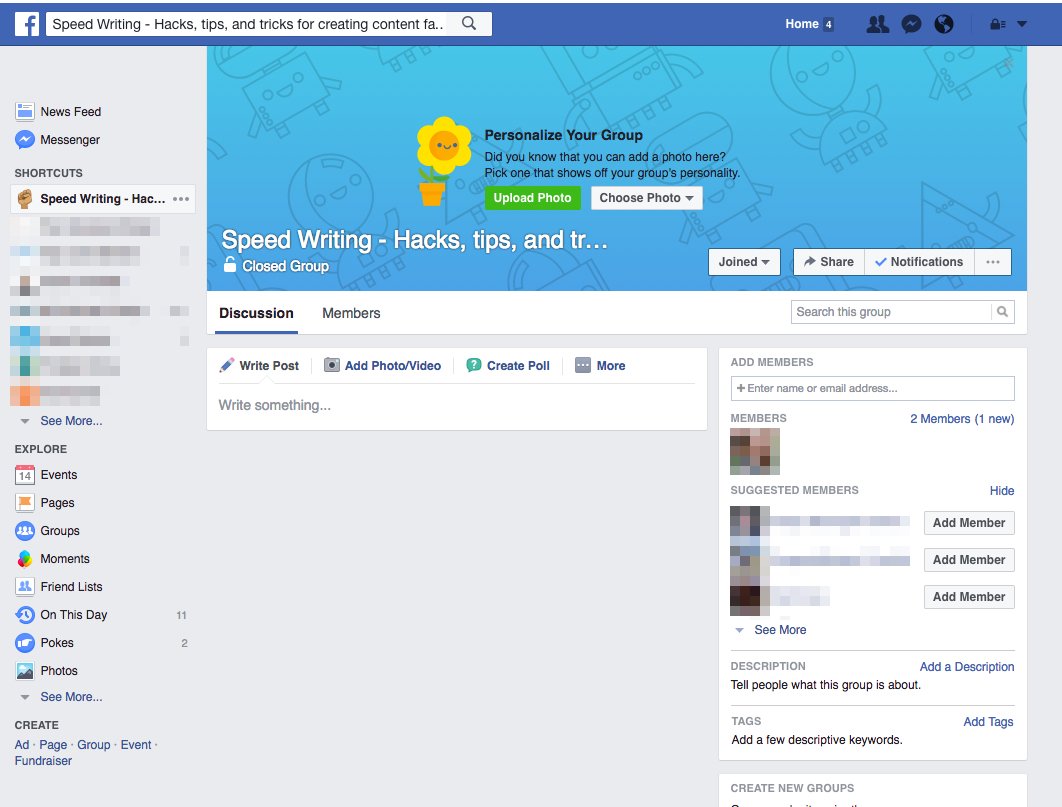
Looks a bit bland, right?
How the heck are you going to get this up to 11,284 members?
Step 2: Create the group’s identity.
Next, we need to shape up the group’s identity.
Click “Upload Photo.”
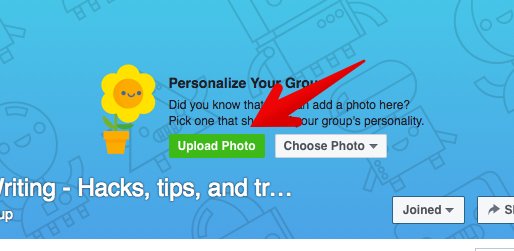
Select a photo from your computer.

Reposition the photo if necessary.
Facebook loads your image, and you can reposition it if necessary.
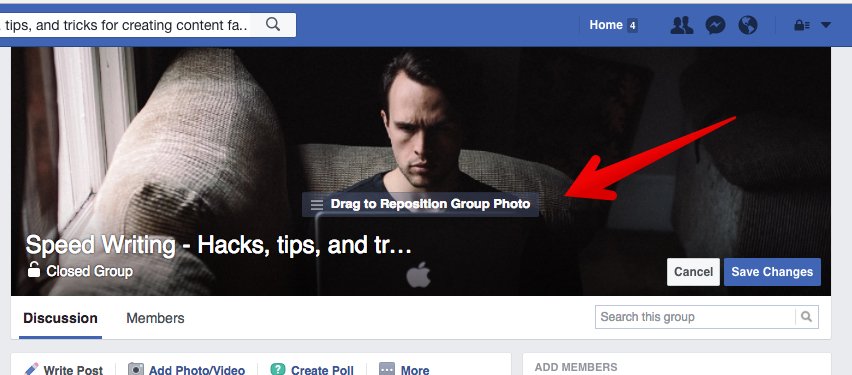
I dragged the image down just a little so the man’s face was visible.
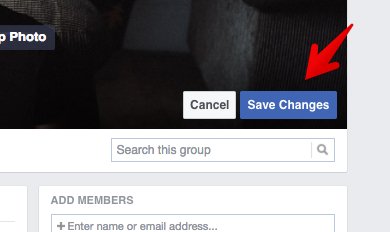
Click “Save Changes.”
So far so good. Now, it’s time to add a Group Description.
Click “Add a Description” in the right sidebar.
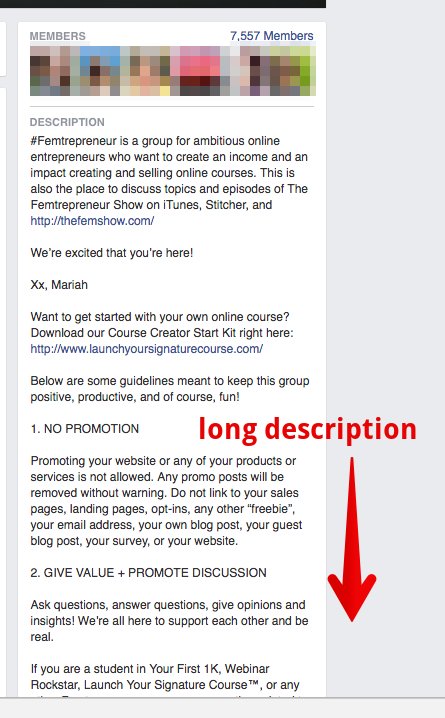
Create a description of the group.
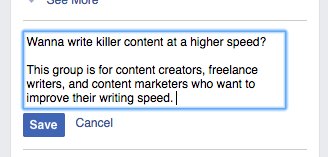
You can make this as long or as short as you want.
Some groups choose to share a lot of information in their description, including a letter from the founder and the group’s guidelines.
Click “Save” when you’re done.
Next, click “Add Tags” below the group description.
This is where you add a couple of words or phrases that describe what the group is about. These keywords will help other people find the group.
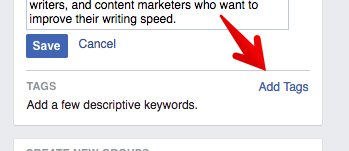
You can add as many as five tags.
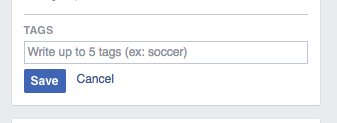
As you type words, Facebook will auto-populate suggestions of topics with like counts.
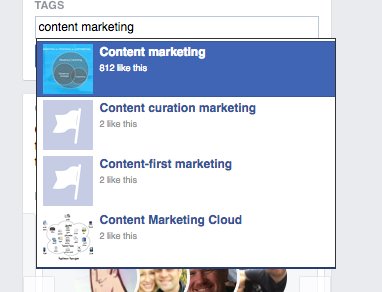
Choose the most relevant tags with the highest number of likes.
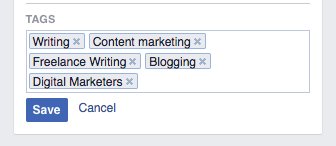
Click “Save.”
Great! Your group is taking shape.
You’ll notice that when you add a description or a photo, this activity appears in the group’s timeline.
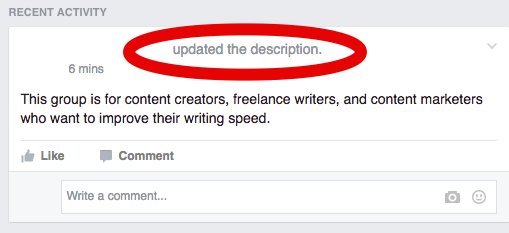
There’s nothing wrong with this. However, if you want to make the timeline less cluttered with irrelevant information, you can delete these updates.
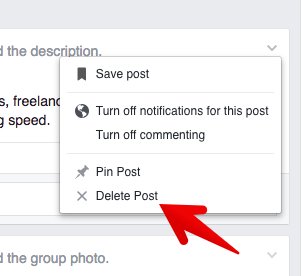
Click the down arrow on the status update.
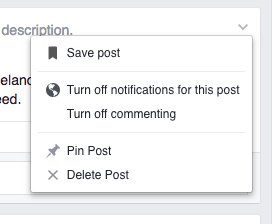
Click “Delete Post.”
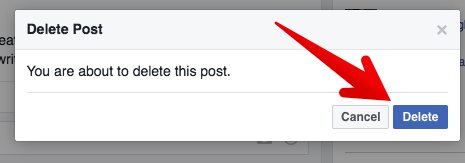
Confirm that you want to delete it.
Step 3: Create some content.
Next, it’s time to add some content.
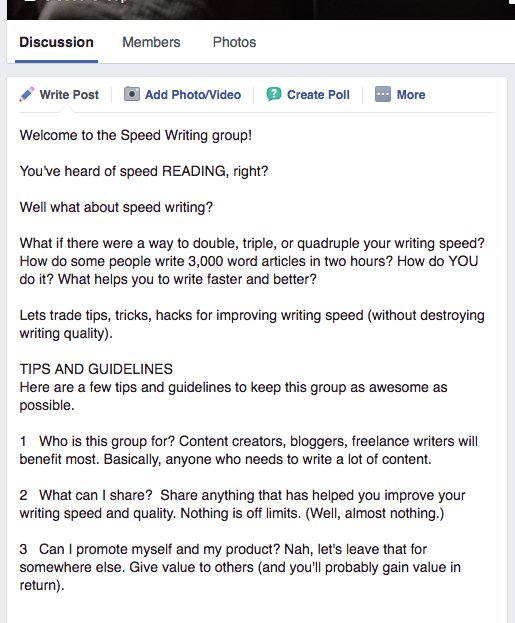
As a first step, I would suggest a brief welcome letter and guidelines. You can add an image, a video, or just a simple text post.
The first thing that people see when they join the group should be a cheerful “hello” and some expectations.
Let’s do that now.
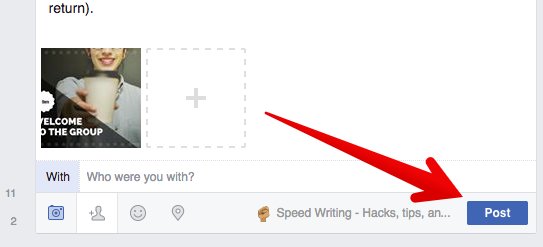
Click on “Write Post” in the group timeline, and create your message.
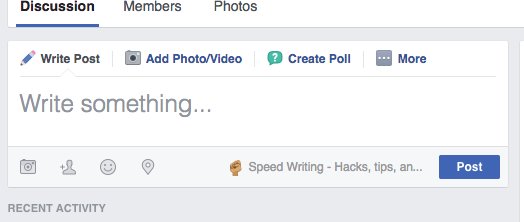
Your post can be as long or short as you want.
I recommend adding an image to your post in order to make it stand out.
To do so, click the camera icon in the lower left corner.
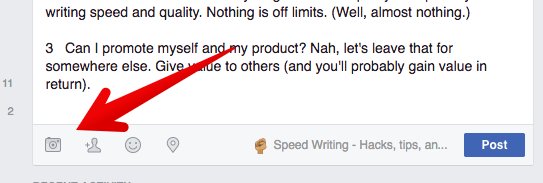
Select an image from your computer.
Then, click “Post.”
To make it permanently affixed to the top of the page, click the down arrow on the upper right of the post.
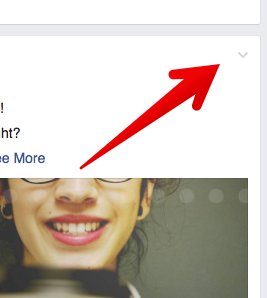
Click “Pin Post” from the menu.
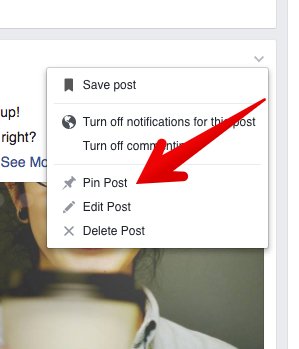
Now, this post will be the first thing that people see when they join the group.
If you’re creating a close group (recommended), it’s a good idea to put these rules right where people can see them right away.
Here’s why. A lot of people use Facebook groups as a marketing channel, but they use other people’s Facebook groups to market themselves or their product.
In other words, rather than going to the hard work of creating their own group from scratch, they hop on someone else’s group, and start marketing to the audience.
This may achieve some short-term results in terms of eyeballs, but it’s usually not healthy for the long term reputation of the brand.
To limit this kind of marketing, post your rules and stick to ‘em.
Let me wrap up this point (Step 3: Create content).
You’ll never stop creating content for your Facebook group.
This is the whole purpose of a group — to interact, access content, get information, etc.
Like other forms of marketing, you’ll spend a lot of time at the front end, generating discussion, posting content, and engaging with members.
As time goes on, however, the group will become active enough that it doesn’t require your constant attention.
In other words, group members are interacting with each other, rather than simply responding to the content that you post.
Besides, you can also hire admins or group managers to reduce the workload of approving members, monitoring for spammers, and posting comments.
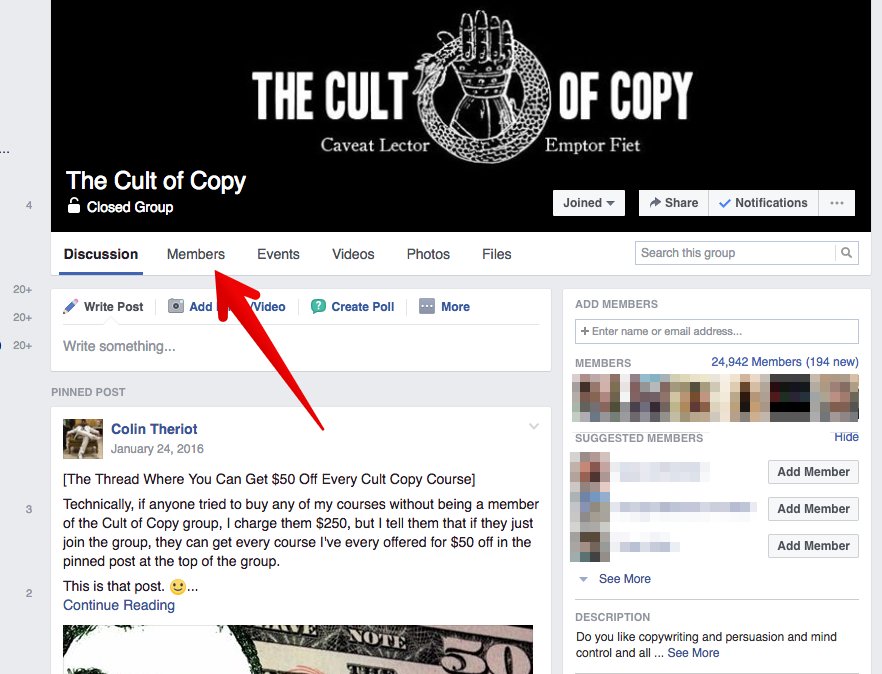
All groups have both admins and members. To see who’s who in a group, click the “Members” button on the menu.
Step 4: Promote Your Group
So far, you’ve created your group.
You’re creating content.
But how do you get members?
That’s what I want to cover in this section.
There are a lot of ways to grow your group membership. Instead of giving you a step-by-step way to do each method, I’ll list them out.
What you can do is try each of these methods. I suggest taking, say, one week and trying the first method. On the second week, try the next method.
Eventually, you’ll build up a strong, solid, and growing group.
Once your group hits critical velocity, it will grow by itself.
Some people have found that “critical velocity” — the point at which the group grows by itself — happens at the 500-member mark.
Here’s how to get the ball rolling.
Method 1: Invite the right friends.
First things first.
You have the option to invite your existing friends to the group.
There’s a danger in this. Your friends might not want to join!
If you have some chill friends who love you, know what you’re up to, and want to support you, by all means, invite them.
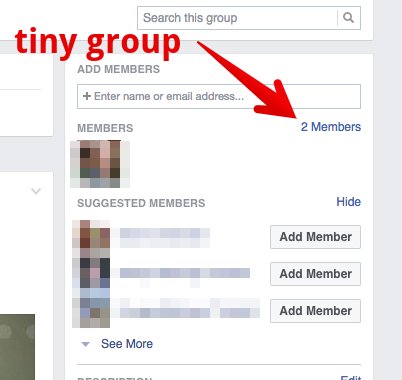
This group started with two members — me and a friend.
All you need to do to invite friends is click “Add Member” next to their name.
Better yet, search for the exact friends who will be best suited to the group and invite them.
A lot of us have a bunch of Facebook friends we hardly even know. Don’t invite people you don’t really know.
Instead, choose carefully and invite respectfully.
Method 2: Pay for ads.
There’s nothing wrong with buying ads to promote your group.
Often, it’s a simple but effective way to get your group some initial visibility.
I’ve written a thorough guide to creating ads for a Facebook group.
- Go to this post.
- Type CTRL + F in your browser and type “head over to h”
- This takes you to the section of the article where I show you how to promote your page with paid ads.
Or, if you are already familiar with Facebook ads, go to Ad Manager to start.
Method 3: Mention your group in similar groups.
Okay, you need to be really careful with this one.
Remember how I mentioned that some people go to existing groups to promote their group?
In my opinion, that’s poor taste. It smacks of self-promotion and is a big turn off.
Sometimes, however, it’s appropriate. You can mention your group in parallel groups.
How do you know if it’s a good occasion to do so?
- The rules of the group don’t prohibit it.
- Someone asks you/tags you or is looking for help that your group solves.
- You are actually adding value to the group by mentioning your group.
There are few occasions for this kind of promotion. When you see the opportunity, take it.
Method 4: Invite your blog readers to join your group.
Most of your blog readers are on Facebook.
Ask them to join your group, and provide a link for easy access.
Method 5: Announce your group on your personal Facebook page.
Tell your friends you’ve started a group and see if they want to join.
Method 6: Post it on Twitter.
If you have a sizeable Twitter following, do some cross promotion of your new group there as well.
You can create a pinned post on Twitter along with your group logo or graphic, and invite Twitter followers to join.
Method 7: Post it on Instagram.
Leave no social media stone unturned.
Give your group a shout out on Instagram as well!
Post an attractive picture — again your group logo or cover image might work — and announce your group to the Instagram world.
To make it easy for people to join, add the Facebook group link in your profile.
Write “Link in profile” or #linkinprofile on the photo, so people can easily tap to your profile and then go to the group.
Method 8: Ask existing group members to invite other members.
This is my favorite method of group promotion.
It works best if you already have a small but loyal group of members.
Within the group, ask them to invite their friends to join. Be sure to explain exactly how they can do this.
Thankfully, it’s super easy to tell people how.
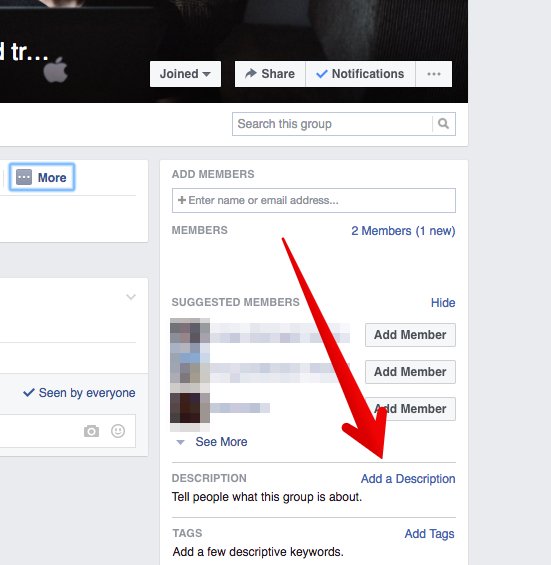
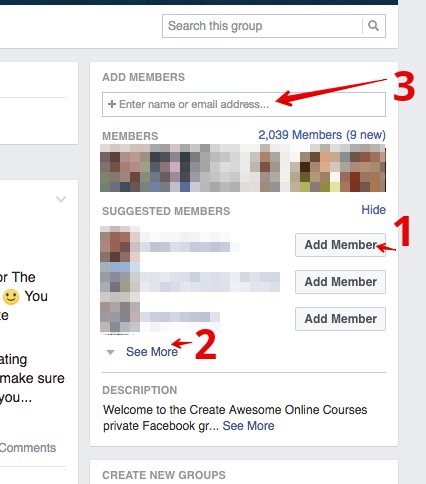
Go to the right side of the group page, and you’ll see the “Add Members” and “Suggested Members” sections.
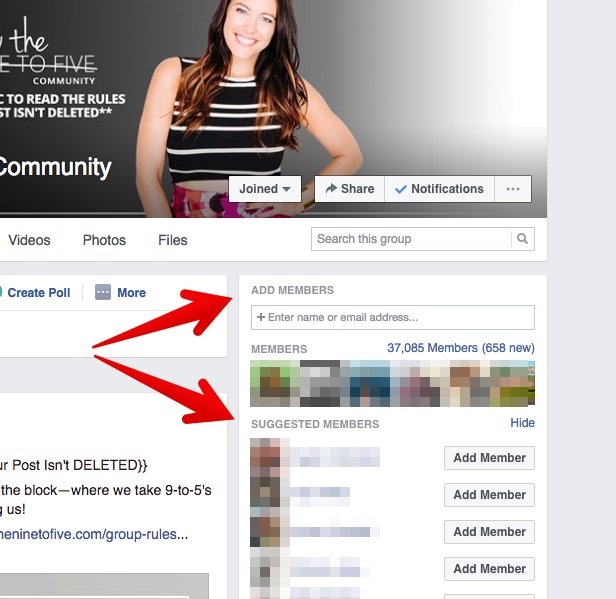
- Click “Add Member” next to your friend’s name.
- Click “See More” to invite even more of your friends.
- Find other friends by typing in their name or email.
You may want to advise your group members not to indiscriminately invite all their friends.
You don’t want the group to be watered down with people who aren’t even interested in the topic.
Instead, ask group members to invite only friends whom they think will be interested.
Method 9: Host a giveaway.
Giveaways are a historical fixture of the Internet.
People have been giving away iPads and gift cards for years. And giveaways still work!
Announce a giveaway on your group, and membership and engagement will rise.
You should promote the giveaway through all the methods above, plus pick a date and create a Facebook event.
Method 9: Ask influencers to join and promote your group.
This one takes some doing, but it can have a dynamite impact.
Get an influencer to join your group. If they join it and promote it among their audience, you’ll win.
I’ve written a complete guide to getting promoted by social media influencers. Find these people, and ask them to promote your group.
Conclusion
I’ve seen some would-be group leaders do something really unwise.
They start a group.
That’s the easy part.
But it’s only the beginning.
They may post a few times and casually invite a few friends.
But then it’s over. They stop posting. They stop promoting. They don’t do anything else.
The group dies.
Look, there are a billion Facebook users using Groups right now. The audience potential is there for the taking.
Don’t stop promoting your group until you’ve reached at least 500 members. Once you’ve reached that threshold, you can congratulate yourself on a job well done.
Groups are an incredibly valuable way to grow your audience, increase your brand visibility, and strengthen your business.
Start one, and then promote it like crazy.
Have you ever started a Facebook group? How did you grow it?
Comments (180)