
You’ve worked for hours on end getting new campaigns started.
Countless days spent planning your goals, prepping your landing pages, and setting up your tracking.
Until you check back in a few days and realize that nothing is attributing properly.
Tags were installed, but they weren’t installed correctly and are reporting misinformation on your campaigns.
This is an all-too-common scenario in the marketing world. For any third-party service to connect to your site, you need scripts.
And scripts often have the major problem of not being installed properly — or the code is simply wrong.
When situations like that occur, it’s impossible to understand how well your marketing campaigns are performing.
You could be landing dozens upon dozens of highly qualified leads a day, but you might not be receiving the credit.
Chalk it up to “word of mouth” or “the latest sales team tactic,” but you know that’s not true.
It was you. Your hard work. But you simply didn’t get the credit for it.
Thankfully, Google’s Tag Manager can help you solve all of those issues fast.
Here’s everything you need to know about the Tag Manager and how to use it to ensure that you get the credit for marketing campaigns.
What is the Google Tag Manager and why is it useful?
For the longest time, Google Analytics was the number one source of data for most businesses.
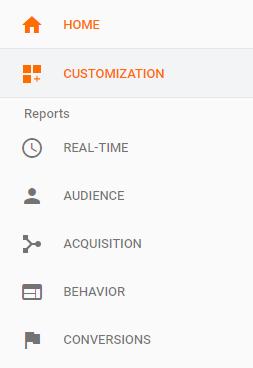
You can see everything from users to sessions, bounce rates, and more. Plus, the number of reports you can run is amazing:
When it comes to collecting actionable data and insights, you always need tags. They’re scripts that can run on your website from third parties, allowing them to collect and process data.
But then, in 2012, Google announced their new release of the Google Tag Manager.
Most people now often get the Google Tag Manager and Google Analytics confused. While the dashboards are similar, they are completely separate entities.
To be clear, Google Tag Manager is a different tool than Analytics, working with separate software and different dashboards.
Essentially, the Tag Manager is just what it sounds like.
The software works to create a user-friendly solution to manage JavaScript snippets and codes that you normally use to track on your website or applications.
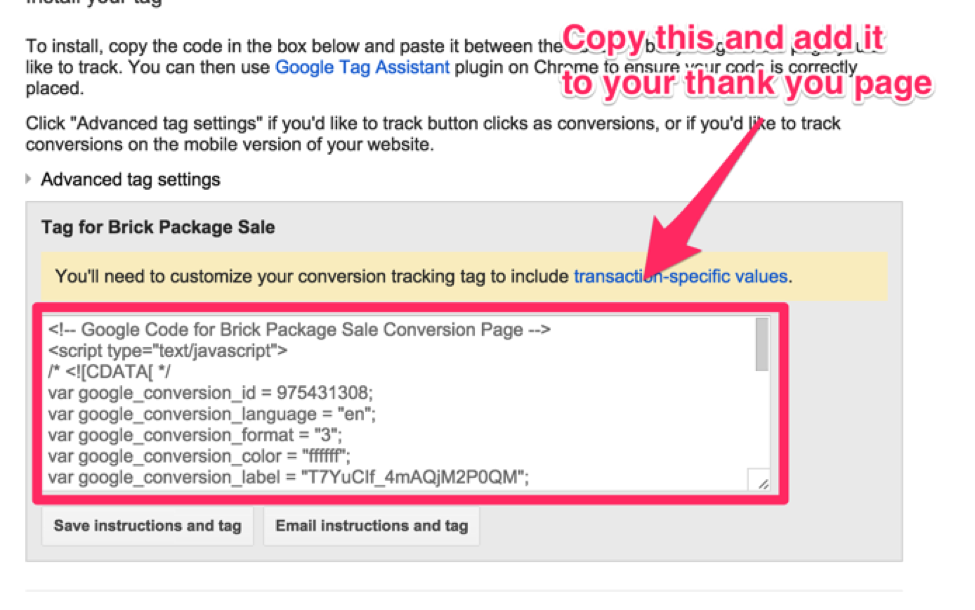
For example, if you want to run a new campaign on AdWords, you will need to install your script:
The Tag Manager helps you manage any codes that need to be installed on your site. This includes anything from conversion tracking to call tracking to remarketing.
The Tag Manager simplifies the process by adding these snippets to your site for you.
Instead of you updating the code or pasting it on each page on your site, the program allows you to decide where to place the code and on what pages.
From there, it does all of the work for you.
Generally speaking, the Tag Manager works in a three-part process:
- The tag: A piece of code, like an AdWords conversion-tracking script, gets added to a page.
- Trigger: Next, you define when and where the code gets executed, for example, when someone lands on a page.
- Variables: Additional modifiers used to receive or store data from tags.
To summarize it, the Tag Manager is a user-friendly program that allows you to edit and place code on your site without having to hardcode it.
It’s useful because, in the past, you would need a developer to make any changes to existing codes. And we all know that those tasks fall behind routine maintenance.
Meaning you could be waiting days or weeks, leaving you with no credit for marketing campaigns that are currently live.
For example, let’s say you wanted to edit a new event for the tag, like how many people added something to your cart.
That requires editing of the hardcode, meaning your developer has to do it.
But with the Tag Manager, you can do this on your own with ease, using step-by-step instructions in the program itself.
Now that you’ve got the basics down, here’s how to set up the Tag Manager on your own website in just a few minutes.
How to set up the Tag Manager for your website
To get started with the Tag Manager, you will need to do some basic setup work.
It involves creating a Tag Manager account, adding one snippet of code to your site and migrating any hardcoded tags back into the Tag Manager once it is installed.
This will allow you to have only a single snippet hardcoded on your site while keeping all tags managed easily in your Tag Manager for quick changes.
So let’s jump right in!
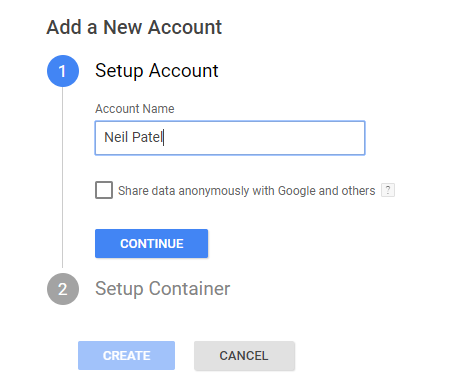
Head to the Google Tag Manager site and create a new account (or add to an existing one).
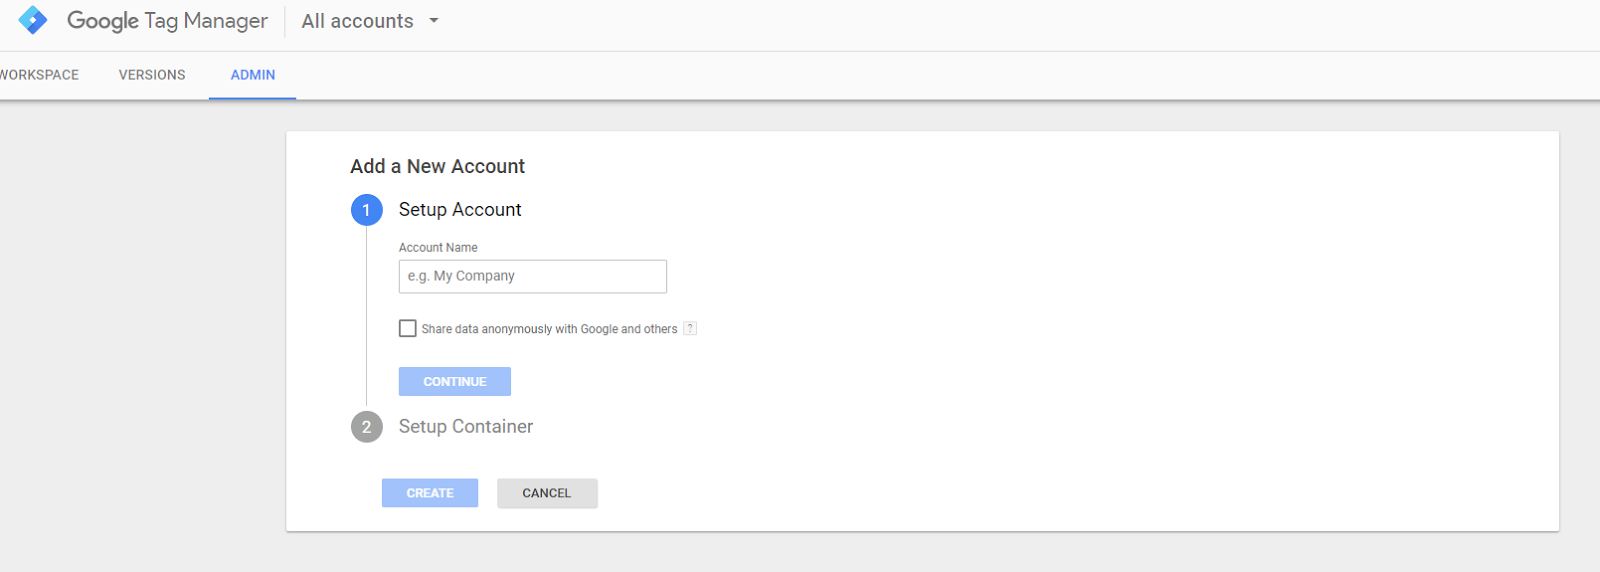
First, name your new account using your company name in the first box:
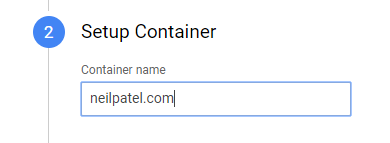
From here, you can enter your website URL into the “Container” setup box:
Next, you are going to select where you want to use the container:

For example, do you want this Tag Manager container to manage snippets of code for AMP, mobile applications on iOS and Android, or on your website?
The Tag Manager container is essentially a single snippet of code that you install on your source (web page, application, AMP) that contains all of your other codes, instead of crowding your source with snippets.
Next, select the container you want to use, and be sure to accept their terms of service:

From here, you should get an instant pop-up box telling you to work through two specific steps to install your new container tag on your given site, application, or AMP.
First, you’ll want to copy and paste the first code onto every page of your website, as high as you can in the <head> section of the page.
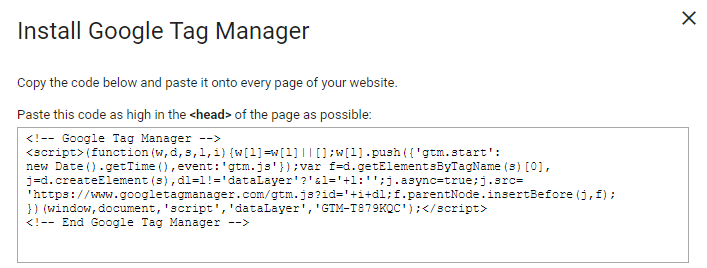
Second, you’ll want to paste the next code immediately after the opening <body> tag on each page of your site:

If you can’t seem to get it, use their Quick Start Guide to get more information.
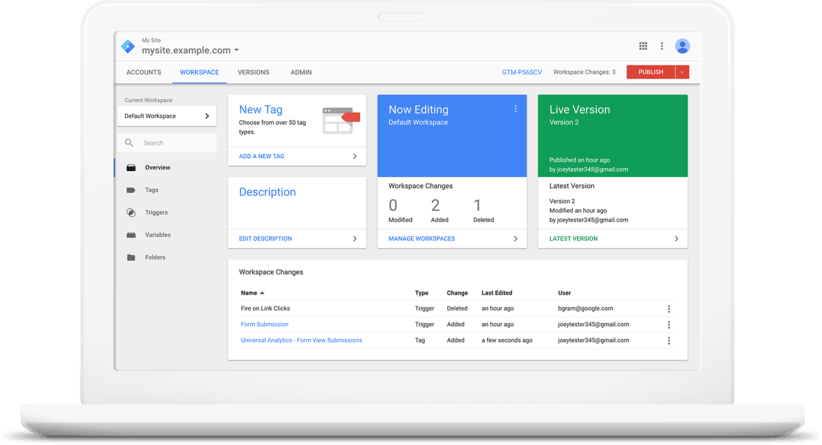
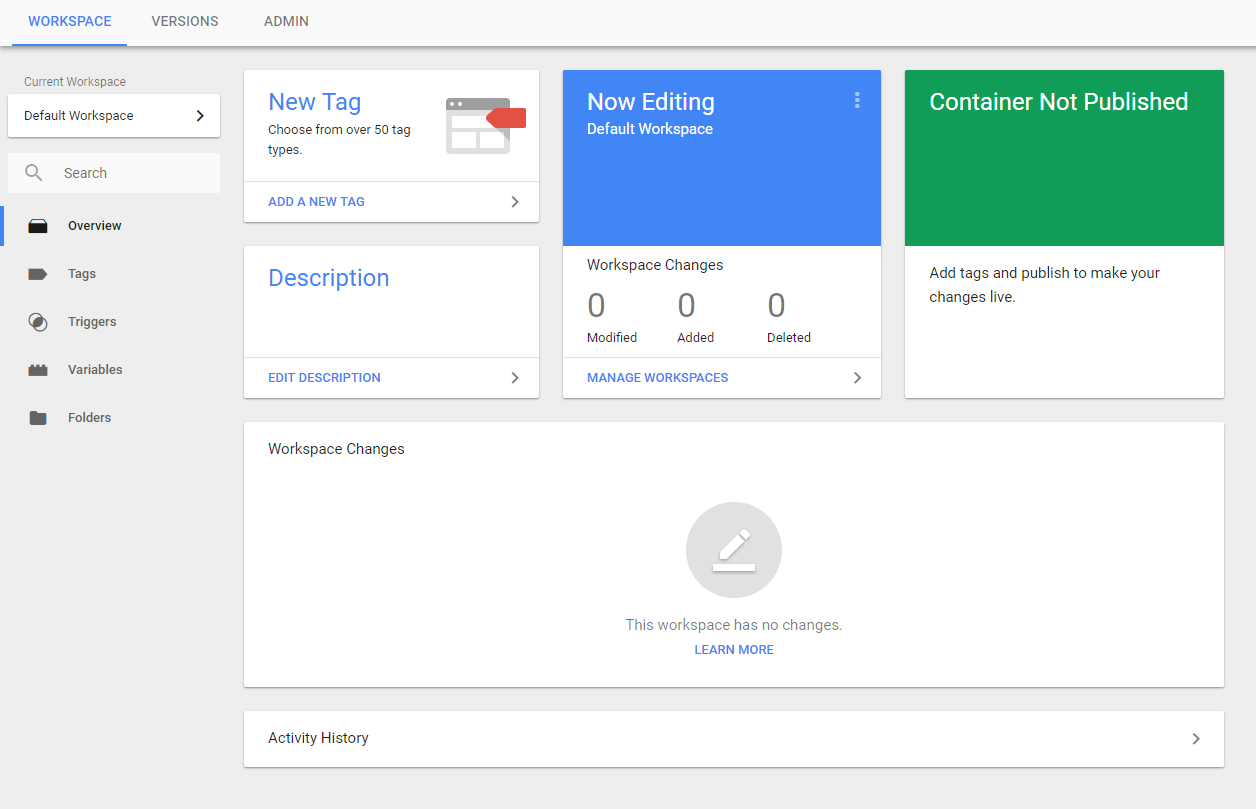
Once you have gotten the container tag installed on each page of your site, or on your mobile application, you can now manage everything on the tag manager dashboard:
More than likely though, you will have additional tags that are hardcoded into your current website.
For example, things like AdWords scripts, Analytics, Facebook Pixel and any other third-party software you use for tracking.
So, let’s get those installed back into the Tag Manager and off of your existing site.
Switch from hardcoded Analytics to Google Tag Manager with ease
Tag management tools are some of the best time-saving tools on the planet when it comes to marketing.
Especially if you are constantly running new campaigns and adjusting scripts to fit new goals (which you should be).
But somehow, they still aren’t that widely used. Tons of past marketers and clients I have spoken with don’t have these simple tools in place just yet.
In this section, I will show you how to take hardcoded tags, like your conversion tracking, and merge them back into the Google Tag Manager so that you can easily edit them in the future.
If you have the following Google Analytics code installed on your site, you have hardcoded scripts that can transfer over:
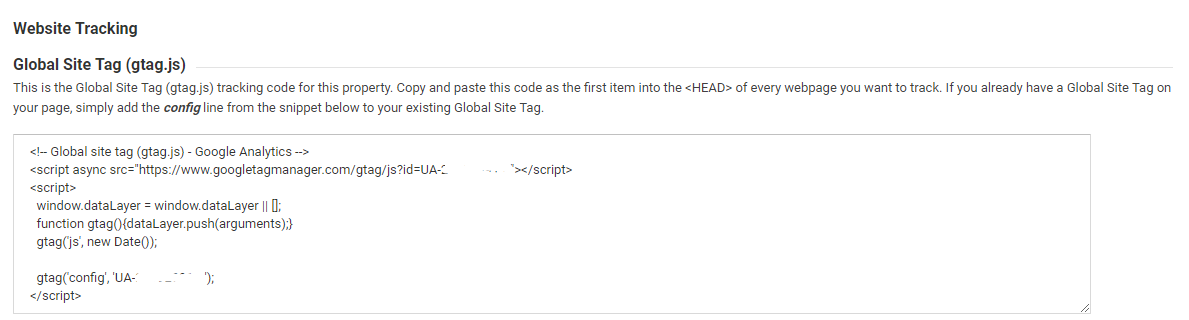
Using the Tag Manager, we can easily allow it to collect data, remove the old scripts and replace them with the container script.
The big issue that most see with Tag Managers is often about the switch.
Will it impact my conversion tracking? How does my data remain intact or not inflated due to the switch?
Follow these steps, and you can ensure that your transition will be as smooth as possible.
Let’s get started.
Step 1. Ensure the Tag Manager container tag is installed.
Remember that container tag that you dealt with earlier in this process?
The first step here is to ensure you have these tags installed properly on your site.
One great way to check is by using the Google Tag Assistant tool that you can install on Google Chrome:
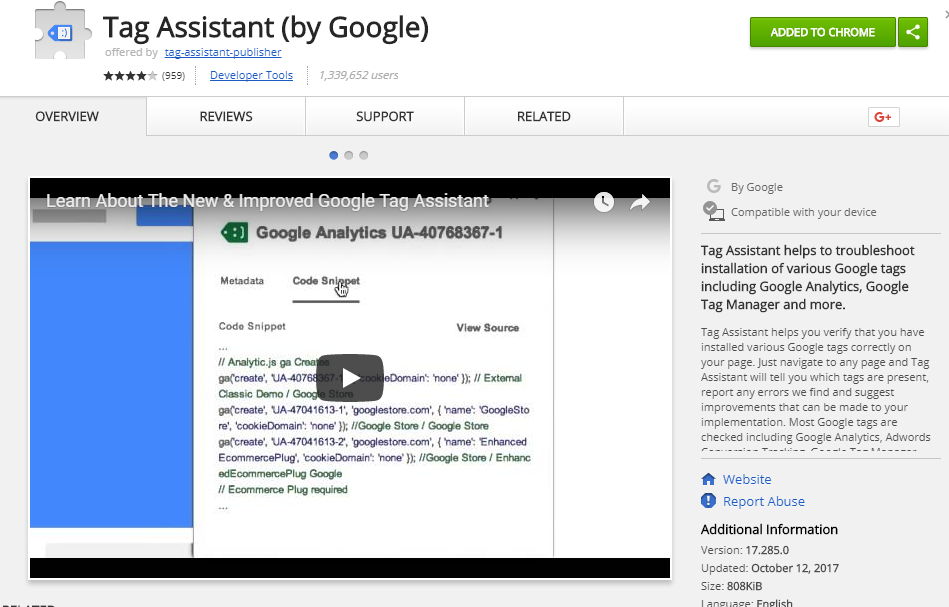
You can use this to test that your tags are installed properly.
Once you’ve done that, move on to step two.
Step 2. Create a page view tracking tag in the Tag Manager.
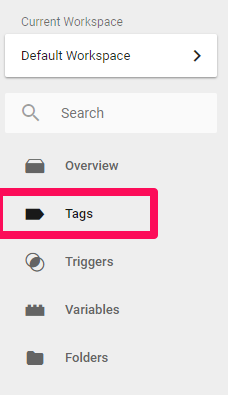
Log in to your Tag Manager account and navigate to the “Tags” section of your dashboard menu:
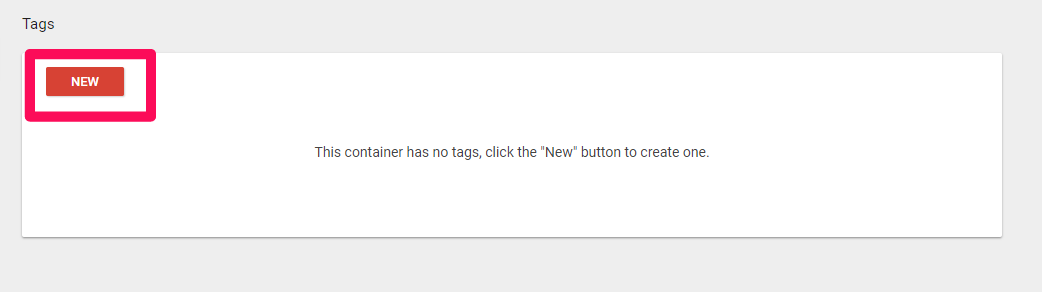
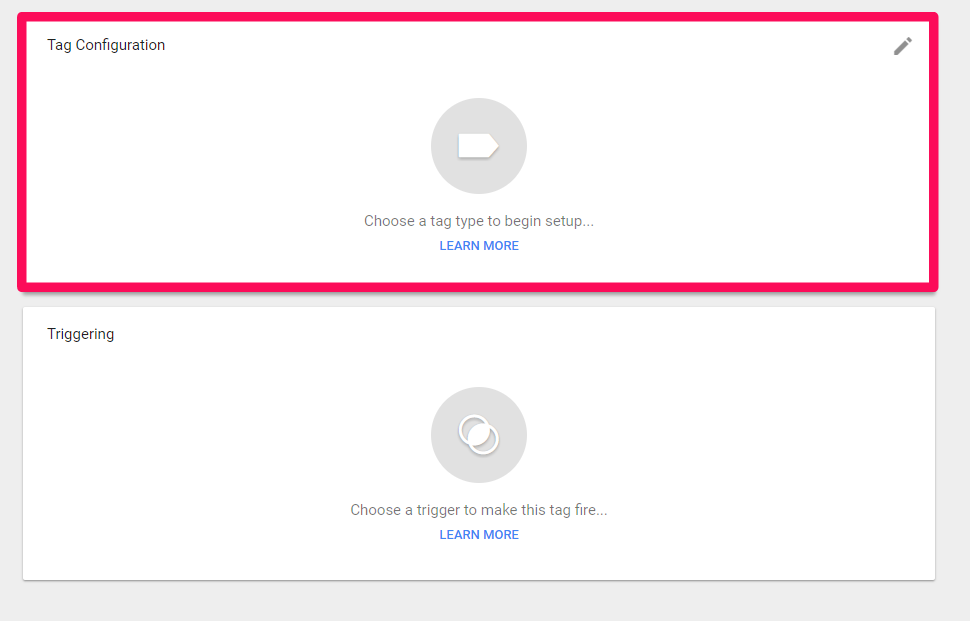
From here, click “New” to generate a new tracking tag:
During configuration, start by editing the “Tag Configuration” section by clicking on the box:
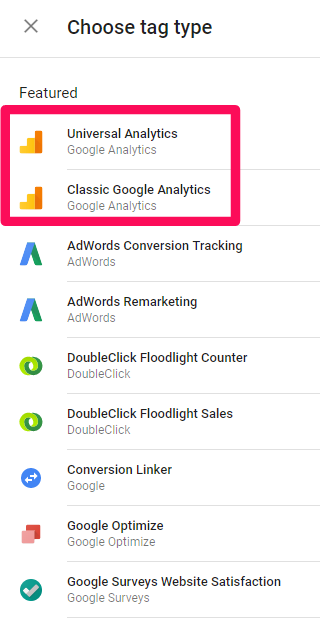
From the drop-down menu, select Analytics as your tag type, selecting either Universal or Classic depending on which one you use:
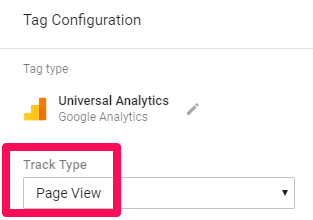
After selecting the tag type, be sure that you enable the “Page View” track type:
Lastly, under the “Triggering” section, select “All Pages Page View” as your firing trigger.
This will allow Analytics to track each new page view when a user views any page on your site.

Now it’s time to create a new variable.
Step 3. Create a new variable in the Tag Manager.
Next, we need to create a new variable within the Tag Manager that will help the Tag Manager automatically transfer existing hardcoded tags.
The variable will help look into your site’s source code to scan for hardcoded scripts.
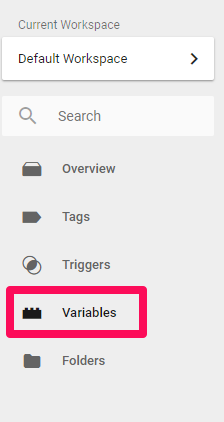
To get started, head to the “Variables” section of your dashboard:
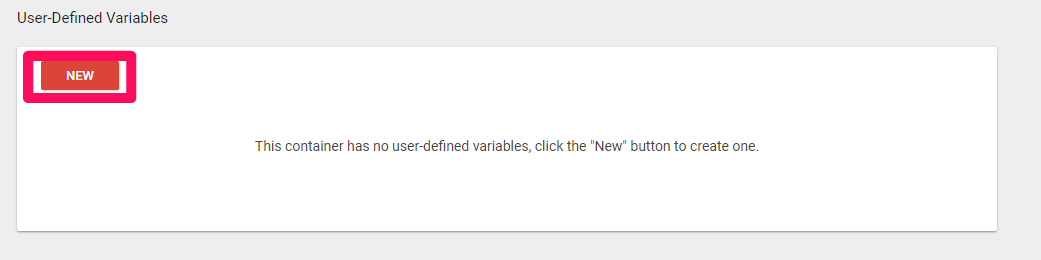
Click on the “User-Defined Variables” section, and click “New” to create a new variable:
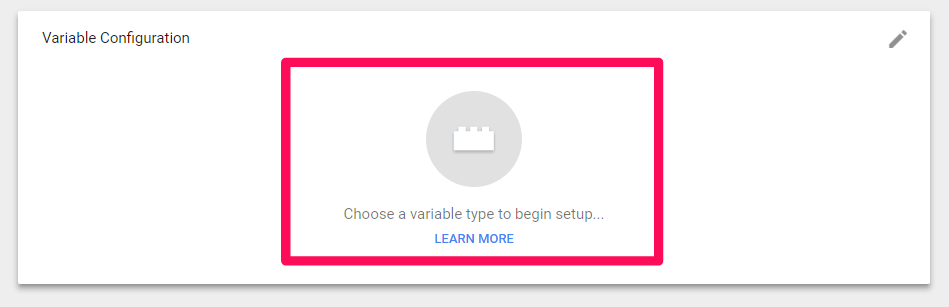
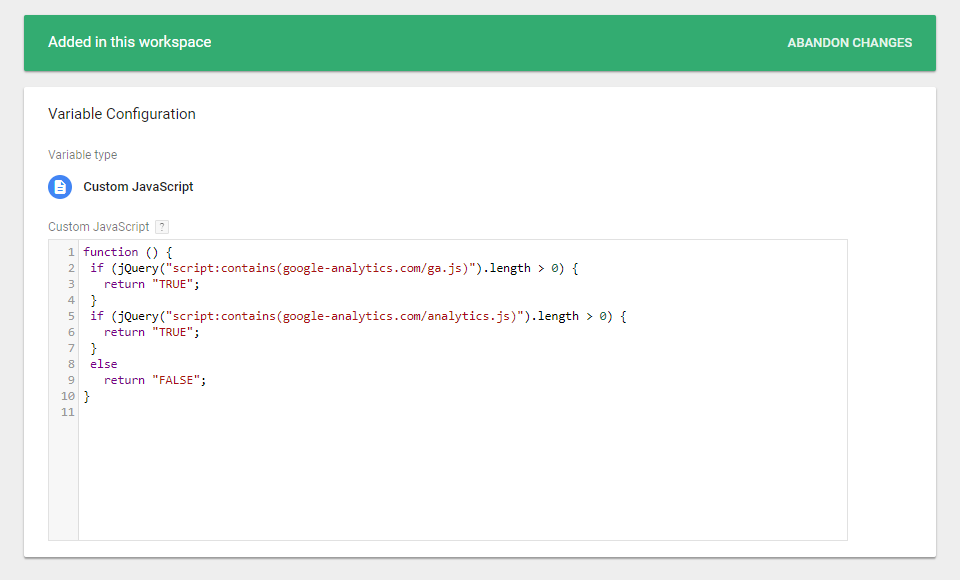
From here, click on the “Variable Configuration” step, and click the center of the box to choose a variable:
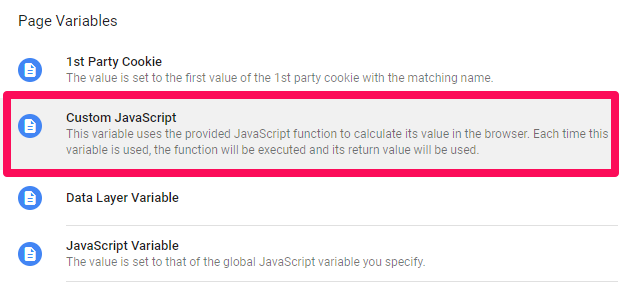
From the Page Variables list, select “Custom JavaScript:”
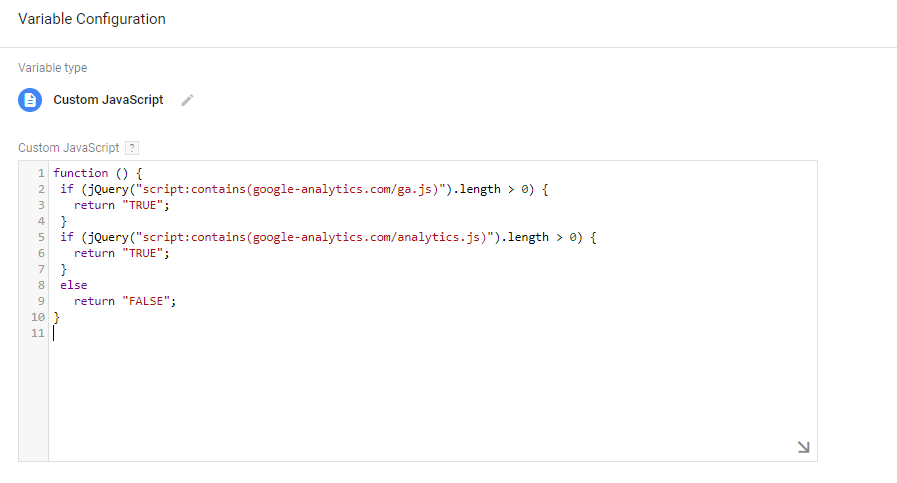
Next, copy and paste the following code into the JavaScript box:
function () {
if (jQuery(“script:contains(google-analytics.com/ga.js)”).length > 0) {
return “TRUE”;
}
if (jQuery(“script:contains(google-analytics.com/analytics.js)”).length > 0) {
return “TRUE”;
}
else
return “FALSE”;
}
Once you’ve copied it, your end product should be highlighted in green, like this:
Step 4. Create a new trigger in the Tag Manager.
Now that you have that variable established, you can create a new trigger to block the Tag Manager page view tracking when there is already an existing, hardcoded Analytics script on the site.
This will prevent double tracking of data that could seriously impact your Analytics. This step is crucial.
To get started, head to the “Triggers” tab on your GTM dashboard:

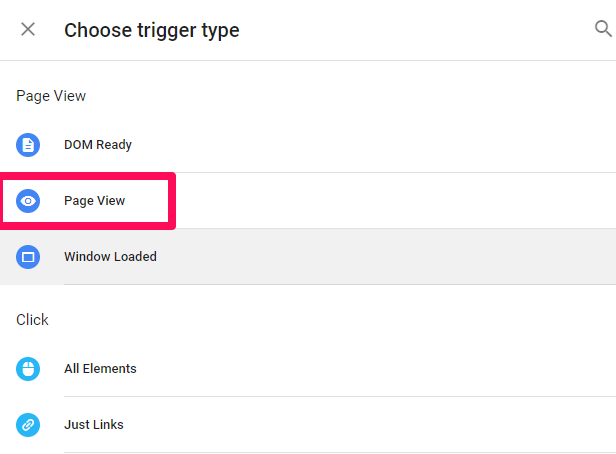
From here, click “New” to create a new trigger. Select the “Trigger Configuration” box again to continue:

From the drop-down menu, select “Page View” as your trigger type:
Now, here is the critical step. While configuring your trigger, be sure to enable the trigger to fire on “Some Page Views:”
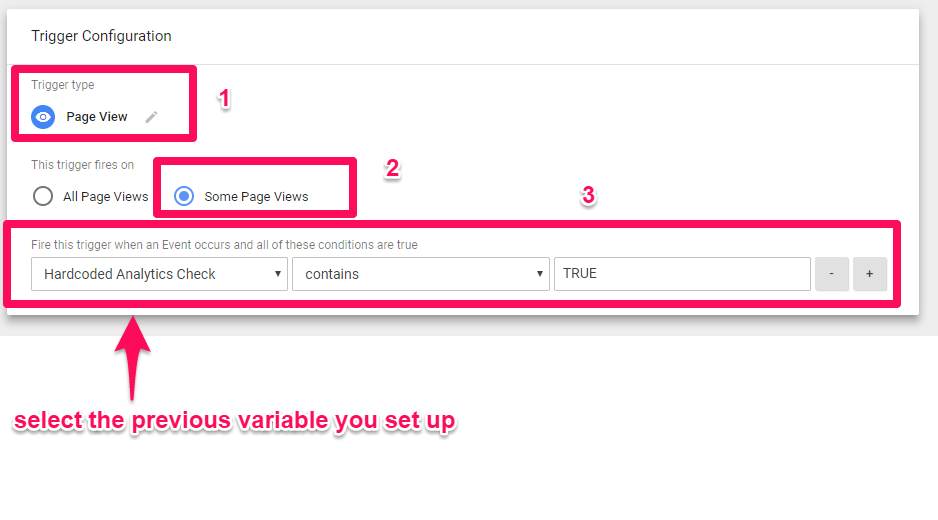
This will pull up a formula where you can select when the trigger will fire. First, select the previous variable we just set up in the previous step.
Next, set the trigger to “contains TRUE.” This will block the Tag Manager from tracking pages where the hardcoded Analytics script is already active, preventing double metric reporting.
Step 5. Modify the existing page view tracker.
Lastly, navigate back to the tag section of your account, and locate the initial tag from Google Analytics that you set up.
In here, create a new exception to the tag using the hardcoded Analytics script:

Step 6. Publish!
Voila! You’ve done it. You deserve an immense pat on the back.
The only step left is to alert your developers to remove the hardcoded Google Analytics tag from your entire website.
Now with these scripts in place, as soon as the hardcoded tag is removed, the Tag Manager will understand that your code is no longer in place, allowing the Tag Manager tag we created to take effect.
How to use the Tag Manager for easy marketing adjustments
The strength of the Tag Manager lies in its user-friendly software and dashboard.
How long currently would it take you to get your developer to make a massive code change to each page on your site?
For example, let’s say you are running an e-commerce marketing campaign. You notice that conversions aren’t great. So, you want to add the following event: add to cart.
Meaning you want to track every time someone adds something to their cart. How long would it take your developer to do it?
More than likely, at least a few days with the normal issues that websites face on a daily, let alone hourly, basis.
That’s where the Tag Manager comes into play. With their dashboard, you can add these events in seconds and have them take effect immediately on your site with a single click.
For example, let’s say you wanted to track a new tag on your site using a tool like Crazy Egg:
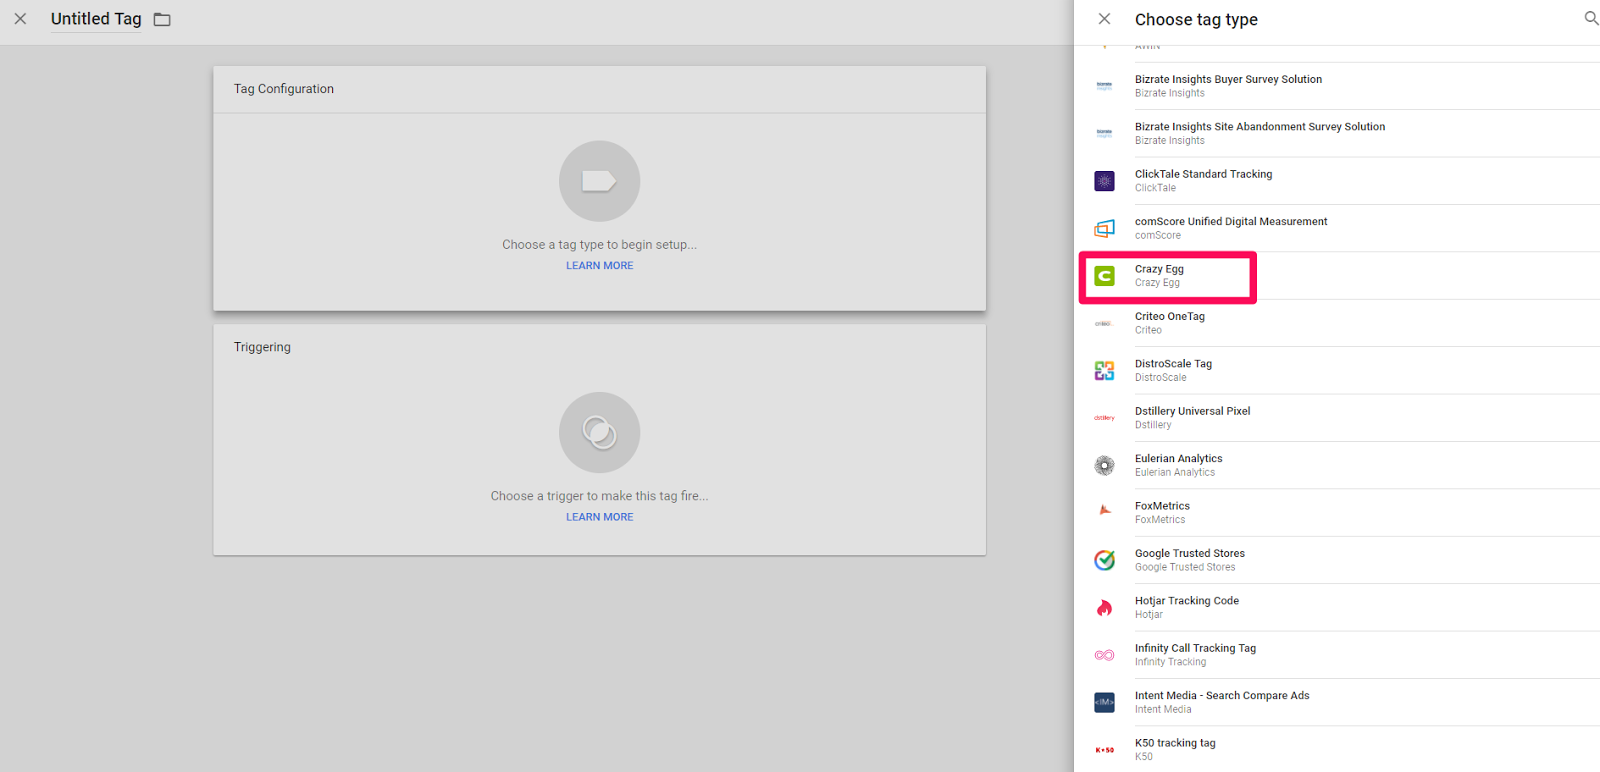
You simply create a new tag on the Tag Manager and select Crazy Egg as the source.
From here, you don’t have to do any coding to get the job done. You can add extremely advanced functions, like timed-based firing schedules without touching a line of code:
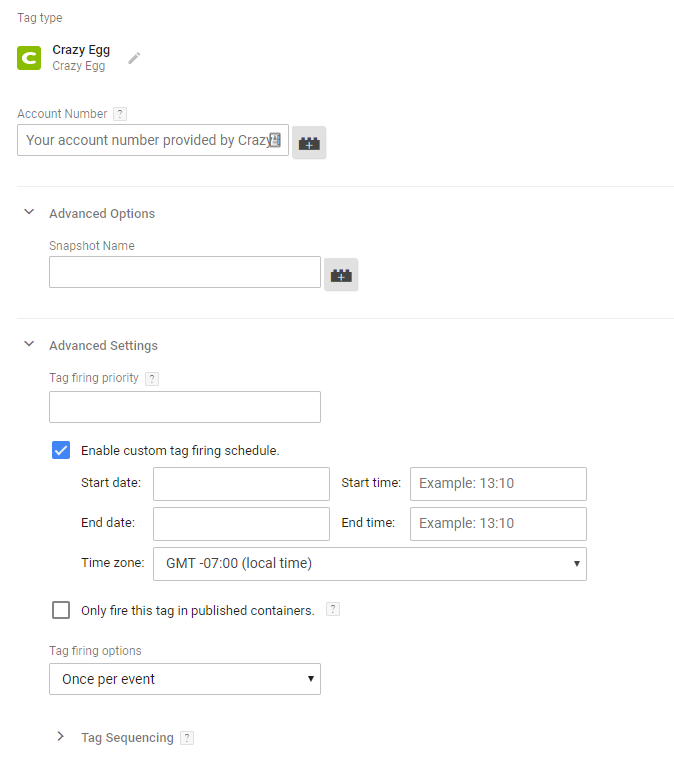
You can then create new triggers or variables for each script, like only triggering the Crazy Egg script to run when someone scrolls past a certain length:
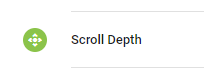
For example, you want to take the heat maps of only the most interested users. So scroll depth can help you weed out users who are reading the first two lines and leaving.
Adding this without the Tag Manager would require a good deal of coding knowledge.
Or when someone loads a specific window, you can enable the tracking to run:

The options are nearly limitless, and give you full and total customization over every single script you run on-site.
Conclusion
Getting campaigns established takes a ton of work. Especially when it comes to setting up the proper scripts.
Everything from AdWords to Analytics to Crazy Egg has scripts that need to run on your site. And hardcoding those into each page can take hours.
Plus, when it comes time to edit them for different goals or scenarios, you have to know how to code them. If you don’t, you simply can’t change them.
And that means all of your hard marketing efforts could be going unnoticed. Basic conversion tracking isn’t enough. It doesn’t tell you the whole story.
Micro-conversions aren’t going to get accredited. Only the major events like form-fills and phone calls.
Thankfully, the Google Tag Manager exists. And you don’t need to know any coding to use it, either.
Start by setting up the Tag Manager for your site and creating a new account. Next, you can switch any of your hardcoded tags using the steps I showed you above.
Lastly, you can start to customize all of your scripts to fit new campaigns and scenarios that you want to test.
Use the Tag Manager to manage all of your scripts in one database and edit them whenever you need to for better marketing reporting and performance.
What are your favorite ways to use Google’s Tag Manager?
Comments (18)