
Are you on board with the idea that you need to devote more time and resources to your blog posts?
If not, consider this: marketing professionals who have decided to start a blog and commit to blogging are more likely to experience a positive return on investment (ROI) from their target audience.
Even if you’re familiar with the many benefits of creating blog content, you may be holding back, for one of several reasons:
- You don’t know which blog post topics to cover.
- You don’t have enough time in your schedule for creating blog posts.
- You’ve never achieved success through blog content in the past.
Along with the above, there’s one other thing holding many marketers who start a blog back: they lack the knowledge and skills necessary to take a blog post from start to finish.
When you look at the big picture, it’s easy to be intimidated at the thought of creating a long form blog post.
Fortunately, it’s possible to tackle this task with a step-by-step guide mentality. By taking this approach, it’s much easier to efficiently make your way from start to finish.
In this blog post, I’ll examine seven tools that can help guide the blog content process from beginning to end. With these tools on your side, it’s much easier to complete one step at a time, as opposed to taking on everything at once. From learning how to install WordPress to domain names, web hosting, the search engines and even social networks – these are all the steps you should know about when you start a blog, and before you move on to these tools.
Here we go!
1. Google Keyword Planner
When creating a blog post or deciding to start a blog, there’s nothing more important than “speaking to” your target audience. You want to provide high quality, unique advice with your blog content that provides readers with something of real value.
Even with this in mind, you should understand that selecting the right keyword is incredibly important as part of your step-by-step guide. After all, there’s nothing wrong with providing value, while still putting your blog post in a position to drive search engine traffic.
Google Keyword Planner has long been a favorite tool among bloggers wanting to capture the spotlight of the search engine, thanks to its accurate data, ease of use and ability to help you dig deep for the best keywords to use in your blog posts.
Getting started means coming up with a basic idea of what you want to create blog content about. You don’t have to go too deep, just yet. Instead, an idea for your free blog is all that you need.
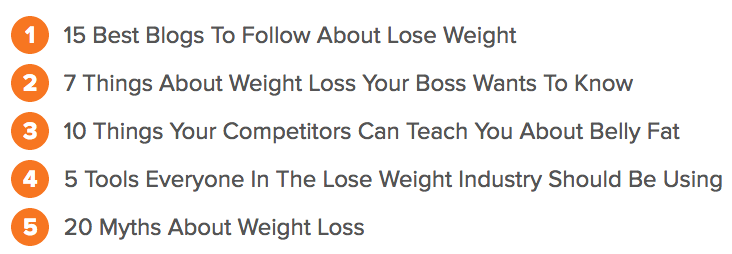
For example, maybe you want to create a blog post on how to lose weight.

Since this is likely to be a bit broad for a blog post, you’ll want to run a search, to see what else you can come up with that will help you stand out on the search engines.
Here are some ideas for your new post:
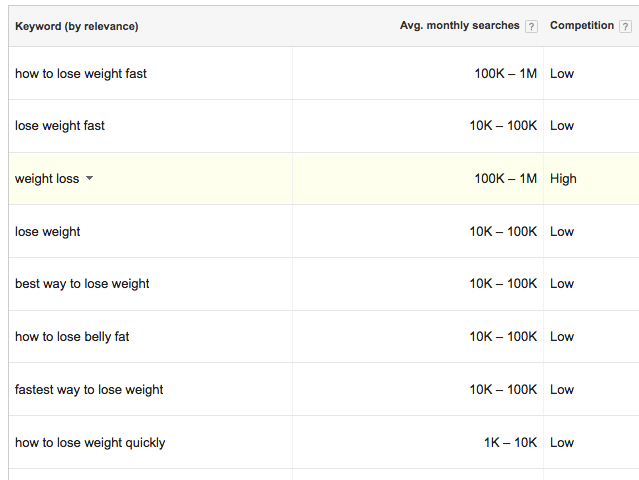
As you can see, there are many variations of the primary keyword, all of which could point you in the right direction.
For example, you could focus on “how to lose belly fat,” as this is less competitive than some of the other search engine terms.
Success with Google Keyword Planner is all about experimentation. If you take the time to search different keywords and then pay close attention to the data, you’ll make a much smarter decision, as to the direction you take with your next blog post.
Pro tip: KeywordTool.io provides many of the same features as Google Keyword Planner.
2. BuzzSumo
Once you settle on a keyword, it’s time to take the next step for your WordPress blog. This is when you get a better idea of what else is out there in terms of blog content and, more importantly, how it’s performed in the recent past.
With BuzzSumo guiding you, it won’t be long before you’re analyzing the blog content that has performed best for your chosen keyword.
Sticking with the example above, let’s run a search on “how to lose belly fat.” Here’s what you’ll see:
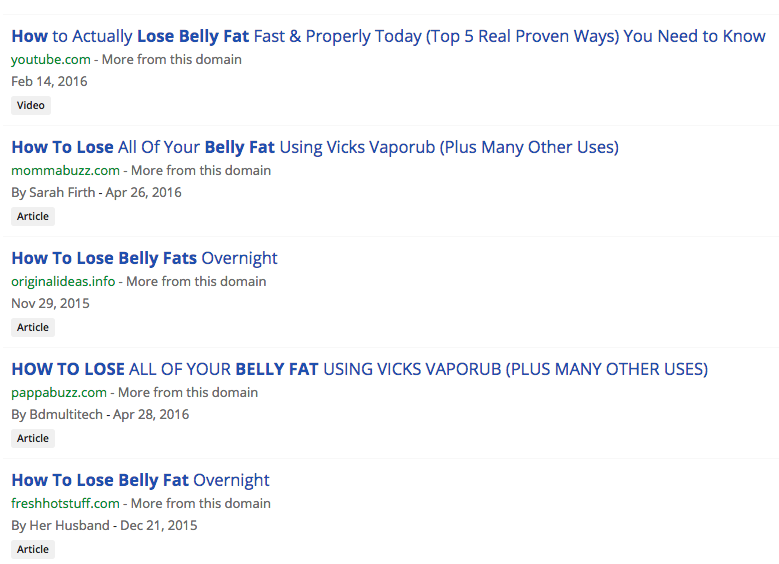
The top results are listed on the left side of the page, showing you the title, URL, author and publish date of each post.
This is important for many reasons, including the fact that it may give you some inspiration for your title (more on this in the next step).
Once you familiarize yourself with these details, let your eyes wander to the right side of the page. This is where you’ll see how much success each piece of blog content has had, from a social network perspective:
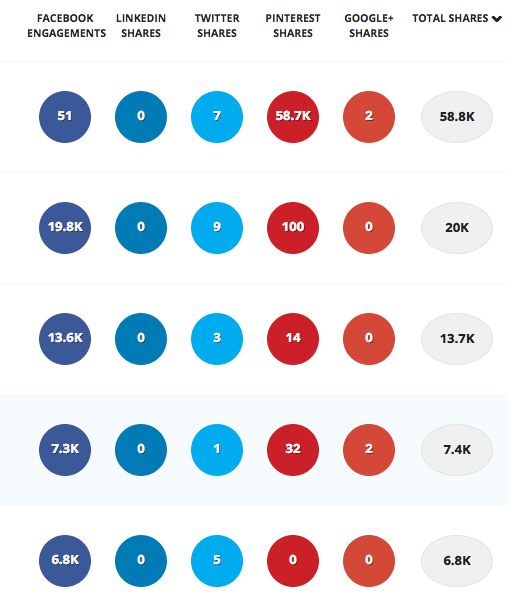
Don’t be intimidated by the social network numbers. Remember, these are the top performing posts, measured by social shares and based on your keyword search.
You may not reach this level of success right away. That’s okay. What you’re trying to do is understand the type of blog content that performs best. This gives you more direction for your own WordPress blog, as you move forward.
3. HubSpot’s Blog Topic Generator
Now that you’ve used the two tools above, you’re closer than ever to choosing a title for your blog post.
A blog post title is incredibly important. The right title can help to drive user engagement. You want it to be creative and unique. You want it to attract your target audience and give them a reason to stay on the page.
Over time, you’ll get a better idea of what does and doesn’t work, in regards to blog post titles. However, if you still need a little help, you can rely on a tool, like HubSpot’s Blog Topic Generator.
This is a favorite step-by-step guide tool of mine, for many reasons, including the fact that it’s simple to use. On top of that, it has a way of getting your creative juices flowing when thinking about blog content.
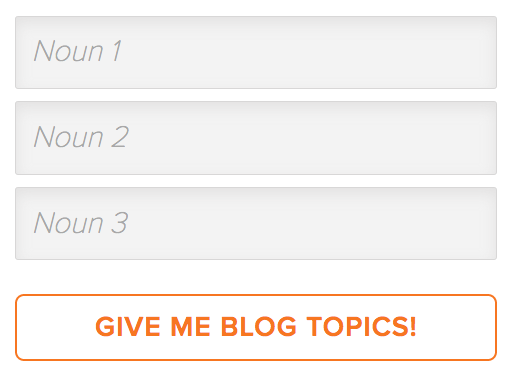
Getting started is as simple as completing this form:
Just as it is with every other tool on this list, you’ll want to experiment with a few different search terms. This is the best way to get a broad overview that spans your entire topic.
Here’s the type of results that you can expect:
If you find something you like from the first batch of results, run with it. If not, click the “Try Again” button and start from the beginning.
There will be times when you run a search, find a title you enjoy and are able to hit the ground running. There will be other times when you need to get a bit creative, building off of one of these ideas.
For example, you could take number 5 and morph it to “20 Myths About Weight Loss in your 40’s.” It’s the same basic idea, but it provides the opportunity to target a more specific target audience.
If you struggle to create unique blog content titles that engage your target audience, use this tool to jump-start your approach.
Pro tip: Portent’s Content Idea Generator provides a similar experience and results.
4. Hemingway App
To this point, we’ve discussed two primary steps:
- How to choose the right keyword for your blog post.
- How to create a unique title that’s based on your keyword.
Now, it’s time to move on to the good stuff. This is when you actually create the “meat” of the blog post.
You can choose the right keyword and title, but this won’t do you any good, if you have nothing of real value to share when it comes to your blog content. Taking this one step further, you want the quality of your blog post to be on par, or better than the rest of your industry.
This is where the Hemingway App comes into play. It doesn’t matter if you have just decided to start a blog or have been creating content for years, this is a tool that can improve your writing. And, when your writing improves, you can rest assured that your target audience will take notice.
Here’s what the blog content tool is all about:
“Hemingway App makes your writing bold and clear.”
That’s pretty easy to understand.
Getting started means copying and pasting your content into the tool. This only takes a couple of seconds, so there’s no wasted effort.
From there, the tool does all of the work for you. In a perfect world, your content would be just right. In the real world, however, it’s likely that the Hemingway App will find some areas that you can improve.
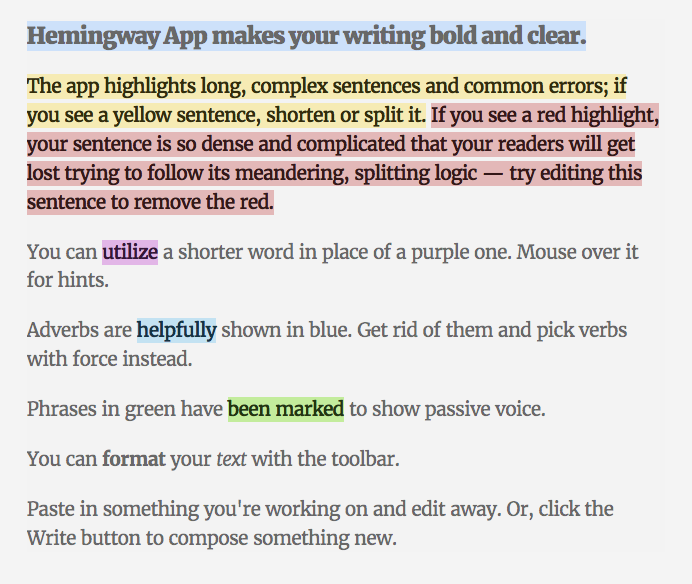
When something is highlighted, it means that you need to take action.
For example, yellow shading means that a sentence should be shortened or split in two. A red highlight points out a sentence that is too complicated.
While it’s good practice to read through your blog post, making note of each area of improvement, you can get a high level overview in the right sidebar.
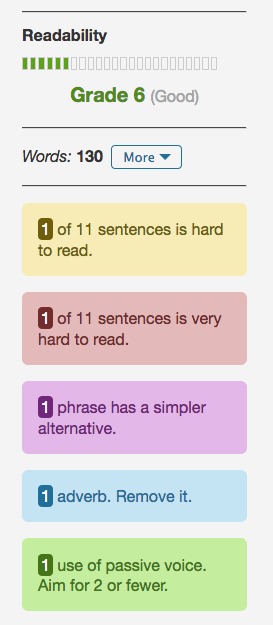
This shows you, in clear terms, how many problem areas you need to address.
Once you make the necessary changes, be sure to run your blog content through the tool one final time. This will guarantee that your new post is ready for publishing.
If you want to become a better writer, there is no replacement for practice. And, if you need some help along the way, you can turn to the Hemingway App.
5. Yoast SEO
Is WordPress your web host content management system (CMS) of choice?
If you have chosen to install WordPress, you should become familiar with the many WordPress plugins that can make your life easier. There are WordPress plugins for everything from SEO to split testing. And, that’s just the start.
For the sake of this post, we’re going to take a look at one of the most popular WordPress plugins of all time: Yoast SEO.
Once your blog post is ready for publishing, there are a few things left to do as part of the step-by-step guide.
Most importantly, you’ll want to take the guidance of Yoast SEO. With this WordPress plugin guiding you, it’s much easier to ensure that every aspect of your WordPress blog post is optimized for the best possible search engine performance.

(via WordPress)
Once you load a blog post, you’ll then want to input the necessary SEO information. As you can see in the above screenshot, this includes a focus keyword, SEO title and meta description.
As time goes by, you’ll become more familiar with what information to include, based on what’s generated the best results.
Yoast SEO provides you with guidance, every step of the way. For example, once you choose a focus keyword, the WordPress plugin tool checks to ensure that it’s included in the following areas:
- Article heading
- Page title
- Page URL
- Content
- Meta description
If you see anything highlighted in red, it means there’s a problem. Review the suggestion, make the necessary changes and then move on. Once everything is green, you know that you can confidently publish your post.
Pro tip: the All in One SEO Pack is another top choice for WordPress plugin users who require SEO guidance.
6. Hootsuite
Do you enjoy the feeling of clicking “publish” on your WordPress blog and seeing your blog post go live?
There is no replacement for this feeling. It gives you a sense of accomplishment. It gives you the feeling that you can do anything.
While this is a big step in the right direction as far as your blog content goes, you’re only halfway home. You now need to share your content with as many people as possible.
There are many ways to spread the word, with social networks leading the pack. From Facebook to Twitter and from Pinterest to Instagram, you need to take full advantage of the power of social media.
You spend so much time creating killer blog content that you may not have much left in the tank, when it comes time to market your free blog post. However, you know that you can’t give up now. Instead, you need to find new ways to work in a more efficient manner.
Enter Hootsuite.
This social network management tool gives you access to a variety of high level features, all of which allow you to easily share your blog content with your audience.
Do you remember the days when you had to jump, from one social profile to the next, to post an update?
This can take a lot of time. Time that you don’t have.
With Hootsuite, this is a thing of the past. You can now schedule content from one convenient dashboard.
You also have access to a variety of management tools that help you to more easily see what you’ve done in the past, what you have scheduled for the future and how your team is working together.
Taking things one step further, don’t overlook the importance of engagement. Sure, you can send out updates, but it doesn’t stop there. You need to engage with your audience and Hootsuite provides many tools for doing so:
- Single click replies.
- Ability to easily identify influencers and leads.
- Save pre-written responses for future use.
With approximately 2.3 billion active social media users, it’s a must that you use social media to share your content.
Pro tip: if Hootsuite doesn’t suit your needs, check out Buffer and its many features.
7. BuzzStream
Social media marketing is enough, right?
Well, it all depends on how much of an impact you want your blog post to have.
You can reach even more people, including those who truly matter, by implementing a sound influencer marketing campaign.
There are many ways to tackle this task. In its most basic form, you can send emails to influencers in your space, hope for a reply and go from there.
If you want to take a more targeted approach, experiment with a tool, like BuzzStream.
BuzzStream has all of the features that you need to run a successful influencer marketing campaign. For example, it allows you to easily find influencers in your space. Along with this, there are tools for conducting outreach and managing relationships.
My favorite features are those surrounding the management side of things. And, here’s why: managing an outreach campaign can eat up many hours, if you decide to do so manually.
With BuzzStream, you gain access to management features that can save you time and improve your results.
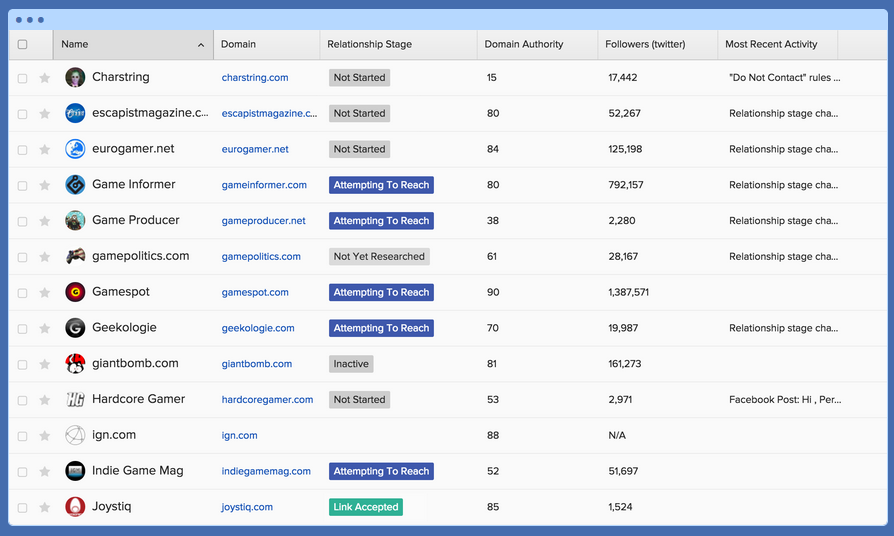
(via BuzzStream)
This dashboard goes a long way in keeping you organized. In addition to the contact’s name, you can also record:
- Domain
- Relationship stage
- Domain authority
- Number of Twitter followers
- Most recent activity
The more contacts you make, the more important it is to stay organized. BuzzStream was designed to help you do just that.
Pro tip: there are many other influencer outreach tools to consider, with some of the top alternatives listed in this blog post.
Conclusion
With these seven tools on your side as part of your step-by-step guide, you should now feel more confident in your ability to create and share high quality blog posts after you have chosen your domain name, web host, and WordPress theme.
As you gain experience with these tools, you’ll come to better understand what you should and should not be doing, in regards to the blogging process as a whole.
Even if you don’t use them all, it only takes a couple to have a positive impact on your blogging strategy.
Do you have experience with one or more of these tools? Do you use any others, when creating a blog post? Share your feedback in the comment section below.
Comments (57)