For the last couple of years, I have been running marketing automation campaigns for large corporations and multinational brands that want to take their marketing strategy to the next level.
The work involves advanced clustering and segmentation, automated email flows, social media integration, lead management, and other push and pull mechanisms for personalizing the brand’s marketing to individuals through several touchpoints.
Does it sound sophisticated and complex? Well, it is, actually, and it works like a charm. However, it costs a lot of money and time, which makes it too difficult for many companies, especially startups, to adopt such a system and methodology.
I have also worked for startups and B2C companies, and I realize that anyone can leverage many advanced marketing automation features by using MailChimp, sometimes in combination with other tools and services.
If you are interested in trying out some new email hacks, put aside your traditional newsletter processes and regular welcome emails for now, and try out my favorite 6 MailChimp automation hacks.
1. Personalize Emails Based On Lead Scoring
In marketing automation, you always try to segment your leads/users based on how close they are to selecting a product, making a purchase, or upgrading to your premium offering. So, how do you do this?
Use lead scoring as a ranking mechanism that qualifies your leads/users based on predefined criteria. In order to be flexible, you can use whatever type of scoring you like. For example, you can use A, B, C, D, etc., or, better yet, you can apply descriptive terms like “Prospect,” “Warm,” or “Customer.” The second type is easier for communication and far more descriptive of the status of your leads.
The point here is for your leads, subscribers, or users to get the appropriate scoring automatically. Of course, there are cases where manual intervention may be required. For instance, a salesman could mark an entry as, say, “Paused,” because he might not want to get in touch for a while. But, in this article, I want to emphasize automation and help you be more efficient and effective, so I will not dwell on special cases.
Now that you understand what lead scoring is, the next step is to map each of these scores with specific actions in your website, application, or marketing campaign. This mapping will help you prepare your lead scoring model.
Basically, your model should be based on individual and company demographics (personal interests, gender, age, social networks, etc.) and behavior (registered, visited pricing page, completed order, upgraded to a larger package, etc.). In order to have such a powerful scoring system, you need a marketing automation platform like Eloqua or Marketo.
However, if you compromise a bit, you can leverage some benefits from scoring using MailChimp. Let me show you how you can start implementing your own lead scoring model in the context of a hypothetical campaign.
Assumption: In this example, I assume you already have a MailChimp premium account (starting from $10/month) because of the automation features and that you have created a list and know the basics of MailChimp Automation.
Step 1: Go to your MailChimp list (I just created one to show you some love!) and click on Audience to import your contacts:

Step 2: Create a segment to match your campaign:

2. Pre-fill Personal Data in Form Fields
How many times have you received an email from someone that led to a landing page asking you to download their awesome PDF, and then you had to type in your email again before downloading? Many times, I know.
Most Marketing Automation Product Managers know that pre-populating people’s data can increase conversions, and it is something they take advantage of by using microsites and personalization engines or other techniques. This is what I got when I clicked on a webinar email recently:
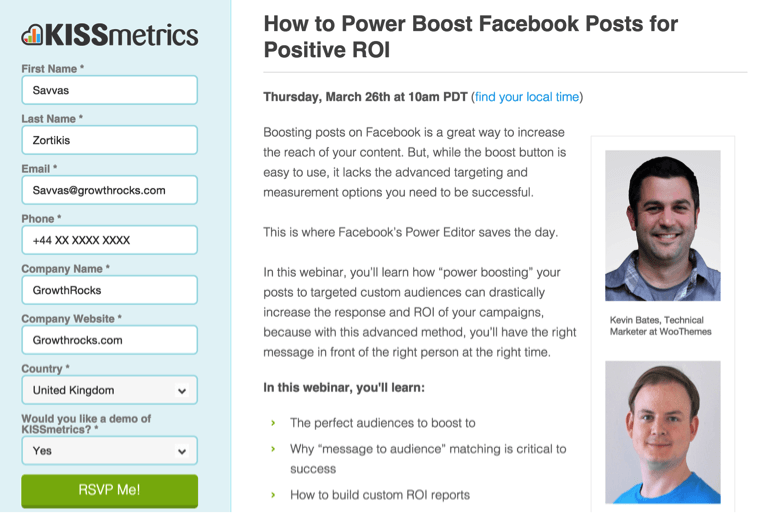
Magic! All fields were pre-filled. No friction for me, one more conversion for Lars Lofgren. They did that by using Pardot.
Can you do that through MailChimp? Yes, with a bit of tool integration. First, go to LeadPages. LeadPages is a lead generation platform that gives you the ability to create landing pages. They have a cool feature called automatic pre-population that does exactly what we want: a lead completes a form once, and then all additional forms in the future are pre-filled with their data.
LeadPages claims that this can increase conversions by 30%! All you need to do is integrate LeadPages with MailChimp and start using them together. You can see how to do it in MailChimp Integrations Directory.
If you don’t want to use LeadPages and just want to send an email from MailChimp that leads to a landing page with a form, use this small hack. (Assuming you have created your MailChimp campaign and your landing page, you’re two steps away.)
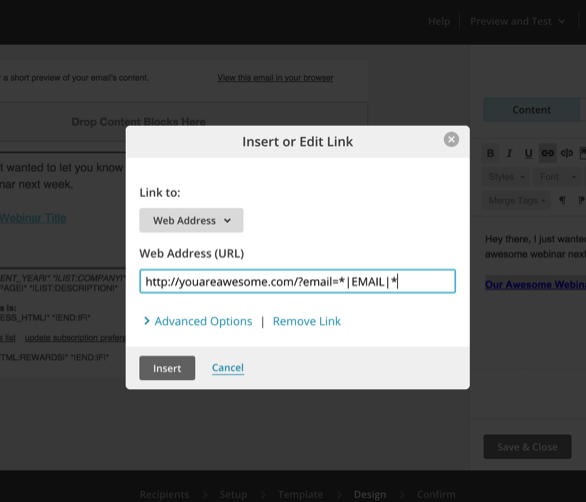
Step 1: Hide the email behind your page link.
In the example below, our email leads to a landing page so people can register.
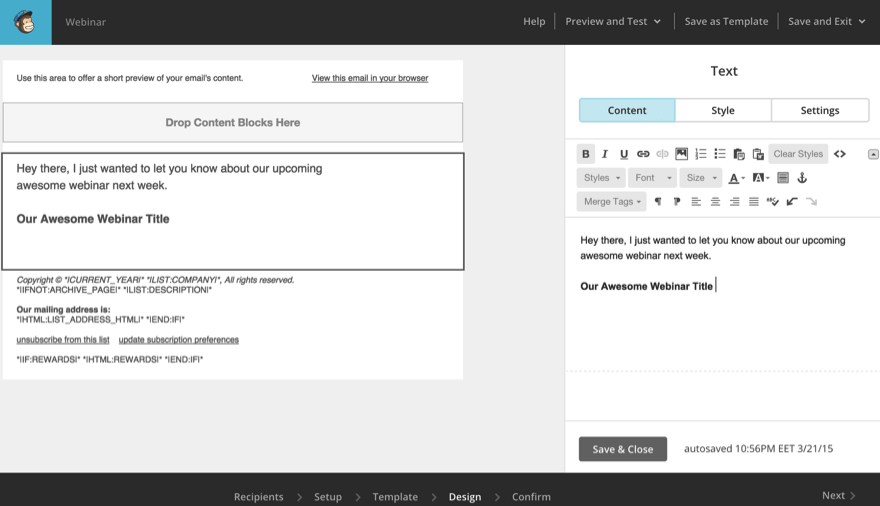
Here is the first step of the hack: instead of just including the link to your landing page, add one parameter for storing the email information, as illustrated in the image below:
Step 2: Insert the magic script in your landing page.
For this step, you may need some technical background on how HTML forms work. Here’s a simple example:
What we actually want to do is this: after a lead comes in from the link in the email (“Our Awesome Webinar Title” in our example), we want to have the email information embedded in the URL of the page so we can parse/extract it and pre-populate the form.
<form id=”leadForm”>
<input type=”email” id=”email” name=”email” class=”required” placeholder=”Enter your email”>
<button type=”submit” class=”btn”>Send email </button>
</form>
In order to do that, first make sure that jQuery is loaded with your page (just include the script below):
https://code.jquery.com/jquery-1.11.2.min.js
Finally, include the following script, which actually does the job:
$( document ).ready(function() {
var url = window.location + ”;
var urlAux = url.split(‘=’);
var leadEmail = urlAux[1];
$(“#email”).attr(“value”, leadEmail);
});
3. Nurture Leads with Drip Campaigns
The well-known drip campaigns, which some claim took their name from the infamous Automatic Drip Coffee Maker, are great for nurturing leads. In case you are not familiar with this kind of campaign, you can read a nice introduction at this handy guide from Zapier.
Most people use drip campaigns based on a time series, say, for onboarding new users. Another common type of drip campaign is the educational email course, like Justin’s Programming for Marketers.
However, what many people miss is that they can take drip campaigns to the next level and engage their leads even more. In order to do so, you need to add some behavioral, demographic, and lead scoring triggers in your campaign. Don’t just send the same email to all your “Prospect” leads just because two days passed after the first email of the series or since the prospect joined your list.
Let me give you some quick tips on how you can do this through MailChimp.
Step 1: Go to MailChimp Automation and use one of the custom workflow templates to get started:

Step 2: Configure your template and choose when your drip campaign will be triggered.

Another more targeted campaign would be to choose, say, “Subscriber browses to URL” under the “Goal events” option, and then choose the Warm Leads as a segment. This way, you could trigger the drip campaign to all the Warm Leads who visited a specific page on your website or completed a specific goal.
4. Use Plain Text-like Emails
Why do simple, plain text emails get better click-through rates? Because they feel more personal. Being friendly is crucial in email marketing. How many emails do you get every day in which the “From” field is something like “Jane at Cool Company”?
Try this: no fancy HTML, just plain text. Well, actually, it looks like plain text, but it is full HTML-enabled content. I did exactly the same for an automated email I use and got a 20% increase in click-through rates.
In order to do this in MailChimp, follow the steps below:

Below you can find the code I used. Read it if you want to save some time figuring out how to include the unsubscribe link, leave breaks, etc.
<!DOCTYPE html PUBLIC “-//W3C//DTD XHTML 1.0 Transitional//EN” “https://www.w3.org/TR/xhtml1/DTD/xhtml1-transitional.dtd”>
Hey there,
<br><br>
I’m so glad to share with you my favorite MailChimp automation hacks.
<br><br>
<b><a href=”https://youareawesome.com”>6 Awesome MailChimp Automation Hacks</a></b>
<br><br>
Plain text email rock off!
<br>Just use the code you see, and make sure to include the unsubscribe option 🙂
<br><br>
[<a href=”https://youareawesome.com”>Continue Reading</a>]
<br>
<br>
Thanks,
<br>
Savvas
<br>
<br>
<br>
<br>
<span style=”font-size: 11px; color: #999999;”>You may <a href=”*|UNSUB|*” style=”color:#999999 !important;”>unsubscribe</a> or <a href=”*|UPDATE_PROFILE|*” style=”color:#999999 !important;”>update your subscription preferences</a> at anytime.</span>
<br>
<span style=”font-size: 11px; color: #999999;”>*|LIST:ADDRESSLINE|*</span>
<br>
<br>
Of course, this is not the silver bullet for your click-through rates. It worked very well for me for specific emails, so you can give it a try and see what happens. It’s a fast and cheap experiment, after all 🙂
5. Integrate MailChimp with Almost Any Tool Using Zapier
Now, let me show you how you can use MailChimp with almost any other tool, even if they are not integrated directly, without writing a line of code. Save more time and be more flexible. Don’t reinvent the wheel!
There is a really cool service called Zapier that lets you connect the tools and services you use and also automate many of your tasks. Zapier gives you a ton of MailChimp integrations, from Google Docs and Gmail to EventBrite and Typeform.
You can take a look at the complete list of integrations at Zapier’s MailChimp Zapbook.
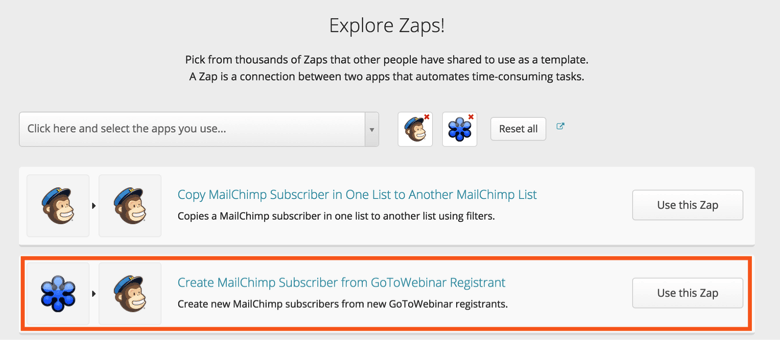
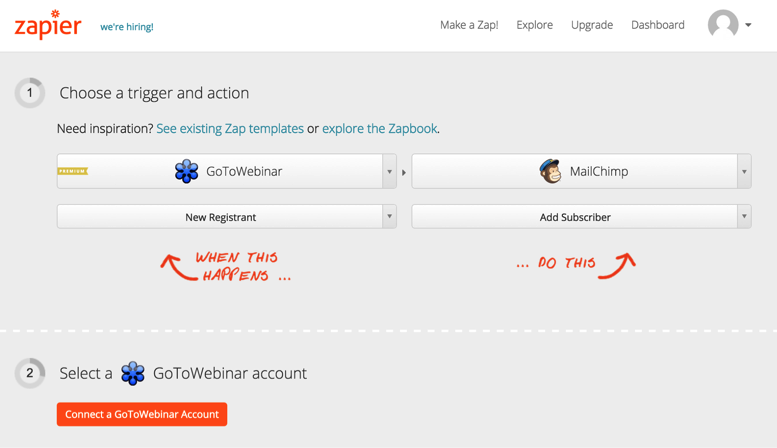
I usually use MailChimp with Zapier when I want to run a webinar through GoToWebinar, and here is how you can easily do the same:
Step 1: Go to Zapier and find the GoToWebinar integration.
Step 2: Create your zap and then connect your GoToWebinar account.
6. Build Viral Loops and Referrals
Do you know what’s strange about email marketing?
A whopping 80% of people find it annoying. And, yet, almost no one can resist an email with a catchy subject and a great offer. Virality engineers are well aware of this. So, they use the email channel as a way to expand their user base by planting viral loops directly into emails. I’ll give you an example of what I’m talking about.
Let’s examine a common scenario.
User “X” signs up for your product. At the moment of registration, his personal information gets stored in a MailChimp list. The next moment, he receives an automated “welcome” email; another typical welcome email, but yet, a different one. In this email, you may include a special offer (e.g., a really cool PDF) that your fresh user can obtain by inviting a friend or colleague.
Here’s how:
Step 1: Create a new MailChimp list for your referred users.
You already know how to do this. You’re a MailChimp automation hero now!
Step 2: Create a landing page for the referral campaign and integrate it with the new list you created.
A plain page with just one field (for an email address) and a description of the “prize” will do the job for now. You can use a tool like LeadPages or Unbounce, or you can hard-code it if it makes you feel better.
Step 3: Include a link that directs User “X” to your referral landing page.
After User “X” submits the form, you may redirect him to a private page that you have linking to the URL for the special offer/prize.
At the same time, the invited users receive an invitation email. Make sure the email’s subject is appealing and not just another “John Doe invited you to join our awesome blah blah blah.” I’m deadly serious about the “blah blah blah” part, as that’s what people are going to read before they throw your email in the trash. Try something personal and creative.
Conclusion
It’s obvious that MailChimp can give you a lot of power by automating and personalizing your marketing. I hope these 6 automation hacks will be a nice introduction to experimenting with integrating more tools and creating new automations you can share with us all. So, let me know, what is your MailChimp automation process that generates leads and conversions for you?
About the Author: Savvas Zortikis is the VP Product and Growth at GrowthRocks, a growth hacking marketing agency that offers consulting services and SaaS tools. GrowthRocks focuses on helping startups and well-established companies achieve rapid and sustainable growth. Zortikis’s experience is in automating user acquisition and retention, building viral loops, and optimizing digital campaigns. Follow him on Twitter.
Comments (36)