Call it a case of too much of a good thing.
Google Analytics puts a lot of data at your fingertips. It’s a mountain of metrics, and a deluge of dimensions. With it, you can drill deep down into your website visitors, their demographics, and their behavior.
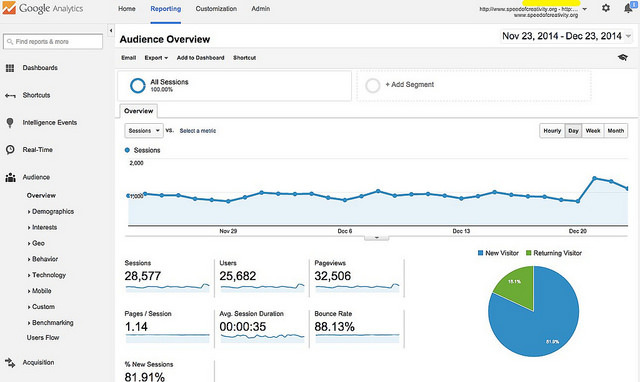
But by default, it just throws everything into one enormous bucket. The reports show stats, graphs, and charts for “All Users/Sessions”.
And while that’s perfect for getting a big-picture-at-a-glance snapshot, you need to break things down a little if you want to find the buried treasure within.
Mixing everything together is good for smoothies, metallurgy, and cocktails. For analytics, you want to separate and segment.
Segmentation in Analytics
Click on any report in Analytics – audience, acquisition, behavior, or conversions – and you get a wonderful presentation of the data collected for your site. For everyone that visited during the chosen time frame (the last 30 days by default).
The beauty of Analytics, though, is in whittling away from general to specific. Of finding the statue of David within the block of marble. Or the chewy core at the center of a Tootsie Pop.
With audience segments, you can break that pile of data into more manageable sections based on the criteria that matters most to you. What insights are you looking for?
Segments group visitors together who share common traits or behavior. And the best part? You get to decide exactly what traits and behavior to group.
Knowing how many visitors you had last week is useful. But how many visitors did you have on desktop devices, from the United States, who viewed at least three pages, but left without making a purchase? That’s the power of segments.
Segments give you ultra-targeted insight into audience behavior, like visitors arriving via mobile, from which country, number of sessions with a conversion, visitor type, demographics, traffic source, value, browser, users with multiple sessions, and so on.
Sounds fantastic, right? Yet 41% are not using audience segments at all. Get out of that group.
There’s no end to the possible combinations you could create (although that’s technically not true…you are limited to 1000 segments that can be edited in any View, and 100 segments for any one specific View). Create an uber-precise segment for tracking and analysis that represents your exact audience and serves your particular needs.
Hit vs Session vs User
When creating a segment, you can often assign the scope as either user, session, or hit, so it’s important to recognize the difference:
- Hit – an individual interaction with your website (usually a page view); a visitor did this, a visitor did that, a visitor…
- Session – a collection of hits; one complete visit to a website
- User – a person’s entire journey with your website (may encompass multiple sessions)
Most experts suggest focussing on users and sessions. It’s all about the relationship you have with them.
Segments: A Simple How-to
Getting started is mercifully uncomplicated. Even an Analytics amateur can create, save, and use segments.
To begin, simply click on the +Add Segment button at the top of any report.
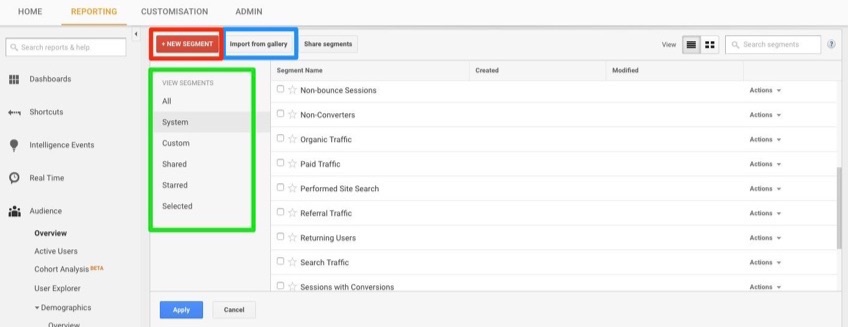
You’ll next see the Segment dashboard, and you’re presented with several options. Down the left-hand side, you’ll find the View Segments column. You can select All, System (the segments pre-loaded on Analytics, like Converters, New Users, and Organic Traffic), Custom (the segments you’ve made), Shared, Starred (you can save segments to this favorites list by clicking the star beside their name), and Selected (the segments you’re currently using).
Do you want to work with an existing segment (select from the list), import from the gallery (custom segments created and shared by others), or create your own new one (click +New Segment to start from scratch, or click on the Actions dropdown beside an existing one, and select Copy to use it as your foundation)?
Let’s copy Organic Traffic. This will allow us to build a custom segment for all incoming organic traffic.
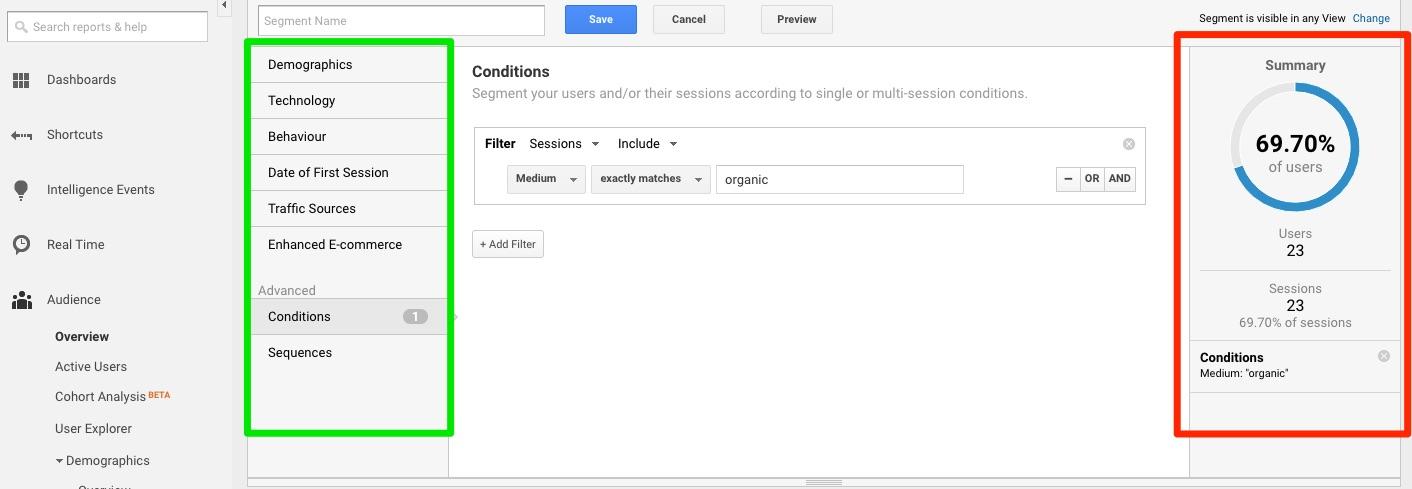
The next dashboard displays the current segment parameters. Because we opted to copy and build upon the Organic Traffic segment, there’s already one criteria listed:
Medium > exactly matches > organic
On the right, you’ll see a segment summary (updated in real-time when you add or delete criteria), and down the left are the categories and filters you can use to define your segment.
Options include Demographics, Technology, Behavior, Date of First Session, Traffic Sources, Enhanced Ecommerce, Conditions, and Sequences.
So far so good. Still with me?
You’ll want to zero in, so we’ll add a few more filters to this segment. Click on the +Add Filter button.
Next, click on the Ad Content dropdown menu, and you’ll see a long list of possible filters and criteria. Click around. Explore. There’s also a handy search field at the top to save you some time.
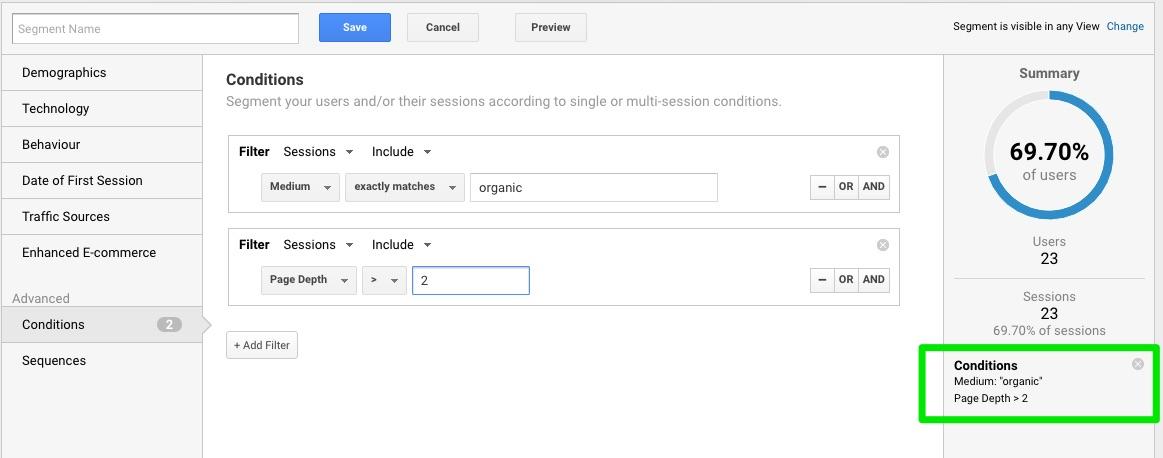
We’re going to segment by users who’ve viewed at least two pages during a session:
- Type “Page Depth” in the search field and select it (it’s found under Behavior if you want to locate it yourself)
- Click on “=” and select “>” (greater than symbol)
- In the blank field, enter 2
Your summary will update, and you’ll see Medium: organic and Page Depth > 2 listed under Conditions. This segment now includes all organic traffic visitors who look at three or more pages during their session.
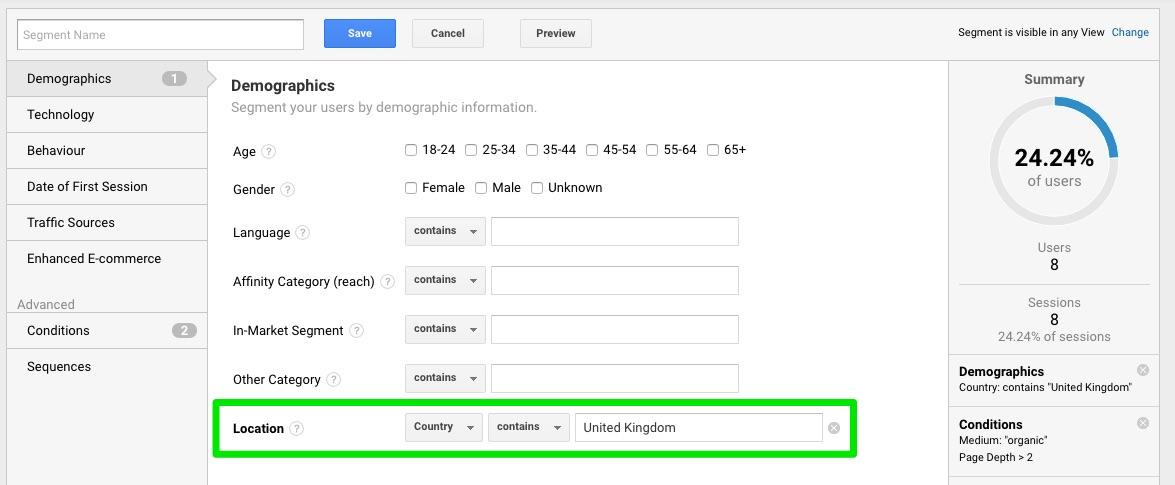
Starting to get the hang of it? Try this one on your own: add a country filter for visitors from the United Kingdom.
Done? Excellent. You can include that filter by either adding another condition (Users > Country > Contains > United Kingdom), or clicking on Demographics > Location > Country > Contains > United Kingdom. Either way, your summary will update, and your segment will now only count visitors from the UK.
We can make “organic” even more precise by adding a filter under Traffic Sources > Source > contains > google
Finally, give the segment a name that reflects what it is, such as UK Page Depth > 2 or something similar (whatever works for you), and click Save.
Congratulations. You just created your first audience segment. Kudos! This one will only exhibit organic traffic from the UK arriving specifically from Google that viewed at least three pages. How’s that for precise data?! It’ll be listed with all the other available segments, ready to be called upon whenever you need it.
Basic Segments
But segments don’t have to be complex. They don’t have to include multiple criteria, either. They can be very simple and straightforward:
- By traffic source or medium (email, social, paid, organic, direct, referral, google, facebook, twitter) to get insight into visitor offsite behavior. Where are they coming from, and how are they finding you?
- By user type (new visitor vs returning visitor, mobile vs desktop, frequent vs infrequent visitor, long vs short sessions, multiple pageviews vs single page) for insight into their engagement with your brand and company.
- By location or language to understand your customer demographics better.
- By Content Viewed (product pages, checkout page, thank you page) to get insight into their onsite behavior.
- By Engagement (more than x pages, more than x seconds) to see how well your content and presentation is appealing to them.
- By revenue, product viewed or purchased, brands added to the cart, or even product variants like specific sizes and colors.
The basic categories along the left on the segments dashboard – Demographics through Enhanced Ecommerce (which does require the ec.js plugin) – are easy to navigate and implement. Try them out.
The Advanced Options
Both Conditions and Sequences are considered advanced options. But that shouldn’t scare you (you’ve already mastered conditions).
As we’ve already seen, Conditions simply set a series of criteria that must be met for a visitor to be included in that segment. It allows for a tremendous amount of customization. There’s a bit of a learning curve – finding the right criterion and definition, for example – but there are plenty of tutorials that can guide you from absolute beginner to pro in no time.
Sequences are a series of conditions that must be met in order (step 1, step 2, and so on), but the fundamental idea is the same. A sequence where users visit your cart (step 1) but then don’t go through with an actual purchase (step 2) gives you an audience ripe for a follow-up.
The More the Merrier
Once you have a few favorite segments, you can start to compare one against another. Go to any report, click on +Add Segment, choose up to four different ones, and click Apply. You’ll then see the report with all segments presented at one time…color-coded for your convenience (thanks Google). Compare and contrast.
Get Fancy
The more comfortable you get with segments, the more you can create ones for every possible group of your audience.
How about a segment that shows you frequent and recent visitors that still haven’t purchased something?
- +Add Segment
- Behavior – Days Since Last Session < 5 (less than five)
- Behavior – Sessions > 4 (more than four)
- Behavior – Transactions = 0 (no purchases), or even Conditions – Page Title – contains – thankyou.html (your order confirmation page, but make sure you select EXCLUDE rather than include)
Once you’ve created a segment like this one, you can then create an Audience from it, and target only that group with ads promoting your free shipping, or current sale, or special coupon to entice them to pull the trigger (they’re obviously interested).
Creating an Audience from a Segment
Segments give you valuable, targeted data. And that’s a very good thing.
But they can extend beyond the Analytics dashboard if you create an Audience from a segment.
For the UK Page Depth > 2 segment we created earlier, let’s assume you’d like a way to send them – and only them – a special ad for a discount available only to UK residents.
Head to the segments list, find that segment, select Actions, and click Build Audience.
For this to work, your Analytics and Adwords accounts need to be linked (but don’t worry, Google walks you through it if they’re not yet connected).
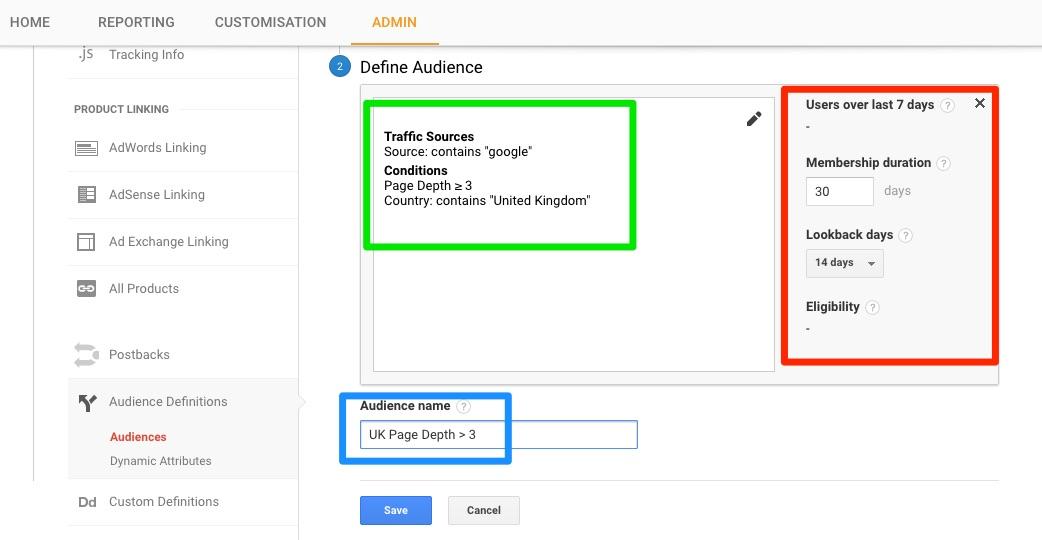
Choose the View (your ecommerce site) and Destination (your linked Adwords account), and define the Audience. The definitions (i.e. criteria) will be prepopulated based on the segment you selected.
On the right, you’ll see a few fields:
- For segments scoped to hits or sessions, you’re limited to Users over last 7 days (this will present the estimated size of this audience from users that meet the criteria in the last week).
- Membership duration sets how long visitors will remain a member of this audience once slotted into it, anywhere from 1 to 540 days. If you’re creating an Audience for visitors with a recent purchase, for example, you’d set this for a relatively short period of time.
- Segments scoped to Users gives the option of lookback days, either 7, 14, or 30. This is a time frame for Analytics to go back and find users that qualify for the Audience.
- Eligibility tells you where you can share this audience, such as search and display ads (Adwords), or Google Optimize (for testing and personalization).
Give the Audience a name to help you remember it over in Adwords, and click Save. Done.
When you’re next in your Adwords account, you can select this Audience and create a targeted ad for them about your exclusive coupon for those in the land of tea, bangers, and mash.
It may be the gentle push they need.
See how everything comes together in the Googleverse?
Segments allow you to identify strengths, weaknesses, and patterns, find reliable revenue sources, and provide the guidelines to improve where you’re falling short.
There are many stellar custom segments ready to import, you can experiment and create your own, or simply utilize the ready-to-go standard segments there already.
The Google Analytics Help portal provides everything you’d want to know about segments but were afraid to ask.
They’re often ignored, but always beneficial. You can use them to track your most lucrative markets, identify where, when, and how the big spenders are coming to you, remarket to specific groups at just the right moment (via Adwords and Audiences), and more.
Anything you can do to better understand your audience behavior and acquisition is time well spent. Grasp the basics of segments, move on to more advanced techniques, and know your audience like never before.
It’s big data broken down.
Have you jumped in the audience segmentation pool? What filters do you find most insightful? Leave your comments below.
About the Author: Aaron Agius, CEO of worldwide digital agency Louder Online is, according to Forbes, among the world’s leading digital marketers. Working with clients such as Salesforce, Coca-Cola, IBM, Intel, and scores of stellar brands, Aaron is a Growth Marketer – a fusion between search, content, social, and PR. Find him on Twitter, LinkedIn, or on the Louder Online blog.

Comments (2)