There’s evidence to suggest that only 2-4% of site visits result in transactions.
Stats like that can be scary.
Or they can be the motivation you need to fuel your marketing efforts.
There are a number of ways to not only get customers to your site but to also persuade them to take action.
One such way is running a remarketing campaign on the Google Ad network.
But, first – what is remarketing?
Remarketing campaigns are designed to display ads to potential customers who visited your site or used your mobile app.
It’s an effective technique that allows you to stay connected to your target audience while also building brand awareness.
Lucky for you, there are a number of tools and strategies to help you with your remarketing efforts, from generating a Smart List to creating a custom audience using a Facebook pixel.
In this post, we’re going to focus on how to bring potential customers back to your site.
We’ll go through how you can set up a Google remarketing campaign and also how you can take advantage of the several networks they offer, so that you can achieve maximum reach to your target audience.
By the end of this post, you should have the skills needed to set up a remarketing campaign that will generate great results.
Let’s get started.
The different remarketing campaigns
Because we’re talking about remarketing using AdWords, there are a variety of ways you can reach your target audience through a display ad.
You can use the following platforms/networks –
- YouTube
- Gmail
- Apps
- Display Network
- Remarketing Search Listings Ads
We’ll briefly go through how you can set up a campaign for each platform. Keep in mind that it is obviously easier to remarket on some networks than it is on others.
A display network ad is simpler to create than a YouTube Video Ad, for example.
Also note that ‘Remarketing search listings ads,’ technically don’t count as ‘retargeting,’ in the eyes of Google.
But, they’re still relevant to what we need to cover.
Understanding your remarketing goals
In general, there are three kinds of remarketing campaigns that you might want to run.
- Campaigns aimed at people who did not take a certain action on a page – e.g. Generating leads from those who did not opt in on your landing pages.
- Campaigns aimed at people who reached a certain page within your checkout process, but did not complete their purchase– e.g. Converting people who abandon carts.
- Campaigns for people who have not seen a page that you’d like them to see – e.g Promoting content or other pages on your site.
It is important that you know exactly what action you want your potential customer to take when exposed to your remarketing campaign.
When you know that, you can then go about the following –
- Deciding which pages should contain your remarketing tags.
- Choosing a network and deciding how to reach your target audience on that network.
- Understanding how to create ads tailored to your target audience.
- Creating custom pages dedicated to the audiences that you’re remarketing to.
Having knowledge of how you’re going to tackle each of these details is essential if you want to achieve optimal results with your remarketing campaigns.
Creating a remarketing list
There are two parts to setting up a remarketing campaign.
- Creating a remarketing list
- Running a campaign targeted at that ‘remarketing list.’
First, let’s cover how to create a remarketing list.
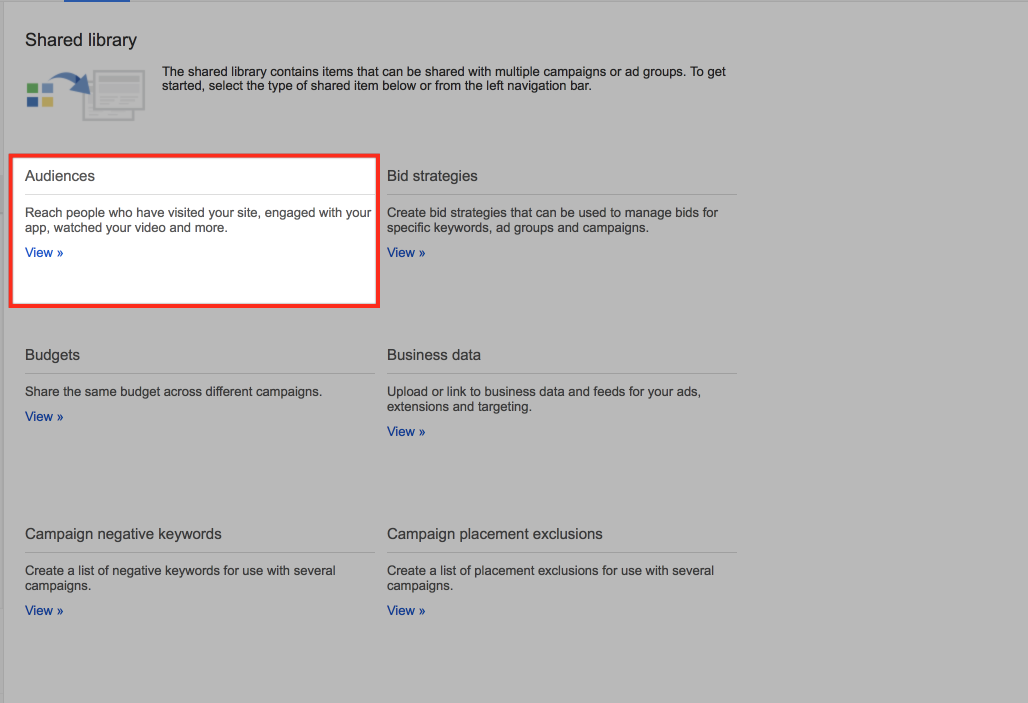
Log into AdWords and click on ‘Shared library,’ which can be found within the left hand sidebar.
Then, select ‘Audiences.’
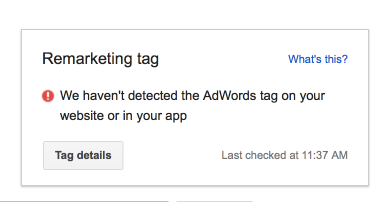
You may then be notified that AdWords does not detect a remarketing tag.
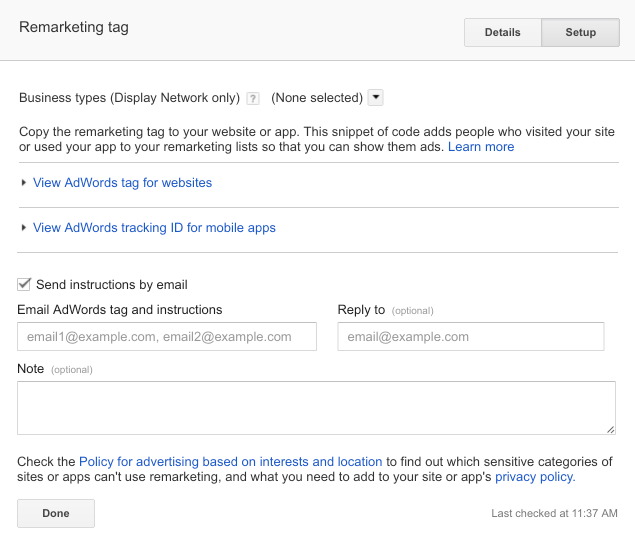
If you click through to ‘Tag details’ you’ll be able to access a tag that you can install on your website.
You can email this tag to your technical support team, if you do not feel comfortable installing it. Make sure this tag is installed on every webpage on your site. Doing so will give you more freedom to run a variety of remarketing campaigns to reach your ad group.
In any case, once you’ve installed the tag, you need to create a ‘Remarketing list.’
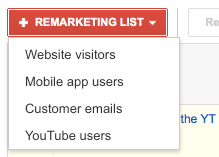
To do that, click on +Remarketing List,’ which can be found in the Shared library section.
You then have to decide how AdWords chooses who it will remarket to, by telling it what data you want it to use.
What you pick here will depend on the data that you currently have/can supply.
There are four options –
- Website visitors – remarket to people who have visited your website
- Mobile app users – remarket to people who have used your mobile app
- Customer emails – remarket to people who have provided you with their email address
- YouTube users – remarket to people who have viewed or interacted with your YouTube videos/channels
In this post, we’re going to focus on website visitors, YouTube users and customer emails.
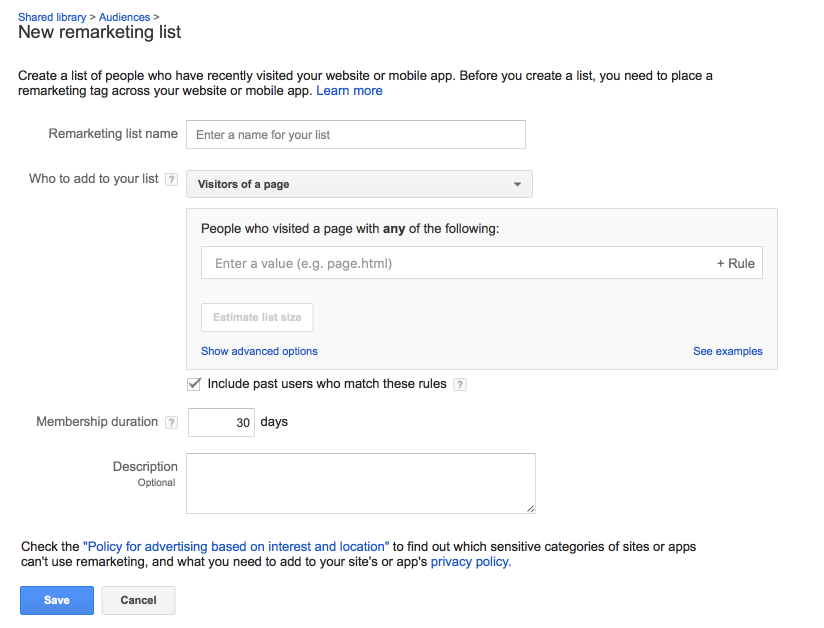
Let’s take a look at how you can set up a remarketing campaign that’s based on the ‘Website visitors’ option.
Make sure that you give your Remarketing list a specific name, so that you can quickly identify what the purpose of the list is, when you go back to check on your campaigns.
Once again, your campaign goals will determine who you should add to your remarketing lists.
Note: If you want to take full advantage of these options, you need to make sure you have installed the remarketing tag on all of your webpages.
Visitors of a page – you can use this for a landing page, in order to drive sign ups for people who didn’t take a desired action.
Visitors of a page who did not visit another page – can be used for people who viewed product pages, but no ‘purchase pages.’ This is only for the ‘Display Network.’
Visitors of a page who also visited another page – for people who are browsing around your site, maybe comparing different product variations. This is only for the Display Network.
Visitors of a page who also visited during specific dates – target people who visit when you are running a special promotion. For example, you may experience traffic spikes during certain ‘events,’ like Valentine’s Day or Christmas. You can build a list of these people using this feature and subsequently target them in the future. You’ll need to have a long list duration, in this instance.
Visitors of a page with a specific tag – For people who ran remarketing campaigns a while ago and have different ‘remarketing tags’ for different pages.
There is also the option for a ‘custom combination,’ though, if you’re new to remarketing, you’ll want to leave that for now.
Once you’ve decided on an option, you need to provide the relevant URL that matches what you’re trying to achieve.
If your URLs are well organized, you can also create a rule.
So, I could create the rule that anyone who visits neilpatel.com and views a page with ‘webinar’ in the URL is added to the list.
If I wanted to promote a webinar course, I could promote it to people in this remarketing list, as I know they’re interested in the topic of ‘webinars.’
You can also decide to add people from the past 30 days to this list, but your ability to do this will depend on how long you’ve had a remarketing tag installed on your site.
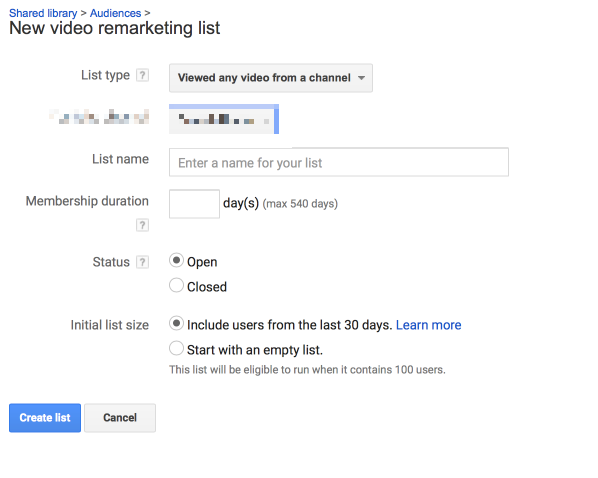
Next, let’s take a look at building a remarketing list using the YouTube option.
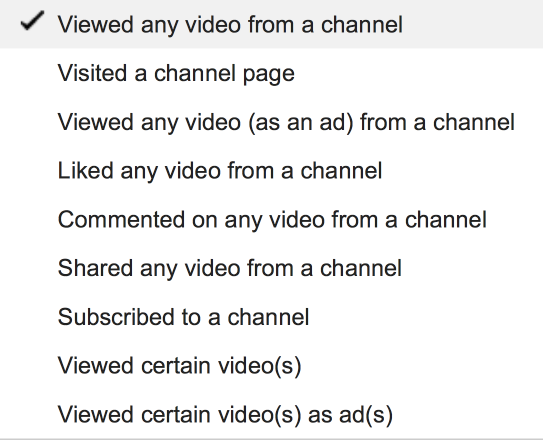
You’ll need to select how this list is populated, by choosing a ‘List type.’
What you pick is going to be decided by what your campaign goals are and what certain actions say about people.
For example, if someone has ‘viewed certain videos,’ you know what specific topic they have an interest in and you can promote a relevant piece of content to them, or even a relevant product.
It’s also a good idea to select ‘users from the past 30 days,’ as this can get your remarketing campaigns running quickly.
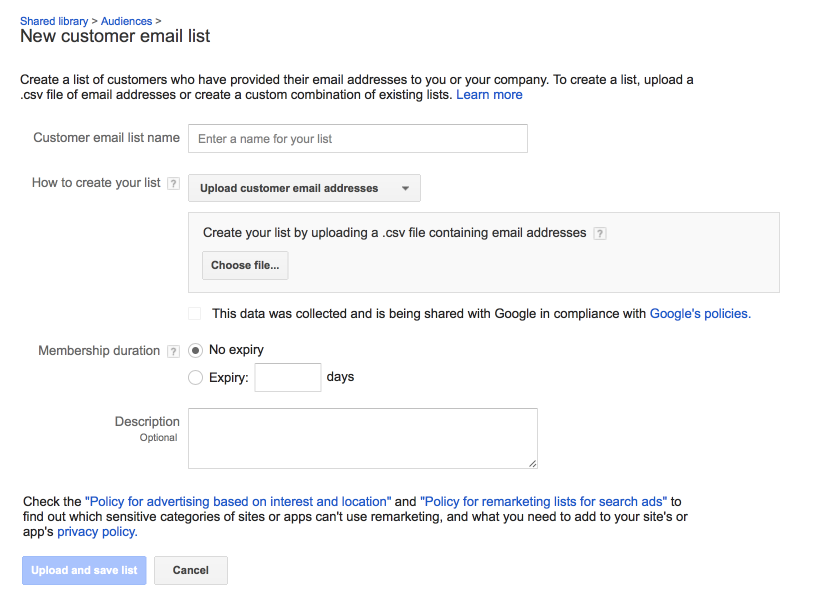
Finally, let’s look at creating a Customer email remarketing list.
The process here is pretty simple. Give your list a specific name and then upload the list of email addresses.
It is important that you collected these emails ethically, and that you did not buy them. If people opted to join your list, it means that you are compliant with Google’s policies.
Note: You’ll need to have a minimum of 1000 emails for this to work.
As a result of having uploaded email addresses, you’ll be able to reach these people on YouTube, the SERPs and within Gmail.
So, how you can set up a remarketing campaign?
Setting up a remarketing campaign
If you want to set up a Display Network remarketing campaign, go through the normal set up process for such a campaign.
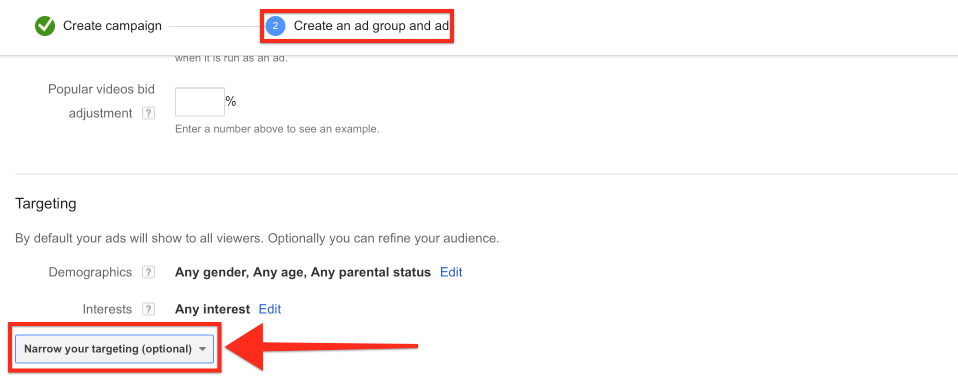
Then, when you get to the section where you get to ‘Create an ad group and ad,’ select the option of ‘Interests & remarketing.’
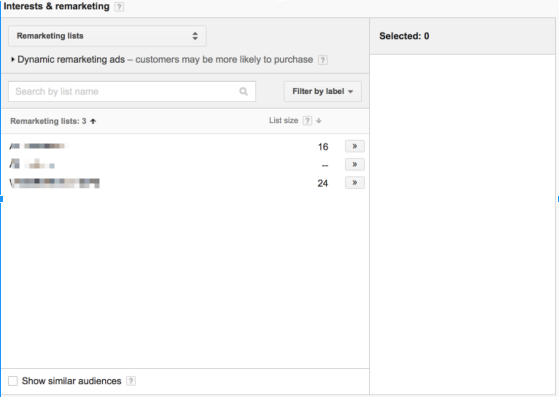
You then need to choose the relevant remarketing list.
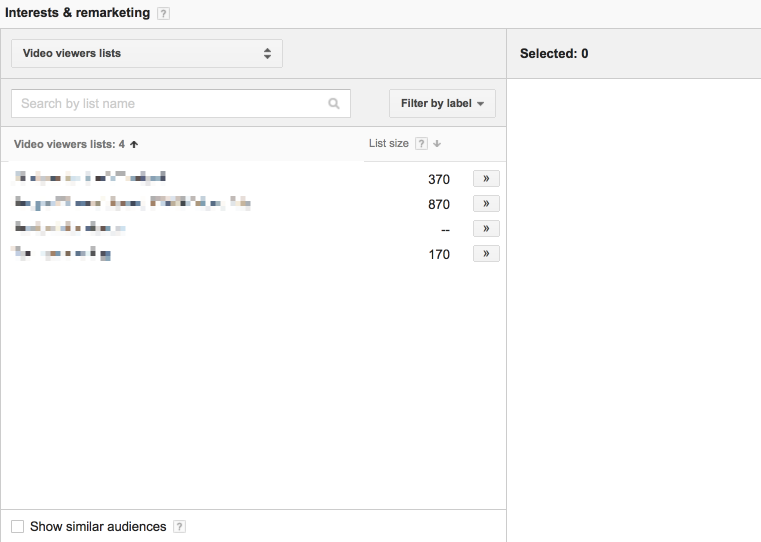
Below is what you might see, when picking ‘Remarketing list.’ Next to the list you can identify how many people belong to the list.
It’s the same, if you pick the ‘Video Viewers’ option.
If you want to show remarketing ads to your target audience within Gmail, pick the ‘Customer email lists’ option.
You can then select the email list that you want to target and go about setting up your campaign.
If you want to display remarketing campaigns on YouTube, the process is slightly different.
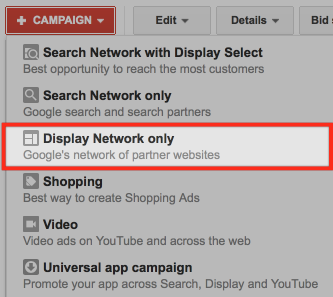
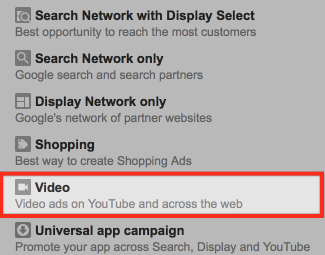
This time, you need to select the ‘Video’ option, when clicking on ‘+Campaign.’
Go through the general set up process for an ad.
Note: If you want your ads to appear exclusively on YouTube, make sure that you deselect ‘Video partners on the Display Network.’
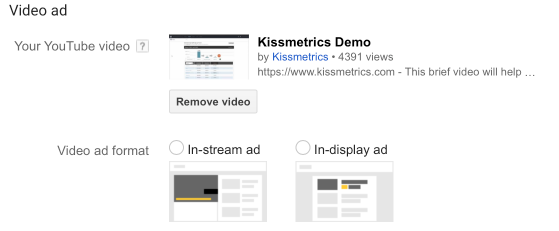
When you’re on the ‘Create an ad group and ad’ section, it is important that you decide what kind of ad format you want to run, first.
Once you’ve picked an ad format, scroll down to the bottom and click on the ‘Narrow your targeting (optional)’ button.
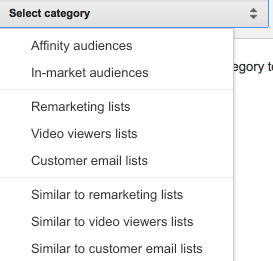
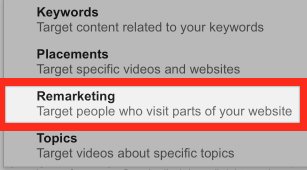
Click the ‘Remarketing’ option.
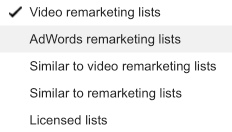
You can then pick the list you want to remarket to.
Under the ‘Video remarketing lists’ option you can promote to people based on their YouTube activity.
Under ‘AdWords remarketing lists,’ you can promote to people based on their AdWords activities, as well as to people who had their email address uploaded into Google.
You might’ve noticed that there is a ‘Similar’ option, too.
We won’t cover that today, but essentially that relates to showing ads to people who bear similar traits to those who belong to your remarketing lists.
Now, let’s look at how to remarket to people within the search listings – this is known as ‘Remarketing Lists for Search Ads (RLSA).’
This is a type of marketing strategy that not many people know about, so it might seem complex at first. But, stick with it, it’s worth knowing this stuff – Transunion managed to achieve a 65% higher conversion rate using RSLA ads targeted at new customers.
What you’re doing with this kind of campaign is that you are showing search listing ads to people on your remarketing lists who have typed in keywords that you have selected.
On a very simplistic level, it works like this –
- Set up a Google Search Campaign
- Pick the keywords you want to target
- Pick the remarketing list that you want to target
- Only those in your remarketing lists who enter the targeted keywords are shown ads
Imagine that you sell curtains. Someone has looked at your site, but then later they search the keyword ‘cheap curtains’ on Google.
With RLSA, you can show search listing ads ONLY to people who have visited your site and are typing in that somewhat broad keyword in Google.
This allows for you to target broad keywords, while also maintaining high conversion rates.
Remember – this isn’t really remarketing. You’re not targeting people based on their past search behavior, because you don’t have access to it. Additionally, you can’t use Remarketing Search Listing Ads’ for ‘sensitive’ categories.
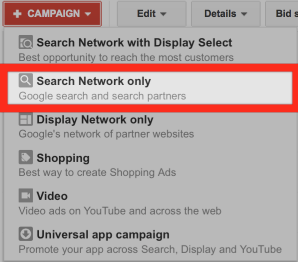
You can set up a ‘Remarketing Lists for Search Ads,’ by going through the normal search campaign set up process – which starts with clicking on ‘+Campaign’ and selecting ‘Search Network only.’
Note: When you’re setting up your campaign, make sure you deselect ‘Include search partners.’
Once you’ve finished up the general set up process for your campaign, you then get to adjust your campaign so that it is shown to your remarketing list.
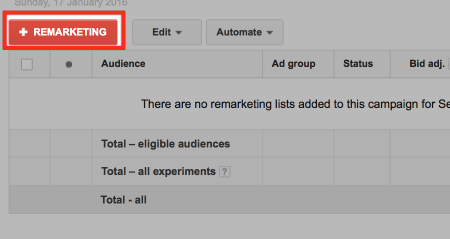
First, click on your campaign and then click on the ‘Audiences’ tab.
Click on ‘+Remarketing.’
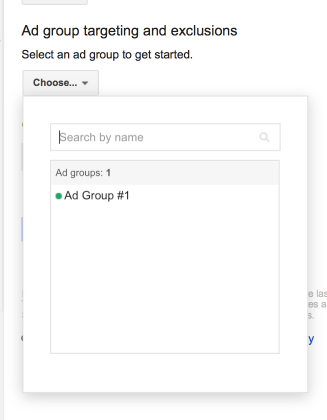
Then, select the relevant Ad Group.
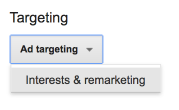
Select ‘Interests & remarketing’ from the ‘Ad targeting’ drop-down menu.
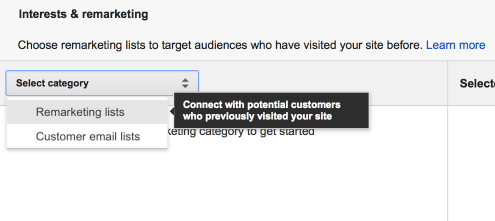
Then, choose the remarketing list that you want to target.
Note: You can select ‘Customer email lists’ as a targeting option, too.
You can also pick what you’re paying for and how much.
The ‘Target and bid’ option ensures that your campaign only targets people within your list. Only people on this list will be able to trigger the display of your Search network ad.
If you pick the ‘Bid only,’ option, you’re showing your ads to everyone, including those on your remarketing lists. So, everyone (within your targeting parameters) will trigger the display of your Search Network ad.
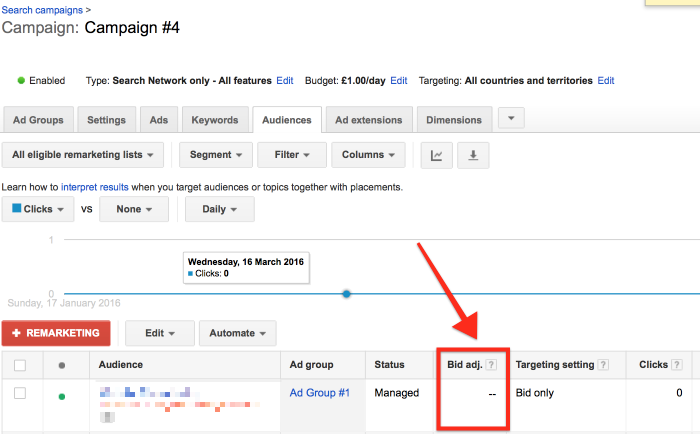
The difference? You can set bid adjustments, so that you’re bidding higher for ads when they’re being shown to people within your remarketing lists.
You do that by selecting your list and then going back to the ‘Audiences’ tab and clicking on the relevant ‘Bid adjustments’ column.
You’ll want to experiment with both options to see which one brings the best results.
Conclusion
There’s a good chance that your business will benefit from remarketing.
Having a goal for your campaign is a great way to focus your efforts and ensure that you get the best possible results.
After all, there’s a lot that you can do. Perfect Audience – a Marin software company, for example – is “a retargeting platform that lets marketers effortlessly bring back lost web visitors with Facebook ads on Facebook, banner ads across the web, and ads on Twitter.”
And hopefully, after reading this post, you’ve seen just how many remarketing options are open to you.
Keep in mind, too, that we focused mainly on website visitors here but, as mentioned, remarketing campaigns can be designed to target people who have used or visited your mobile app.
In any case, pick one goal and run a remarketing campaign in the hopes of achieving it. Then, when you have some experience, branch out and try some more adventurous campaigns.
Best of luck!
Do you have any remarketing tips that you can share? What worked better for you–a text ad or an image ad, or both? Please let me know in the comments below.











Comments (57)