Editor’s Note: This page was published in April 2014. The UI and some of the methods described in this post may have changed since then.
Using Facebook Ads Manager is fine if you’re just starting to advertise on Facebook, but soon you’ll want to graduate to a more effective, advanced way to manage your ads – the Facebook Power Editor.
The Facebook Power Editor is a free plugin that lets you bulk-edit your ads and a lot of other cool stuff you can’t do in the Ads Manager. It’s optimized for Chrome, so avoid using it in other browsers.
Of course, there already are some great guides on how to use the Facebook Power Editor, but given the tool’s new and improved interface as well as Facebook’s new ad structure, I thought it would be useful to create a guide that explains how to use the Facebook Power Editor of 2014.
In this article, I’ll give you an overview of the Facebook Power Editor, show you how to create an ad with it, and explain the perks of using the Power Editor over the Ads Manager.
Introduction to the Power Editor
When you first open the Facebook Power Editor, you might feel a bit like this:

Don’t fret. The Power Editor actually is going to make your life a whole lot easier once you get comfortable using it.
Let’s start with an overview of the most important sections in the Power Editor:
Download Campaigns and Upload Changes: The first thing you’ll want to do in the Power Editor is download all of your campaigns, ad sets, and ads from the Ads Manager so that you will have your past and current campaigns ready to edit.

The Download to Power Editor and Upload Changes buttons might be the most important buttons in the entire tool. If you forget to download your data before working in the Power Editor or you forget to upload it after you’ve finished, you stand to lose important information and possibly a lot of new work. So, make a habit of hitting Download to Power Editor every time you open the tool and Upload Changes when you finish working.
Left Pane: The left pane lets you filter the data displayed to the right according to your campaigns, ad sets, and tags.

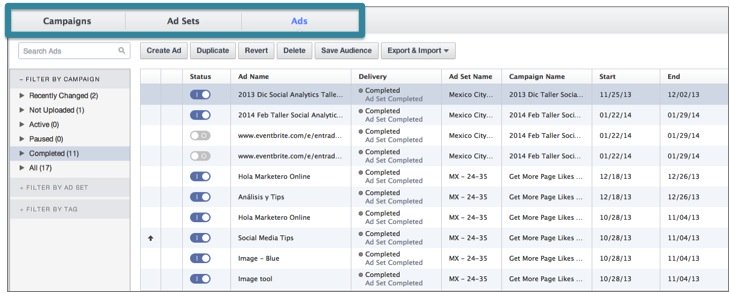
List View: When the Ads tab is selected, the list view displays all ads for the campaigns or ad sets selected in the left pane. When the Ad Sets tab is selected, you’ll see all ad sets corresponding to the campaign selected in the left pane; and when the Campaigns tab is selected, you’ll see all campaigns related to the campaign category selected in the left pane.
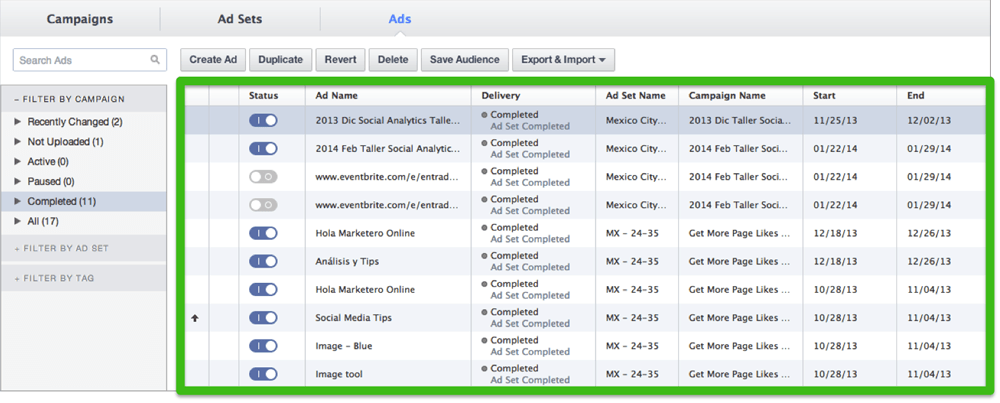
Workspace: The workspace is where the action happens. It displays editable fields for your ads, campaigns, and ad sets, depending on what you’ve selected.
Campaigns, Ad Sets, and Ads Tabs: Click on these tabs to cycle through your information for the campaigns, ad sets, and ads related to what you’ve selected in the left pane.
There’s much more to the Power Editor than these sections, but I wanted to point out the areas you’ll be using most, in order to help you get comfortable using the tool.
Creating an Ad with the Power Editor
Okay, time to dive in and create your first ad in the Power Editor.
1. Create a Campaign
Let’s imagine you run a website that sells digital educational products on health and wellness. One of your main Facebook advertising objectives is to increase the number of downloads of a comprehensive ebook you’ve put together on green smoothies and juices.
The first step in creating an ad with the Power Editor is setting up a campaign. Click Create Campaign in the top left corner, name your campaign, and select your preferred buying type.
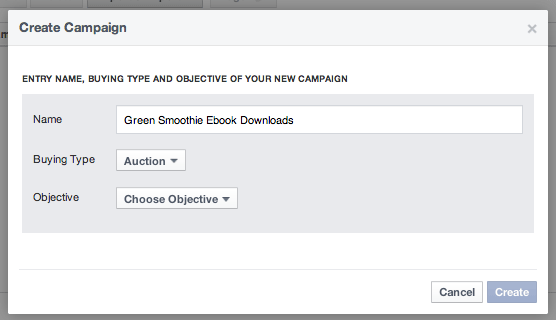
Next, choose the objective for your ad campaign – in other words, what it is you want to accomplish with your ad – such as page likes, website conversions, or event responses. Take a look at the handy table that Facebook created to show which types of ads qualify for each objective.
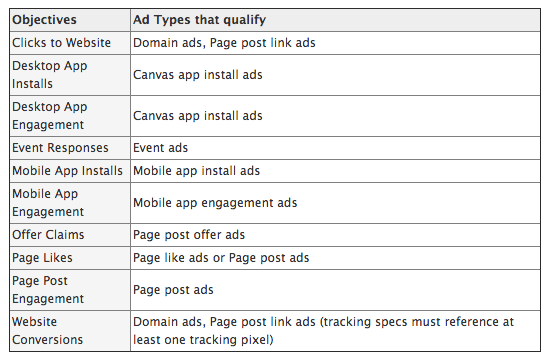
(See the original table here under “What objective should I use for my ad type?”)
Since the success of your green smoothie ebook ad campaign will be determined by the number of times the ebook is downloaded as a result of the ad, choose the Website Conversions option as your campaign objective.

2. Create an Ad Set
Facebook recently introduced a third level to its campaign structure: ad sets. This means that the primary function of a campaign now is to establish an objective for your groups of ad sets and ads; meanwhile, ad sets allow you to target distinct audience segments and control separate schedules and budgets for your ads within each campaign.
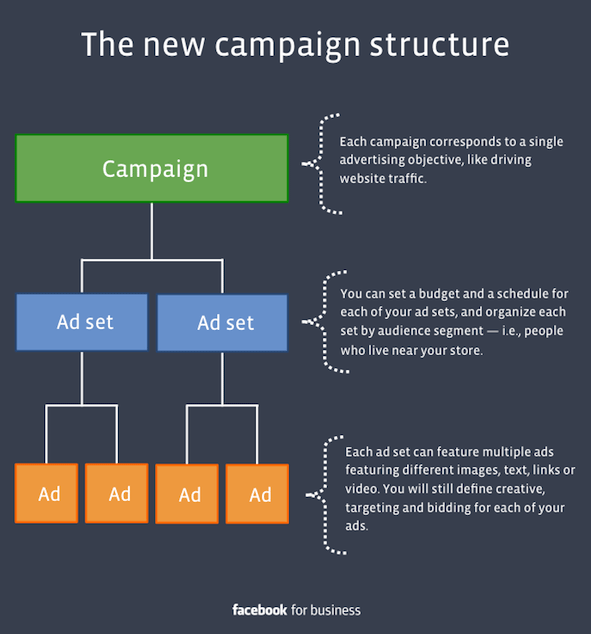
Facebook explains the new campaign structure like this:
Let’s say you’re the owner of a small hotel chain. You may have a few different advertising objectives:
- Drive traffic to your website to increase reservations
- Increase brand awareness
- Promote weekly offers
With the new campaign structure, you’ll begin by creating a campaign for each objective. Next, you can create ad sets representing the audiences you want to reach in each campaign. For instance, in the campaign built around driving traffic to your website, you might want to create one ad set for people who are on your email list, and another for people who’ve expressed interest in attractions near your hotels.
Finally, you’d create ads for each ad set. You can create multiple ads within each ad set, making sure each ad is targeted to the same audience while delivering different images, links, video or ad copy. This can help you learn which ads are resonating with each audience and, in turn, create better-optimized campaigns.
To create an ad set, click on the Ad Sets tab in the top-level menu, and then click Create Ad Set. A pop-up window like the one below will appear.
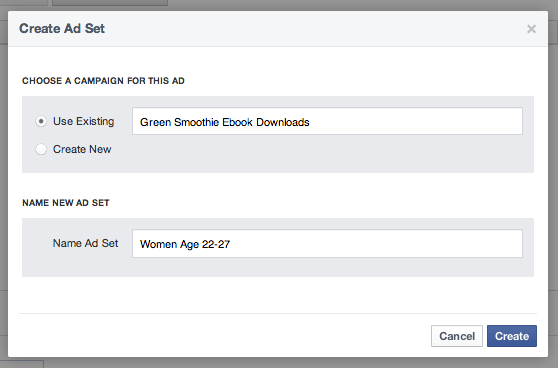
Continuing with your goal of driving ebook downloads, link the ad to your “Green Smoothie Ebook Downloads” campaign and title your ad set so that it describes your target audience.
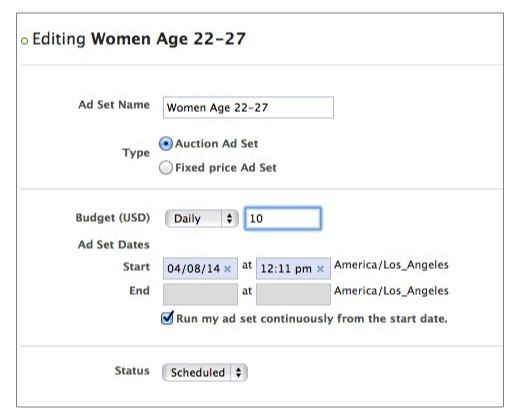
Once you click Create, use the workspace to set your budget for this ad set and determine the start and end date.
3. Create Your Ad
Now it’s time to create your ad. Click over to the Ads tab, and then select the Create Ad button in the top left corner. Chose the campaign and ad set you want to associate your ad with, and then name your ad.
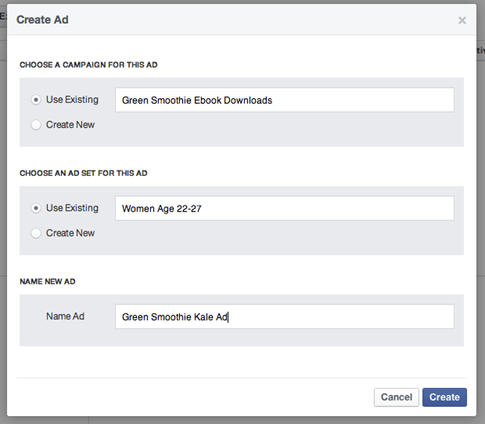
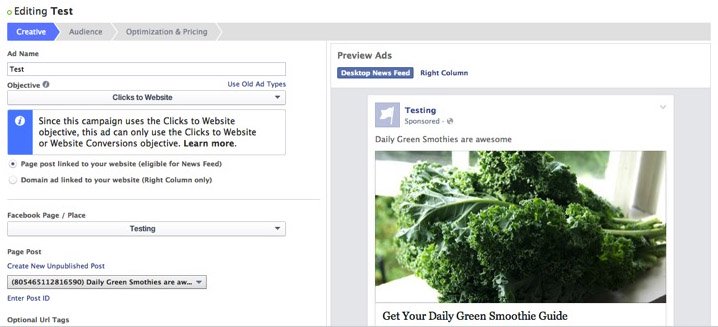
After clicking on Create, you’ll be taken to a workspace for creating ads that includes the following three sections: Creative, Audience, and Optimization & Pricing. Let’s take a look at each one.
Creative: This is where you will build your ad. First, scroll down a bit and select the Facebook page for which you want to create an ad.

Next, you’ll need to decide if you want to create an ad from a page post or use a domain ad. Let’s look at the difference between the two:
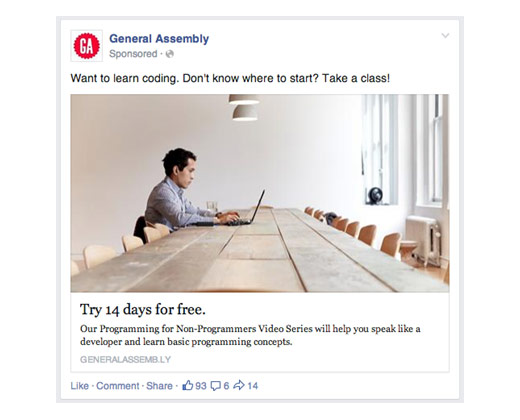
The page post ad is what it sounds like: an ad created from a Facebook page post that can appear in your target audience’s news feeds or in the right column.
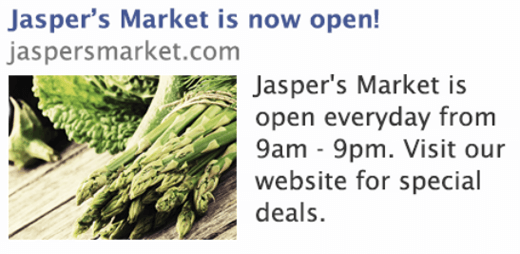
Domain ads show up in the right column only and take the user to a separate website when clicked on. You might think these are spammy and that no one would click on them, but test one out against a news feed ad before making any final judgments about their effectiveness. The results might surprise you!
Let’s start with a page post ad.
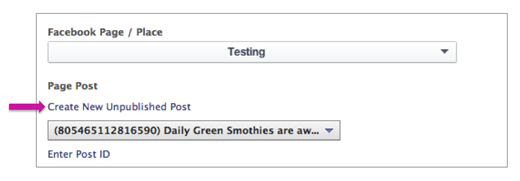
The Power Editor allows you to either turn a previously published post into an ad or create a new, unpublished post that will function as an ad. Let’s go with the latter for now. Click Create New Unpublished Post and enter the relevant information for your green smoothie ebook.
- The URL you want to send people to after they click
- The text that will appear in the post
- A call-to-action button (if you want)
- The link headline
- The display link
- The link description
- Your image
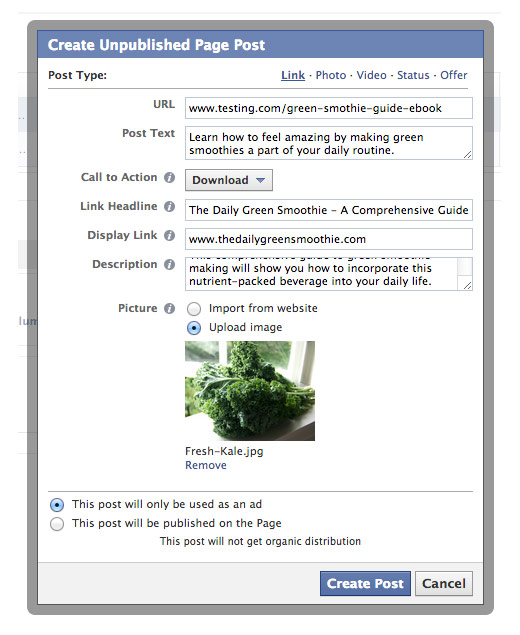
(Note: the default ad type is a link which probably is what you’ll use most often, but you also have the option to create an ad out of a photo, a video, a simple status update, or an offer.)
In order to track the downloads generated by your Facebook ad, you’ll need to create a conversion tracking pixel, which is a snippet of code that tells Facebook when someone has converted.
![]()
Select Leads from the drop-down menu, and then name your conversion-tracking pixel.
![]()
After creating the conversion tracking pixel, place the JavaScript code snippet between <head> and </head> tags in the webpage where you wish to track conversions. Since you’re tracking ebook downloads, you’ll want to place the code on the page where your contact arrives after filling out the form to download the ebook.
![]()
For more on conversion tracking pixels, check out this step-by-step guide by Facebook expert Jon Loomer and this one by Wishpond.
Last, but definitely not least, decide where you want your ad to show up and on which kind of device you want it to be displayed. For example, if your landing page is not optimized for mobile, then be sure to show your ad only to people who are using Facebook on a desktop computer.
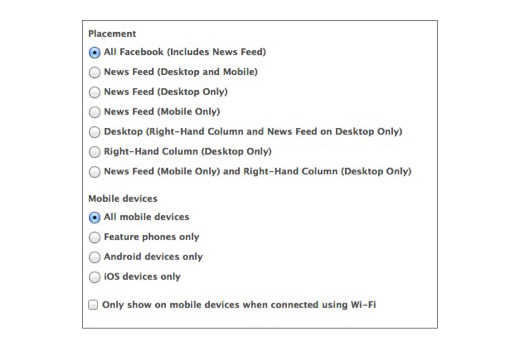
Pro tip: split test optimal ad placement by creating one ad that shows up only in the news feed and another that appears only in the sidebar, and then compare the results.
Audience: Nice! You are finished with your creative. Now it’s time to define the audience you want to show your ad to. Switch over to the Audience tab and start by determining the age range, gender, and language of your target audience. You can get even more specific by clicking on More Demographics, where you can specify things such as what school your target audience went to, their education level, and their relationship status.
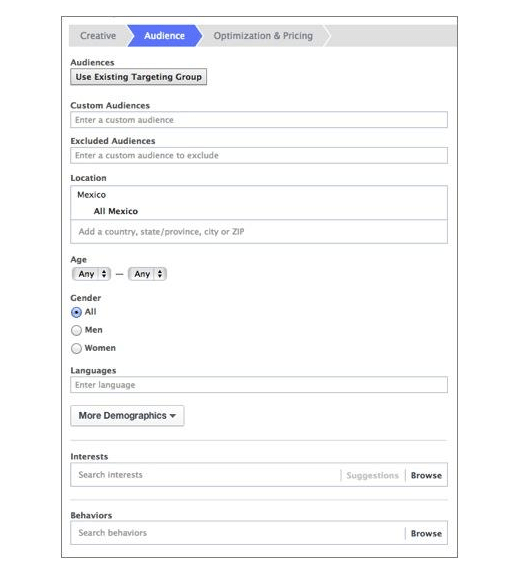
Now, for the fun part: under Interests you can insert things your target audience is interested in so that your ad gets in front of the right people’s eyes. You also can explore Facebook and Partner Categories, which I’ll talk more about in a bit.
For more on creating audience segments for you ads, check out the articles below:
- 5 Ways to Segment Facebook Ad Campaigns for Fast, ROI-Driven Analysis
- The Death of Facebook Interest Targeting: Shifting Budget Priorities
- How To Use Facebook Advertising For Advanced Targeting
- How To Laser Target Your Prospects With Facebook Ads
Next, tell Facebook if you want to target users who already like your page, event, or app; users who don’t; or users whose friends are connected to your page.
Optimization & Pricing: Finally, in the Optimization & Pricing tab, choose your preferred payment structure: cost-per-click (CPC), cost-per-1,000 impressions (CPM), or optimized cost-per-1,000 impressions (oCPM).
Here’s an explanation of the difference between CPC, CPM, and oCPM and how to choose between CPM and oCPM. Check out this post for more on each type of bidding, and for general bidding best practices.
Great! You’ve just created your first ad with the Power Editor. Remember, this is just one of the many kinds of ads you can create. Check out Qwaya’s guide to Facebook Ads to see a full list of each ad type, a brief description of how each one works, and their image dimensions. Then, play around with the different campaign objectives to better understand what you can do with each one.
Reporting with the Power Editor
I’ll leave a full-fledged overview of Facebook ad reporting for another post, but I do want to point out that you can access Facebook’s reporting tool by clicking on the Ad Tools drop-down menu in the upper right corner of the Power Editor. This will take you to the Reporting section of the Ads Manager.
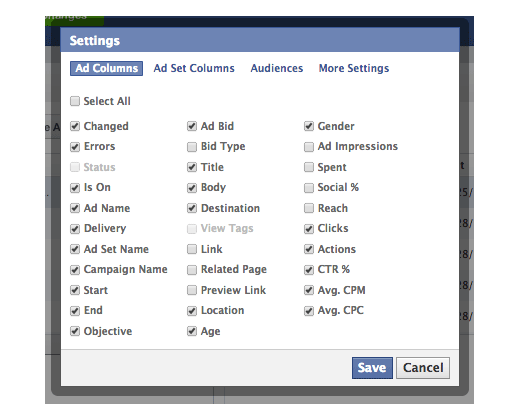
Also, you can edit the columns that appear in the list view of the ads workspace by clicking on List Settings and checking off the metrics you want to have on hand.
The Perks of Using the Power Editor
The Ads Manager has been improved a lot recently, but it’s still no match for the Power Editor. Below are a few features and benefits available only in the Power Editor. Master these, and you’ll be on your way to being a full-fledged Power Editor user.
Save Your Audiences
One of the best things about the Power Editor is that it allows you to save audience segments and then use them at a later date in new ads, whereas if you want to target the same audience for multiple ads within the Ad Manager, you need to recreate that audience each time (hello, huge time waster).
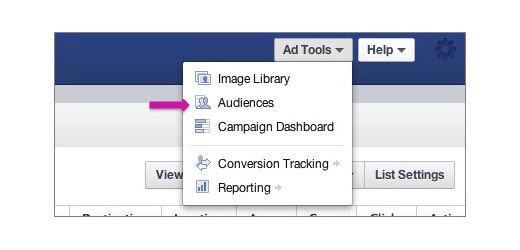
You can access all of your saved audiences within the Power Editor by clicking on the Ad Tools button in the top right corner.

Get Granular Targeting with Partner Categories
Facebook describes Partner Categories as “a way to identify and reach the right people with the right message on Facebook, based on their activity off of Facebook.” This information comes from third-party data providers, and it allows you to build more precise audience segments for your ads based on Facebook users’ behavior outside of Facebook. For example, you can specify senatorial districts, the number and age of the children a person has, job role, and more.
As of now, Partner Categories are available only in the Power Editor. For more on how to take advantage of Partner Categories, check out this explanation for advanced targeting with Partner Categories. And here’s a list of all Facebook Partner Categories available as of June 2013:

Reach Interested Consumers with Lookalike Audiences
Lookalike audiences are pretty cool. They help you reach new people who are likely to be interested in your product or service because they are similar to an audience or customer list you already have validated.
Learn all about creating Lookalike Audiences here.
Get More Control over Where Your Ad Appears
Currently, in the Ads Manager you can decide if you want your ad to appear in the desktop news feed, the mobile news feed, and the right column. This is a great start, but the Power Editor gives you even more control over where people see your ad.
Take another look at how you control ad placement in the Power Editor. So many options!
Save Time with Bulk Editing
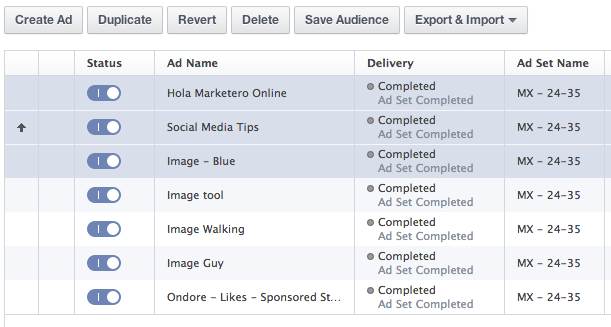
Productivity nerds will love this one. You can save heaps of time using the bulk-editing function. Simply select the ad sets or ads you want to edit, and then start working on them in the panel below. Any changes you make will apply to all of the ad sets or ads you’ve highlighted.
Edit Existing Ads and Create New Ads with Bulk Upload

The Power Editor also allows you to create new ads in bulk as well as edit existing ads by uploading an Excel file. Simply click on the Export & Import button above the list view and select Import Ads in Bulk. Learn more about how to prepare your Excel files here.
Get Organized with Tags
Here’s what Facebook says about Tags:
Tags is a feature in Power Editor that lets you organize your campaigns into groups. When you create a campaign, you will have the option to add a tag to it. A folder for each tag will be added to the left navigation.
Basically, tags are for people like me who love to organize related things in folders. Tags allow advertisers to group campaigns in top-level folders in any way that makes sense to them, including tags for all campaigns related to an overall marketing campaign, tags for each kind of objective, and so on.
Create Custom Audiences
Custom Audiences are no longer exclusive to the Power Editor. But they’re highly useful, so let’s take a quick look at what they are and how to utilize them.
Custom Audiences allow you to use your own contact lists (i.e., people whose emails or phone numbers you already have) in order to reach customers with targeted Facebook ads. Also, now you can create custom audiences with Facebook User IDs and App User IDs.
To access Custom Audiences in the Power Editor, click on Audiences in the Ad Tools drop-down menu. Then, click Create Audience, and select Custom Audience.
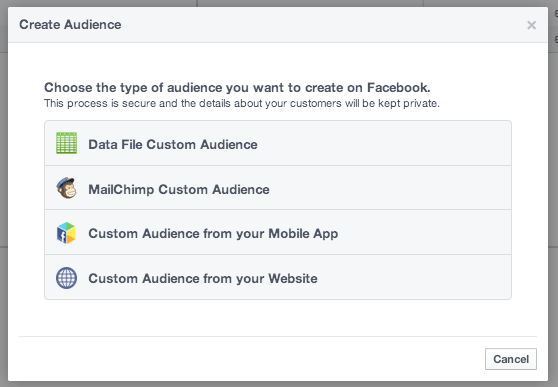
Facebook gives the following example of how advertisers can use custom audience: run an ad campaign to get more likes for your page by targeting customers who have signed up for your mailing list but still haven’t liked your page.
Conclusion
There you have it: the complete beginner’s guide to the updated Facebook Power Editor. As you become a more advanced user, I’m sure you’ll discover new ways this tool can make your social advertising more efficient and effective. For now, use this guide to get a head start!
About the Author: Chloe Gray specializes in digital marketing strategies for startups. Be sure to say “Hi” to her on Twitter. You also can follow her on Google+.
Comments (52)