I’m going to lay it to you straight: Google Analytics doesn’t offer any value out of the box. In fact, it’s costing you money because you spend WAY too much time looking at metrics that don’t matter.
But there’s a way to fix this.
Below, you’ll find the 8 critical features that will help you get every possible insight out of Google Analytics. You’ll know whether or not your site is worth the effort, how to protect yourself from corrupted data, and how to evaluate all of your marketing efforts. To figure out how to grow your business, you’ll need to activate each of these features.
1. Ecommerce Tracking
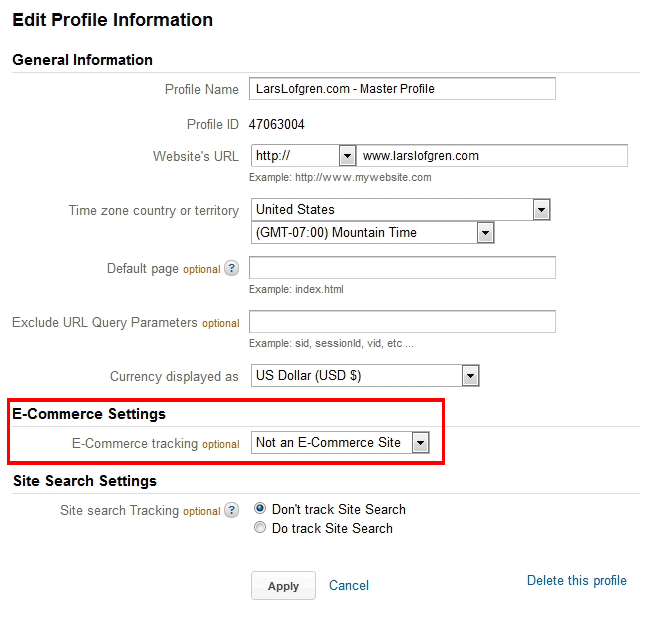
Don’t you want to know where your most profitable customers come from? With ecommerce tracking, you’ll know right where they came from so you’ll be able to brainstorm ways to find more. Nearly every report in Google Analytics can be switched to an ecommerce version so you can see exactly how you’re making money. If there’s only one thing you set up in Google Analytics, it needs to be ecommerce tracking.
Obviously, feel free to skip this one if your customers aren’t purchasing anything from your site.
To set up ecommerce tracking:
- Go to your Google Analytics standard reports
- Click on the “Admin” button in the top right
- Click on “Profile Settings”
- Go to “Ecommerce Settings” and change the drop down to “Yes, an Ecommerce Site”
- Click the “Apply” button at the bottom.
Now the hard part starts.
You see, we have to connect the ecommerce part of your site to Google Analytics and send all the important data like which items were purchased and their prices. But this isn’t easy. Your best bet is to find you friendly neighborhood developer/engineer/code wizard and buy him or her a case of PBR (or whatever their favorite beverage is) to connect everything for you. You’re going to want help with this.
If you feel particularly courageous, you can get the gritty details on ecommerce tracking from Google here. Be warned, this is not for the faint of heart.
Isn’t there an easy way to set up ecommerce tracking?
There is, as long as your site is built on the right platform. Shopify will automatically pass ecommerce data to Google Analytics once you connect them together. All you have to do is give Shopify your Google Analytics property ID, turn ecommerce tracking on in Google Analytics, and you’re done.
There are also plugins for WordPress that will do this like Cart66. Once again, give Cat 66 your property ID, turn on ecommerce tracking, and you’re all set. I don’t have personal experience with connecting other WordPress ecommerce plugins to Google Analytics so I can’t vouch for other options.
When you’re shopping around for an ecommerce cart or WordPress plugin, make sure that it easily integrates with Google Analytics. This is one of the most important features to have.
What about Paypal?
Honesty time: Paypal does not play nice. I never found a reliable way to pass data from Paypal to Google Analytics. I haven’t been successful but hopefully you will. If you’ve pulled it off, definitely let me know in the comments. I’d love to hear how you did it!
2. Goals
With a bit of creativity, you can tag just about anything you want as a goal. But why do we love goals so much? Because they’re how Google Analytics tracks conversions.
And conversions pay the bills.
To figure out what you should be tracking, start with the most critical element (yes, singular) of your site. Are you looking for leads? What about newsletter signups? Do you have a site that sells ad space by the page view? Whatever keeps the lights on is what you want to track. If you’re just starting, keep it simple and focus on a single goal. Worry about everything else later.
To reach the goal settings:
- Go to your Google Analytics standard reports
- Click on the “Admin” button in the top right
- Click on “Goals”
- From one of the Goal sets, click “+ Goal” (goal sets are just a way for you to easily group goals)
You’ll first need to decide what kind of goal you want Google Analytics to track.
- URL Destination: Tracks a goal when people visit a specific URL.
- Visit Duration: Tick off a goal every time someone spends a certain amount of time on your site.
- Pages/Visit: Set a threshold for a number of page views that will set off a goal during a visit.
- Event: You’ll need to define an event by adding a snippet of code to your site. Once Google Analytics is tracking the event, then you can set it as a goal. See Google’s Event Guide for the lowdown.
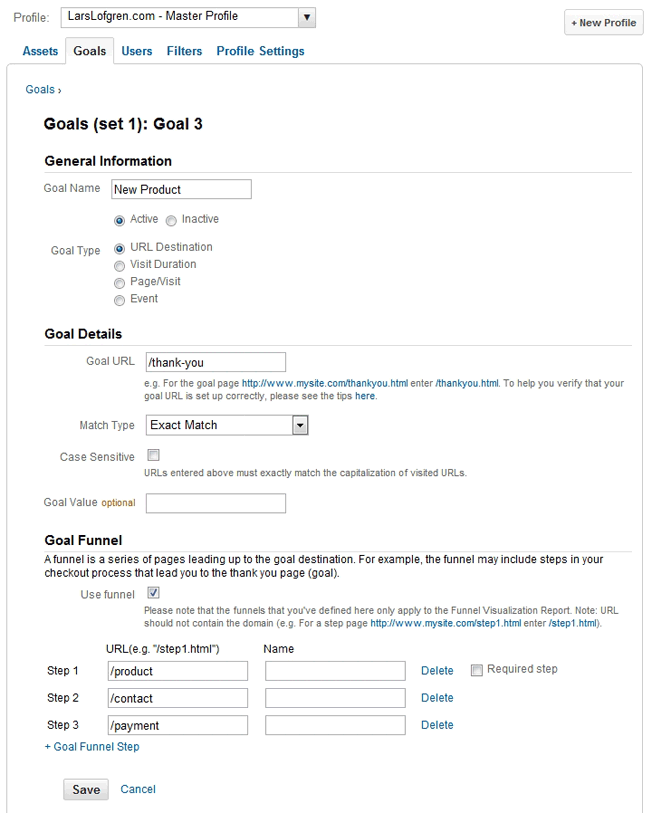
If you’re looking to build one of Google Analytics fabled goal funnels, select URL destination, define the goal URL (the final URL that you want people to reach), check “Use funnel”, and punch in the preceding URLs of your funnel. Here’s what the final settings look like:
3. AdWords
If you’re using AdWords, you’ll need to connect it to your Google Analytics account. AdWords has a wealth of data that you’re paying for, you need to make the most of it. If you don’t take the time to set everything up correctly, your paid search traffic can be reported as organic search traffic.
Step 1: Enable Auto-Tagging in Google AdWords
This tells AdWords to tag each of your links which will tell Google Analytics that the visitor came from AdWords.
- Log in to AdWords
- Click on the “My Account” Tab, then “Preference”
- Make sure Auto-tagging is set to yes. If not, click “edit” and check “Destination URL Auto-tagging”
Step 2: Link Google AdWords and Google Analytics
This will import all your other juicy Google AdWords data into Google Analytics.
But sadly, this is a tad buggy right now. My best guess is the recent UI changes to Google Analytics v5 haven’t been completely streamlined with Google AdWords. Generally speaking, you follow these steps:
- Log in to AdWords
- Click on the “Tools and Analysis” tab, then “Google Analytics”
Normally, you’ll see a screen asking you if you want to create a new Google Analytics account or if you want to use an account you already have. Select the “already-have-one” option, pick the Analytics account you want to connect to, and you’re all set.
During the past week, I wasn’t able to get the setup to work with Google Analytics v5 at all. So try using the old version (click the link in the top right) of Google Analytics and it should give you access to the setup process.
You can also find your AdWords settings in Google Analytics v5 here:
- Log in to Google Analytics, click “New version” at the top if you’re not already there
- Click “Admin” in the top right
- Select your Google Analytics account
- From the list of tabs at the top, click “Data Sources”
4. Site Search
What if you could find out what people think is missing for your site? That’s easy. Just connect your Google Analytics account to your internal site search and you’ll have a list of every keyword people search for on your site. You’ll know exactly what they think is missing and what they have trouble finding.
To set up site search:
- Go to your Google Analytics standard reports
- Click on the “Admin” button in the top right
- Click on “Profile Settings”
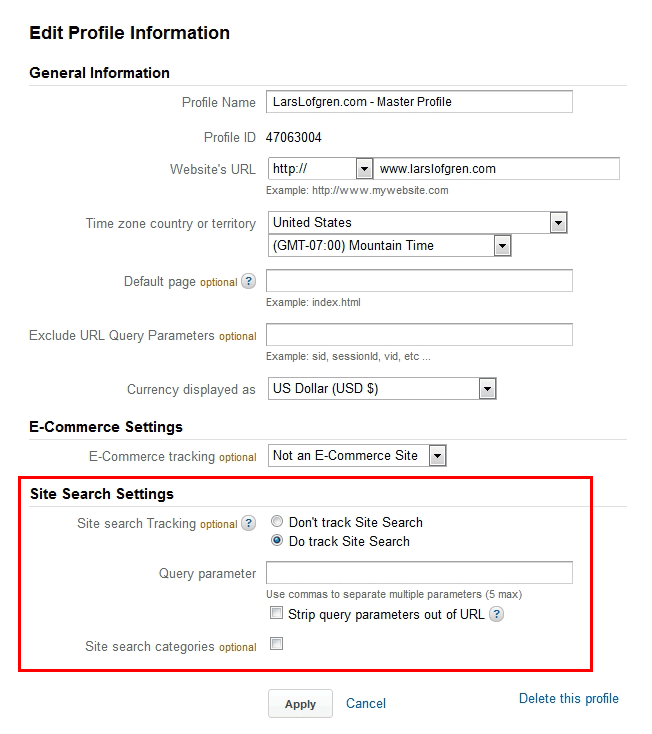
- Go to the bottom where you’ll find “Site Search Settings”
- Select “Do Track site Search”
Now you need to find out how your site identifies internal search terms. Your site uses what’s called a query parameter for this. We need to make sure Google Analytics knows to look for the same query parameter and identify them as internal search terms.
How to Find Your Search Query Parameter
Go to your website and search for something. On the search results page, look at your URL and find your search term.
For example, I get this URL if I search for “google analytics” on the KISSmetrics blog.
Before the search term, there’s an “=” and the letter “s”. The “s” is the query parameter for the KISSmetrics Blog site search. Now your letter might be different (it’s usually “s” or “q”) and you may even have a complete word like “search”. The key is to look for your search term and find the letter or word before the “=”.
Once you know what letter or word your search query parameter is, plug it into the Query Parameter box in the Site Search Settings of Google Analytics.
If you’re not already stripping other URL parameters from your URLs to clean up your data, don’t worry about doing that here. Feel free to leave the “Strip query parameters from your URL” box unchecked.
Check the “Search Categories” box if your search field has a way for people to search within a category on your site (through a drop down for example). If you do, you’ll need to figure out the category parameter the same way that we just figured out the search query parameter. Otherwise, leave it unchecked and apply your changes.
You’re all done. Once it’s connected, all you have to do is wait for the data to come in, find the trends, and fix what your customers have trouble with.
5. Campaigns
Measuring the ROI of search traffic is great. But it’s even more important to measure the ROI of all your marketing campaigns. After all, you’re spending money and time on them. We need to know if it’s worth it.
Google Analytics will track any URL that you can edit. Emails, Facebook, banner ads, you can track it all.
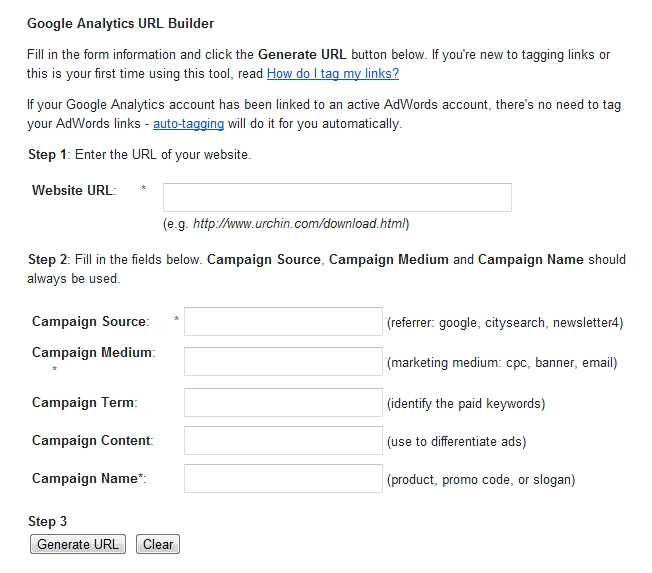
It’s also super easy to set campaigns up. There’s no settings on your profile to manage and no new reports to activate. All you have to do is start building campaign URLs via Google’s URL Builder tool.
Enter in your domain and some basic info about the link so you can keep track of it in your Campaign reports:
- Source – What domain are you placing the link on? Which email list?
- Medium – Use things like banner ad, PPC, affiliate, email etc.
- Term – This is for paid keywords but in general, you won’t use this because there’s a better way to connect Google Analytics to AdWords.
- Content – Use this to separate different versions of the same ad.
- Name – This is how you’ll easily differentiate groups of ads in your reports. Google groups campaign links by name so this is the first item you’ll see in your reports, make sure you can tell what the link is from here without having to look at any of the other info.
Punch everything in, grab your new link, and drop it wherever you want. When people use the link to access your site, it’ll come up under the campaign you defined.
Don’t worry about adding campaign URLs to AdWords, your ads get tagged automatically if you’ve enable auto-tagging and connected AdWords to Analytics.
6. Safety Net Profiles
What happens if you have a typo in one of your filters? Or you set up your goals incorrectly and don’t catch it until 3 weeks later? That mistake will corrupt your Google Analytics data as long as it’s in use. So what can you do to make sure you always have a backup plan?
You want to create two additional profiles for your Google Analytics account that will protect you from data corruption.
The Raw Data Profile
This profile does exactly what it sounds like. Set up a new profile, name it Raw Data, and never touch it again. That’s it. Don’t apply filters, set goals, or change the settings in any way.
The purpose of your Raw Data Profile is to silently collect data in the background and serve as a last resort if something goes horribly wrong on your other profiles. You’ll have a set of data to work with and depend on no matter what happens.
The Test Profile
Before rolling out new settings on your main profile, test them on a junk profile that you never use for analysis. This way, you’ll be able to experiment with settings as much as you want and you’ll never have to worry about corrupting your data.
Set your Test Profile up with the exact same settings as your main profile so you can see exactly how they’ll change your real data. If the test goes well, apply the new setting to your main profile. If something goes wrong, keep making changes until everything works or remove the new settings altogether.
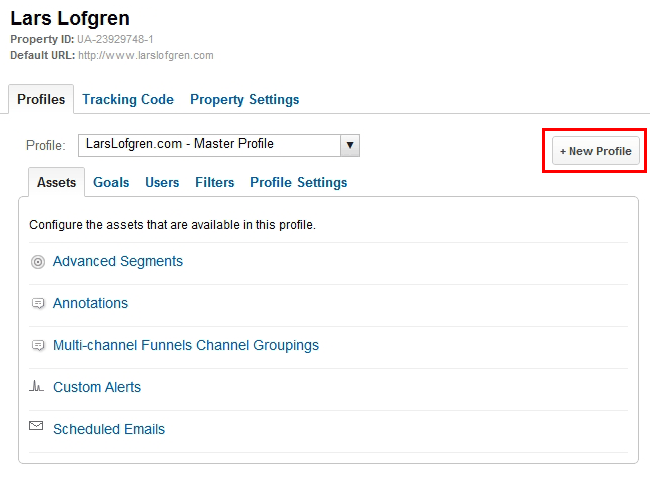
How to Create a New Profile
This takes no time at all:
- Go to your Google Analytics standard reports
- Click on the “Admin” button in the top right
- Click on “New Profile” on the right
- Name your profile, then select your country and time zone
- You’re done, apply any settings you want
Word of Caution: Every account on Google Analytics is limited to 50 profiles. For most people, this isn’t a problem. But if you have a bunch of different website, you can hit this limit pretty quickly. Rumor has it that you can petition this limit and get it raised but I wouldn’t count on it. You’ll probably be forced to split your sites up between different accounts or avoid creating any new profiles.
7. Filters that Exclude Internal Traffic
Google Analytics collects data on every visitor (as long as they have cookies and javascript enabled) and that includes you. And if you’re constantly checking your site, tweaking details, and updating content, a sizable portion of your overall traffic could be you and your team.
This will skew every metric in your reports. Instead of gaining insights about your customers, you’ll learn how you behave on your own site. And the way you use your site is going to be VERY different than how your customers use your site.
But never fear, you can exclude all of your internal traffic to your own site. We’ve already posted a great step-by-step tutorial for how to set up filters that exclude internal traffic.
Use your newly created Test Profile and make sure you’ve set everything up correctly. To verify it, just compare the traffic from your state/country between your main profile and the test profile. If the filters are doing what they’re supposed to, you’ll see less traffic from your location. Go ahead and apply the same filter to your main profile when you know it’s working.
8. SEO Reports via Google Webmaster Tools
Google recently released a batch of SEO reports for Google Analytics. They help you see how you perform within Google’s search rankings. Previously, we could only get data on which keywords people click through on. Now, we can also see what Google sees:
- Which keywords give us the most impressions
- What our click through rates are
- How we rank for individual keywords (and our average position)
- Click through data for our top landing pages
But we have to jump through a few hoops to get the SEO reports activated. You’ll need to activate Google Webmaster Tools on your site and connect it to your Google Analytics account. Check out the Beginner’s Guide to Google Webmaster Tools for help on how to set up GWT for the first time.
And the Guide to Google Webmaster Tools will show you how to connect Google Analytics to GWT (it’s towards the bottom of the post).
Bottom Line
If you want to make the most of Google Analytics (and learn how to grow your business), you need to set up these features:
- Ecommerce tracking
- Goals
- Connect to AdWords
- Site Search
- Campaigns
- Safety net profiles
- Filter out your internal traffic
- Connect to Google Webmaster Tools
So grab yourself a cup of coffee and get ready to unleash all that valuable data you been missing from Google Analytics! If you have any questions please ask them in the comments below.
About the Author: Lars Lofgren is a Marketing Analyst and has his Google Analytics Individual Qualification (he’s certified). Learn how to grow your business at his marketing blog or follow him on Twitter @larslofgren.

Comments (42)